
Introduction
Why settle for less efficient testing methods when Robot Framework offers a streamlined, powerful alternative? This blog post delves into the reasons why adopting Robot Framework for testing scripts can revolutionize your development process. Covering everything from installation to executing a basic script in PyCharm, we offer a concise guide that showcases Robot Framework’s simplicity and efficiency.
Why Robot Framework?
Robot Framework is an open-source automated testing framework for acceptance testing and acceptance test-driven development (ATDD), behaviour-driven development (BDD) and robotic process automation (RPA). It uses a keyword-driven syntax that allows testers to create test cases using keywords and libraries. There are some reasons why the Robot Framework is a preferred choice for acceptance testing scripts:
- Ease of Use: Robot Framework employs a keyword-driven approach that makes test case creation and maintenance accessible to non-programmers. Its natural language syntax enhances readability and reduces the learning curve.
- Versatility: It supports a wide range of testing types including web, mobile, API, and database testing. Additionally, it integrates seamlessly with various tools and libraries, expanding its capabilities.
- Extensibility: The framework can be extended with custom keywords and libraries, allowing teams to tailor it to their specific testing requirements.
- Cross-platform Support: Robot Framework is platform-independent, enabling testing on different operating systems and environments.
- Rich Ecosystem: The vibrant community around Robot Framework contributes numerous libraries, tools, and plugins, enriching its functionality and providing solutions for diverse testing needs.
If you want to know more about the Robot Framework, refer to the Robot Framework User Guide.
Why Robot Framework Selenium Library?
- Web Browser Automation: SeleniumLibrary is a widely used Robot Framework library dedicated to web browser automation, offering a range of keywords for this purpose.
- Versatile Functionality: It offers a wide range of keywords to facilitate actions such as clicking buttons, inputting text, and verifying page elements.
- Compatibility: SeleniumLibrary is built on the Selenium WebDriver API, ensuring seamless communication with popular web browsers like Chrome, Firefox, and Safari.
- Extensive Documentation: Its comprehensive documentation and rich set of keywords empower testers to efficiently create and execute automated test cases for web applications.
- Cross-Browser Support: SeleniumLibrary’s flexibility extends to supporting multiple web browsers and platforms, enhancing its suitability for diverse testing environments.
If you want to know more about the selenium library keywords of Robot Framework, refer to the official website of Robot Framework Selenium Library.
Prerequisite Steps
In this blog, during the practical, we’ve used the below versions for respective libs & applications:
- Python Version: 3.12.0
- Pip Version: 23.3.2
- PyCharm Version: 2023.3.5
- Selenium Version: 4.19.0
- Robot Framework Version: 7.0
- Robot Framework Selenium Library Version: 6.2.0
Download and Install Python and Pycharm Editor
We’ve already covered the process of downloading and installing Python as well as how to setup Pycharm Editor. In our previous blog on Python with Selenium.
Install Robot Framework and its libraries
- Open the command prompt as administrator and enter the below commands to install the robot framework and its libraries.
- pip install selenium
- pip install robotframework
- pip install robotframework-seleniumlibrary
- You can verify that the robot framework and its libraries are installed by entering the below command in the command prompt.
- pip list
Test Case Creation
1. PyCharm Project Setup
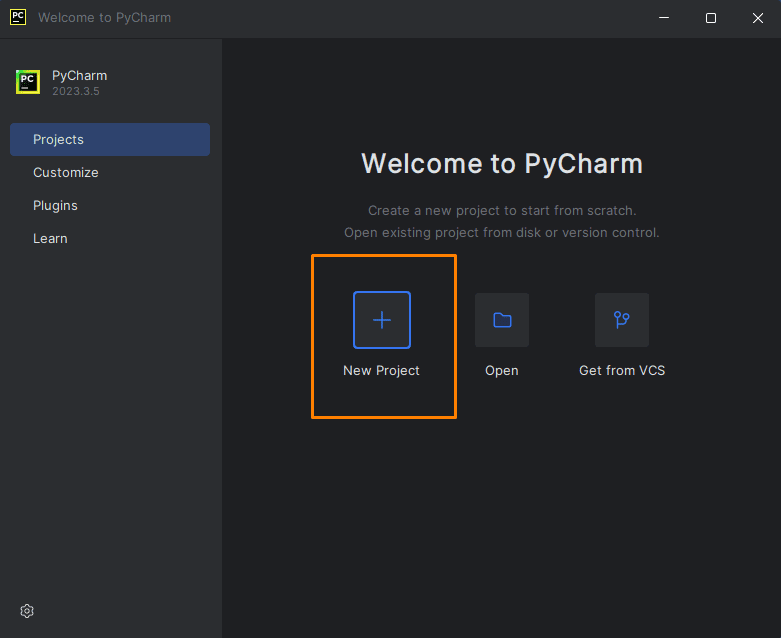
- Launch ‘PyCharm’ and click on ‘New Project’.
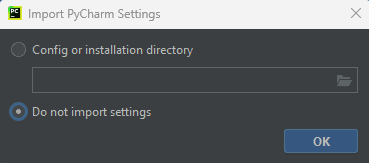
- Note: Select ‘Do not import settings’ if installed for the first time.
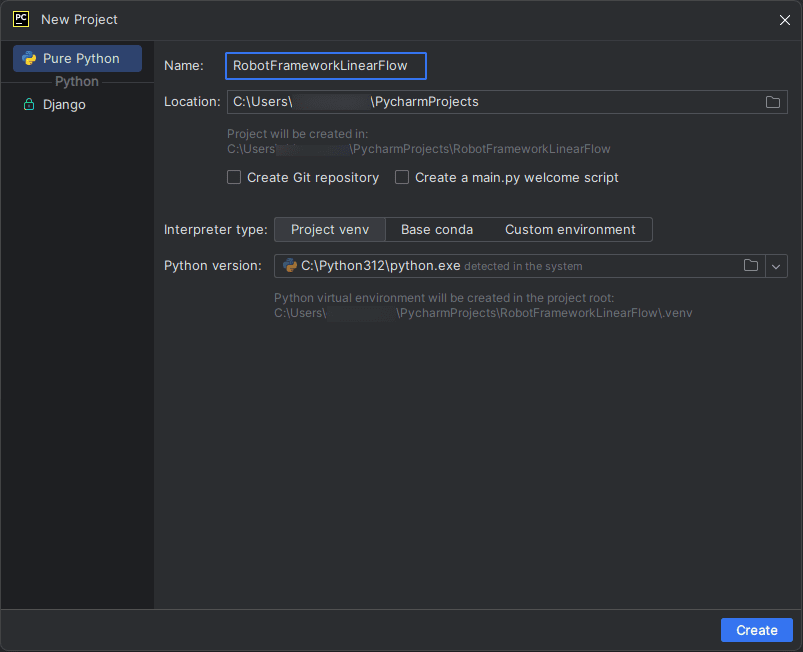
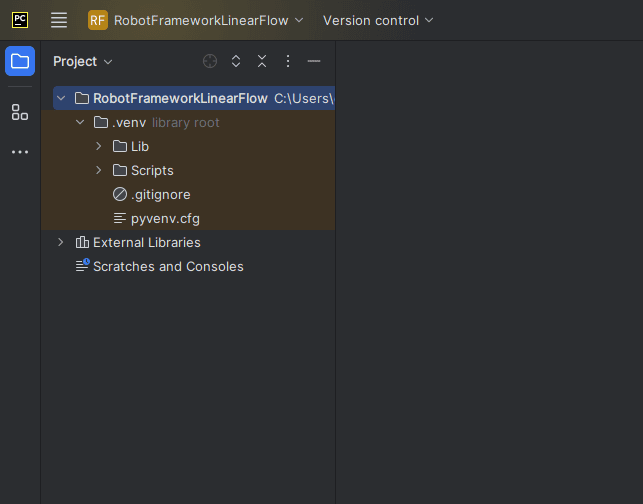
- Enter the project name, choose the location of the project, Interpreter type as Project venv and click on the ‘Create’ button.
- Ensure that your created project is displayed like the image below.
2. Install Robot Framework Language Server
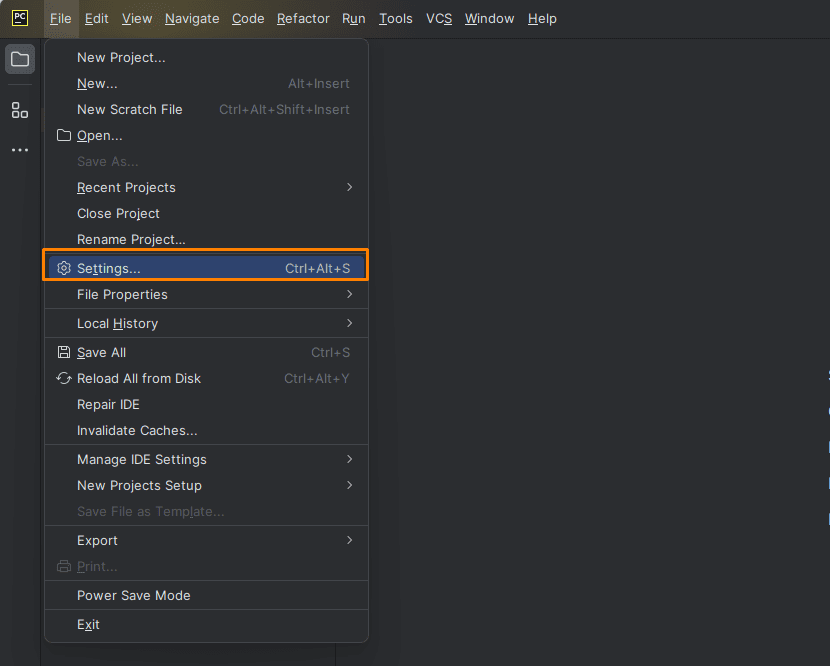
- Open ‘Settings’ from the ‘File’ menu or ‘Ctrl+Alt+s’ shortcut key.
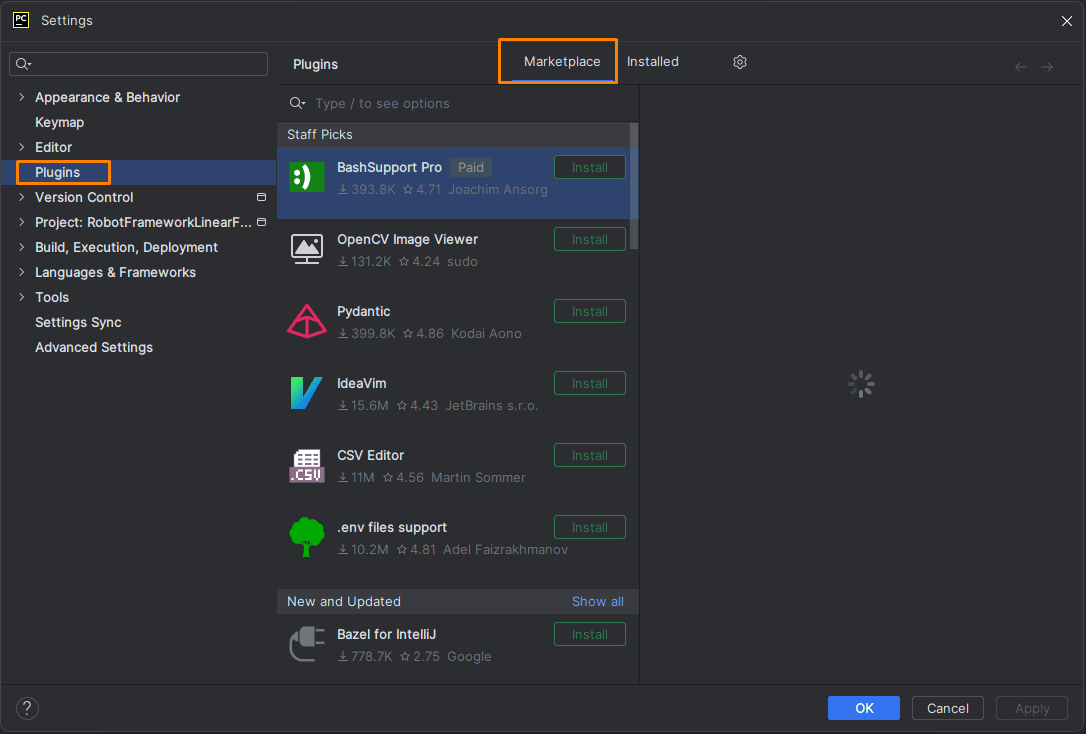
- Select Plugins and click on the Marketplace tab
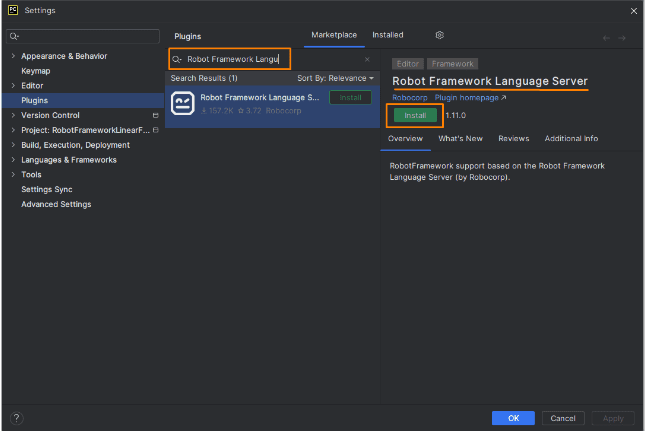
- Search for Robot Framework Language Server and click on Install
3. Create a Robot file and write a test script
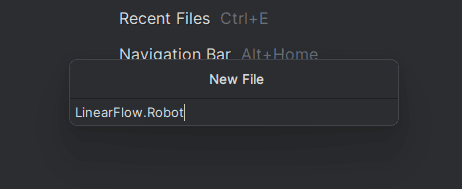
- Create a new robot file with the name ‘LinearFlow.robot’ by selecting ‘File’ from the ‘File > New’ menu or by right-clicking on the project name and selecting ‘New’.

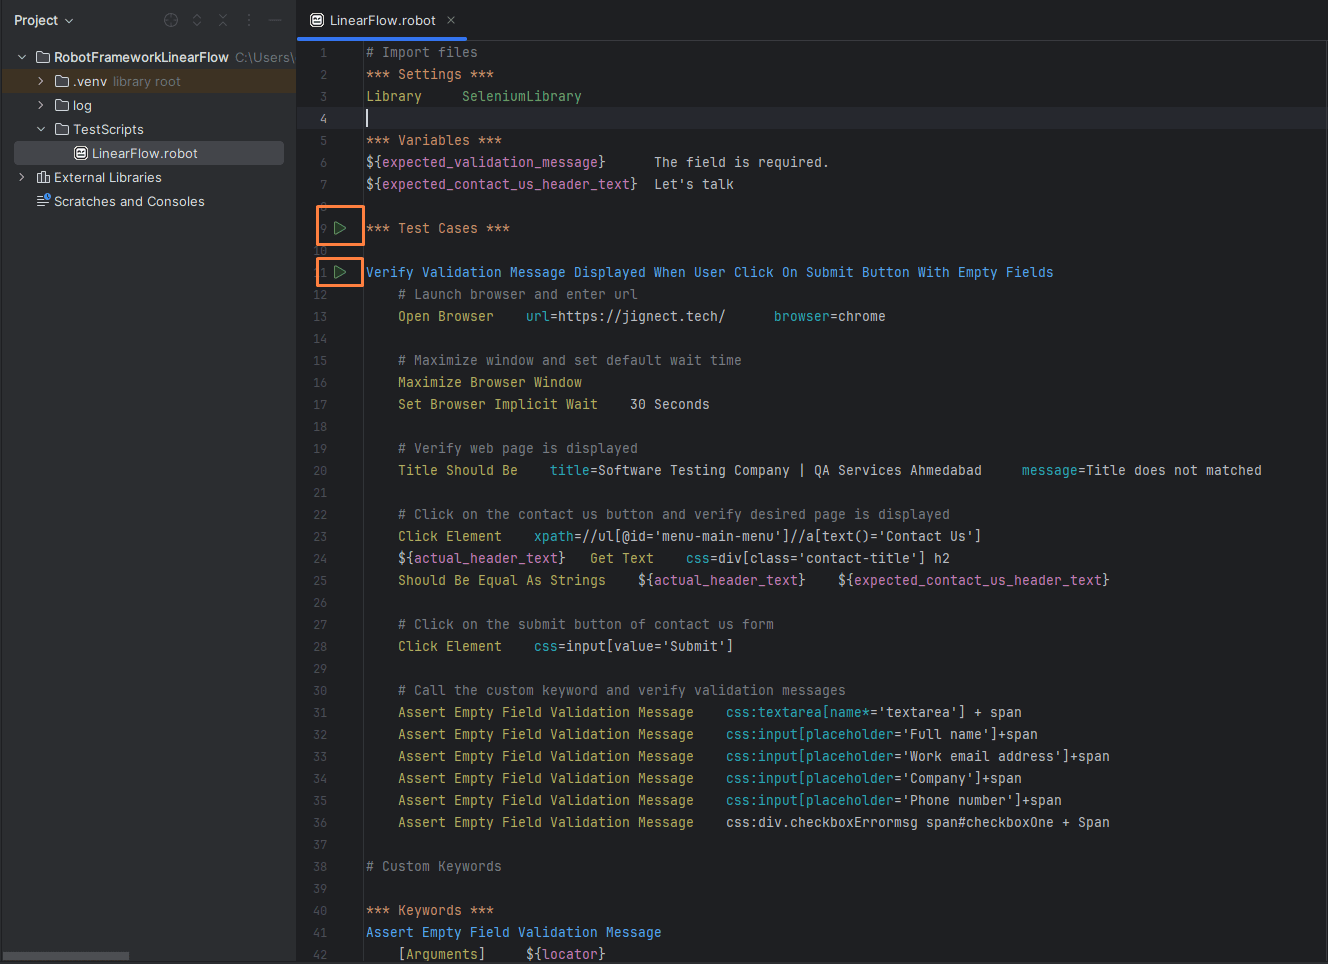
- Once a robot file is created, start writing basic test code as described below.
# Import files
*** Settings ***
Library     SeleniumLibrary

*** Variables ***
${expected_validation_message}      The field is required.
${expected_contact_us_header_text}  Let's talk

*** Test Cases ***

Verify Validation Message Displayed When User Click On Submit Button With Empty Fields
   # Launch browser and enter url
   Open Browser    url=https://jignect.tech/      browser=chrome

   # Maximize window and set default wait time
   Maximize Browser Window
   Set Browser Implicit Wait    30 Seconds

   # Verify web page is displayed
   Title Should Be    title=Software Testing Company | QA Services Ahmedabad     message=Title does not matched

   # Click on the contact us button and verify desired page is displayed
   Click Element    xpath=//ul[@id='menu-main-menu']//a[text()='Contact Us']
   ${actual_header_text}   Get Text    css=div[class='contact-title'] h2
   Should Be Equal As Strings    ${actual_header_text}    ${expected_contact_us_header_text}

   # Click on the submit button of contact us form
   Click Element    css=input[value='Submit']

   # Call the custom keyword and verify validation messages
   Assert Empty Field Validation Message    css:textarea[name*='textarea'] + span
   Assert Empty Field Validation Message    css:input[placeholder='Full name']+span
   Assert Empty Field Validation Message    css:input[placeholder='Work email address']+span
   Assert Empty Field Validation Message    css:input[placeholder='Company']+span
   Assert Empty Field Validation Message    css:input[placeholder='Phone number']+span
   Assert Empty Field Validation Message    css:div.checkboxErrormsg span#checkboxOne + Span

# Custom Keywords
*** Keywords ***
Assert Empty Field Validation Message
   [Arguments]     ${locator}
   Element Text Should Be    ${locator}    ${expected_validation_message}
In this ‘LinearFlow.robot’ file,
- Settings: This component is used to import built-in libraries, external libraries, custom libraries, suite setup keywords and many more.
- Variables: This component is used to store data for dynamic use throughout the test file.
- Keywords: This component is used to encapsulate reusable actions or operations.
- Test Cases: This component is used to write down individual test scripts.
Selenium Library and Built-in Libraries offer unique keyword formats tailored to specific needs. The ‘Title Should Be’ keyword was used in a test script with a title and optional call message while omitting optional calls in other assertions. This principle extends to specifying keywords like ‘title=text’ or ‘url=text’, allowing direct use without explicit written like ‘text’ when values align with the expected method order.
Run the created Test Case and check the result
- Once the test script is written, proceed to execute the test and carefully analyze the results.
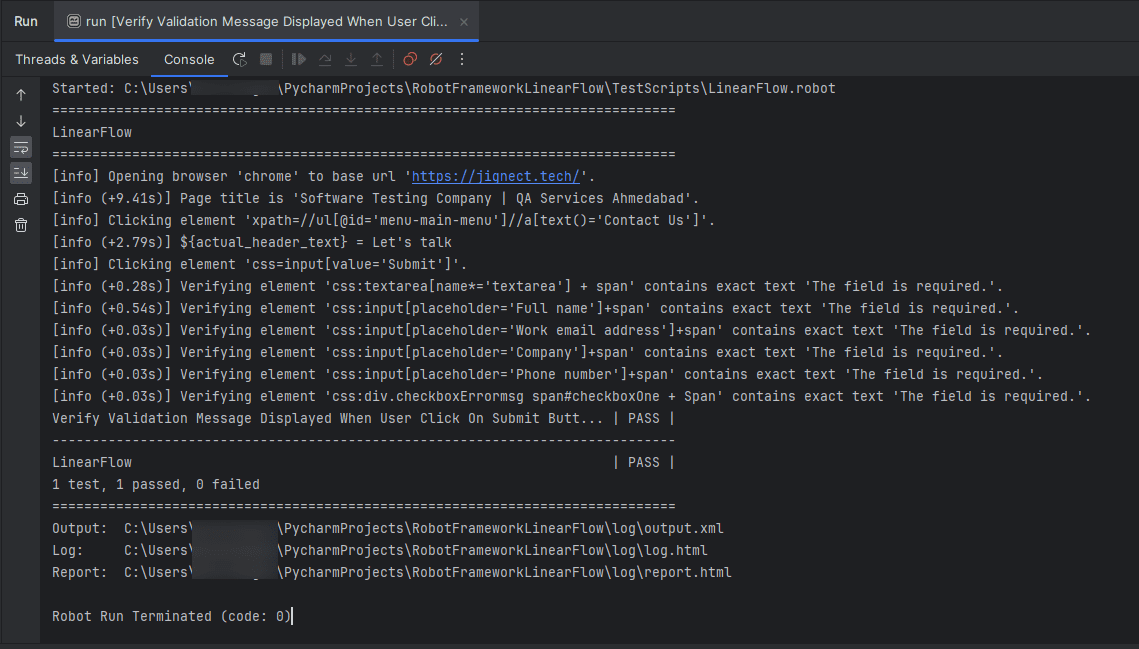
- To run the test case, go to the test class or test method, click or right-click on it, and choose the “Run” option. The results will be displayed in PyCharm’s Run tool window.
Test Run Results
- The results shown in the PyCharm Run tool window provide important information about the test run.
- As you can see, the test we created has passed and is functioning correctly as anticipated.
- By reviewing these results, we can understand which tests passed, failed, or were skipped.
- This helps us improve our testing process and make our scripts better and more precise.
Conclusion
Robot Framework is a versatile automation tool with a user-friendly syntax and extensive library support, suitable for beginners and experts. Its keyword-driven approach promotes readability and reusability. However, dependency on external libraries and plugins may cause compatibility issues. Limited language support can be a drawback for those unfamiliar with the supported language. Nonetheless, Robot Framework is a robust option for test automation, providing scalability and flexibility to meet various project needs.
We’ve explored why the Robot Framework is favoured for acceptance testing with a simple example on our blog. In upcoming posts, we’ll delve into Robot Framework areas like custom libraries, data-driven testing, setup and teardown methods across various levels, page object models, and more. Keep an eye out for additional automation-focused content in our forthcoming blog posts!
Keep practicing and exploring to master these powerful tools further with Jignect.
Witness how our meticulous approach and cutting-edge solutions elevated quality and performance to new heights. Begin your journey into the world of software testing excellence. To know more refer to Tools & Technologies & QA Services.
If you would like to learn more about the awesome services we provide, be sure to reach out.
Happy Testing 🙂

")
