
Introduction
In today’s world of software testing, APIs (Application Programming Interfaces) are super important. They help different apps and systems talk to each other. However, managing and testing APIs can be challenging without the right tools. This is where Postman excels. Postman provides a user-friendly interface and robust features that streamline the process of testing APIs, making it an indispensable asset in the toolkit of every developer. In this blog, we’ll delve into the essence of Postman, explore why it’s indispensable for developers, and provide a step-by-step guide on installing it along with an overview of its REST API methods.
What is an API?
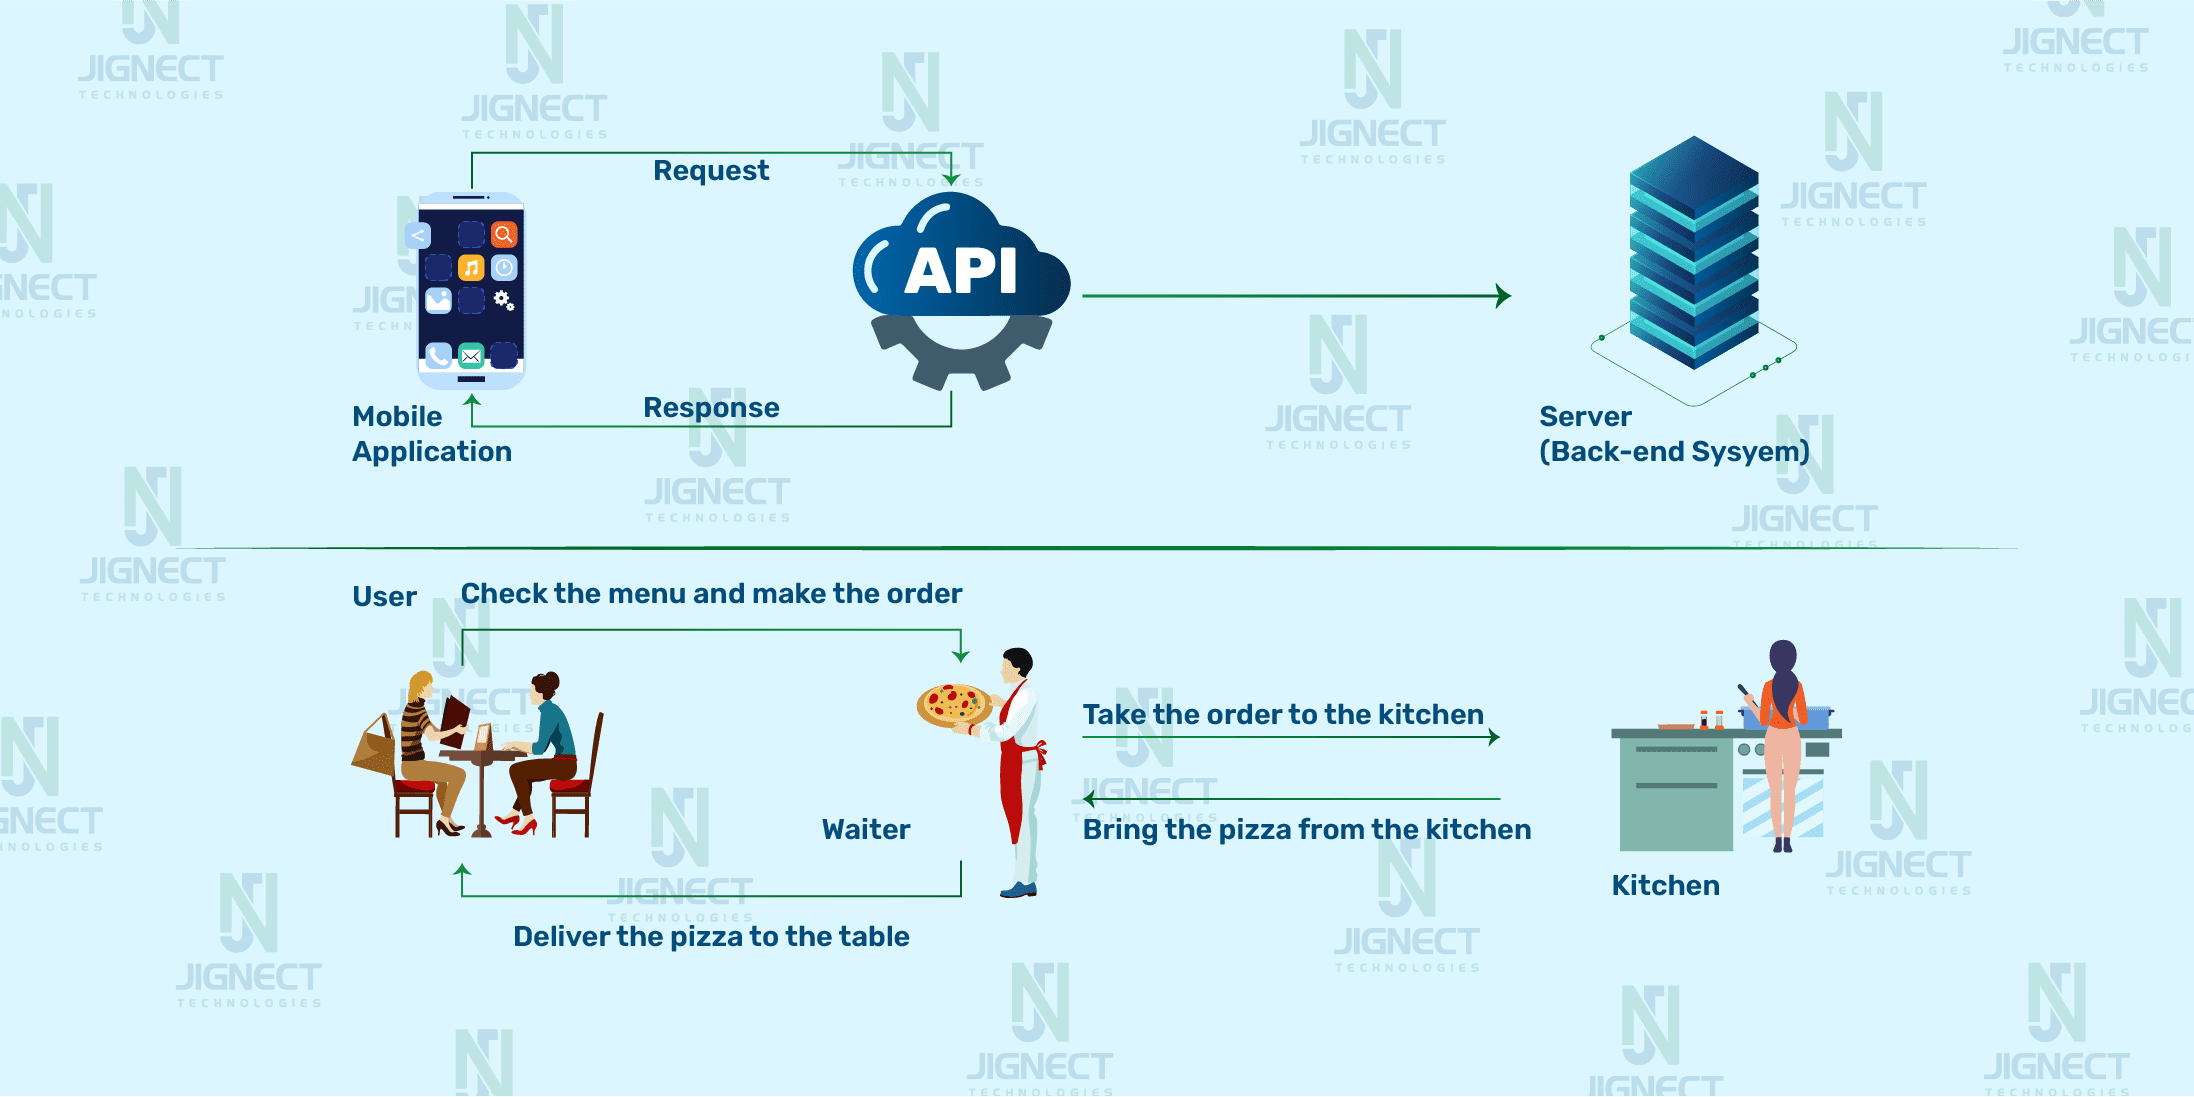
An API or Application Programming Interface, acts as a bridge between different software systems, enabling them to communicate and share data seamlessly. It defines the rules and methods that applications can use to interact with each other, allowing developers to integrate the functionalities from one application into another without needing to understand the underlying code. In essence, APIs serves as the glue that connects various software components, making it possible for them to work together harmoniously.
What is Postman?
Postman is a popular collaboration platform for API testing. It offers a user-friendly interface and a comprehensive set of tools for designing, testing, and debugging APIs. Developers use Postman to streamline the process of building and integrating APIs by providing features such as API documentation, automated testing, and team collaboration capabilities. In short, Postman simplifies and enhances the workflow of API testing, making it easier for testers to create robust and reliable APIs. Here’s a detailed explanation of what Postman entails :
- User-Friendly Interface: Postman offers a simple and intuitive interface, making it easy for both beginners and experienced developers to navigate and utilize its features effectively.
- API Request Builder: With Postman’s API request builder, users can effortlessly create and send HTTP requests. They can specify request methods (like GET, POST, PUT, DELETE, etc.,), add headers and parameters, and include request bodies as needed.
- Request Collections: Postman allows users to organise API requests into collections, simplifying the management and execution of multiple requests within a workflow or test suite.
- Environment Variables: Supporting environment variables, Postman enables users to define reusable values across multiple requests. This ensures consistency and flexibility in API testing and development workflows.
- Automated Testing: Postman provides robust testing capabilities, enabling users to create and execute automated tests for their APIs. Using JavaScript, users can write test scripts, and Postman offers a built-in test runner to execute tests and view results within the application.
- Documentation: Postman offers tools to generate interactive API documentation from requests and collections. This documentation can be easily shared with team members or external consumers, enhancing understanding and usage of the API.
- Collaboration: Postman facilitates team collaboration with features like shared workspaces, comments, and version control. This enables teams to work together on API development and testing projects, share knowledge, and track changes effectively.
- Mock Servers: Postman enables users to create mock servers for their APIs, allowing simulation of API responses during development and testing. This helps teams to test applications against realistic API responses before full implementation.
For further insights into Postman, you can check out its official documentation.
Why do we use Postman for API Testing?
Postman is widely used for API testing due to its simplicity and efficiency. Its user-friendly interface makes it accessible to testers of all levels, allowing them to easily navigate and utilize its features. With Postman, testers can efficiently create, send, and manage API requests, saving time and effort. The platform also offers powerful automation capabilities, enabling testers to create and execute automated tests, reducing the need for manual testing.
Additionally, Postman simplifies documentation generation, making it easier for testers to understand and use APIs. Collaboration is made seamless with features like shared workspaces and version control, allowing teams to work together effectively on testing projects.
Overall, Postman provides a comprehensive toolkit for API testing, making the process easier, faster, and more efficient for testers.
HTTP Requests with Postman
In Postman, requests to APIs can be effortlessly made, enabling access to or transmission of data from a data source. To send the API request, we require an HTTP method. Several widely utilized methods exist, such as POST, GET, DELETE, PUT, and PATCH. Certainly, here’s a more detailed explanation of each HTTP method :
- GET: This method is primarily used to retrieve data from an API. It is commonly employed when you need to fetch information or resources from a server without making any modifications to the data.
- POST: Unlike GET, the POST method is used to transmit new data to the server. It is typically used when you need to create a new resource on the server or submit data that will be processed and stored.
- DELETE: As the name suggests, this method is used to remove or delete existing data from the server. It is commonly used when you need to delete a resource or data entry from the server permanently.
- PATCH: The PATCH method is used to update specific fields or properties of an existing resource on the server. Unlike PUT, which updates the entire resource, PATCH allows you to modify only the specified fields without affecting the rest of the resource.
- PUT: Similar to PATCH, the PUT method is also used to update existing data on the server. However, PUT replaces the entire resource with the new data provided in the request. It is commonly used when you need to completely replace an existing resource with updated information.
- HEAD: Similar to GET, but it only retrieves the headers of the response without the actual data.
- OPTIONS: Returns the HTTP methods that the server supports for the specified URL.
- TRACE: Echoes the received request so that clients can see what changes or additions have been made by intermediate servers.
In this blog post, we’ll look into API exploration using Postman, examining GET and POST endpoints individually to enhance our understanding. To enhance our understanding of Postman and API functionality, we’ll utilize a demo website Reqres to test APIs and gain deeper insights into their workings. Firstly, we need to install the Postman tool before we proceed with our exploration.
Prerequisite for API Testing in Postman
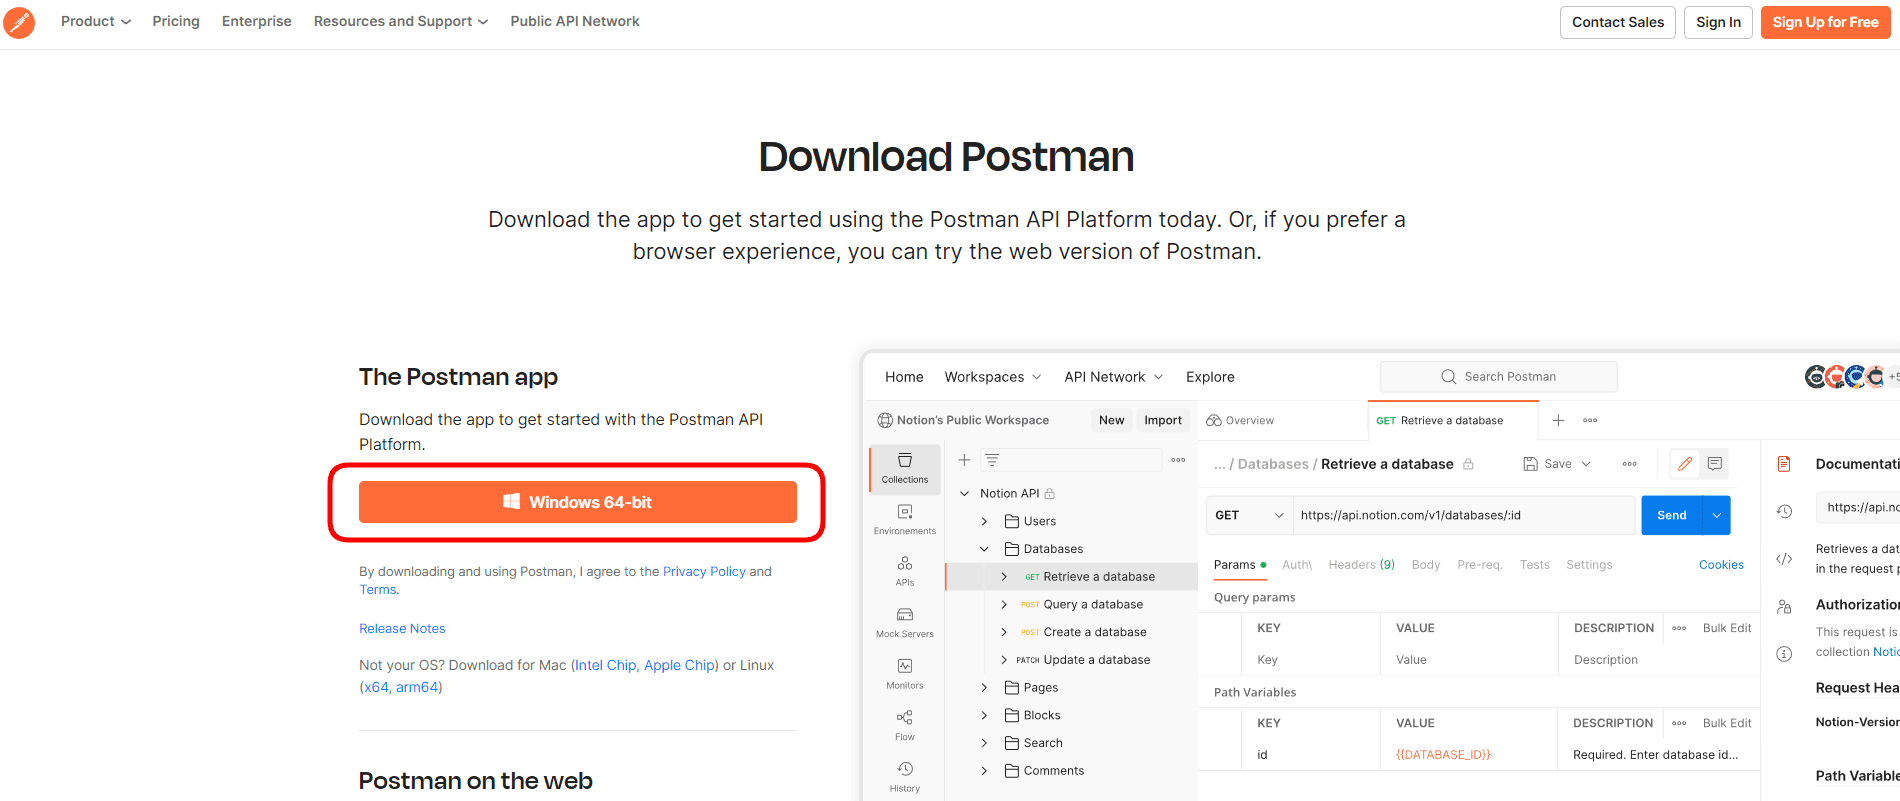
1. Download Postman
- Visit the official Postman website, click on the Windows button to download, and choose the 64-bit option for your system.
2. Install Postman
- Find the downloaded Setup file in your system’s downloads folder, then run it to start the installation process, which usually takes about a minute.
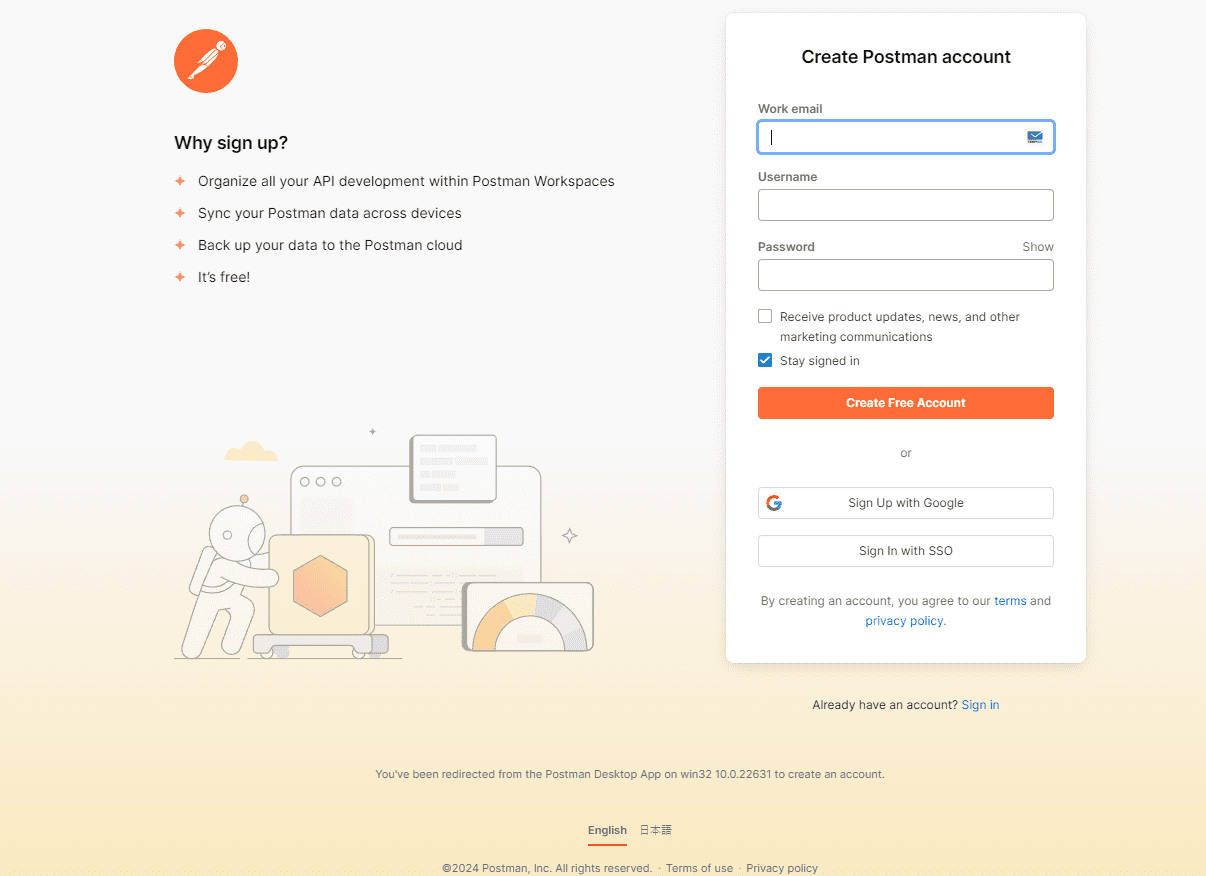
3. Create an Account
- Once the installation is complete, it automatically opens, allowing you to view the Sign-up interface.

- Signing up for an account in Postman is a good idea. It helps you save your work and prevent losing progress. You can sign up by entering your details or using Google sign-up, as shown in the image.
4. Setting up Workspace and Create a Case in Postman
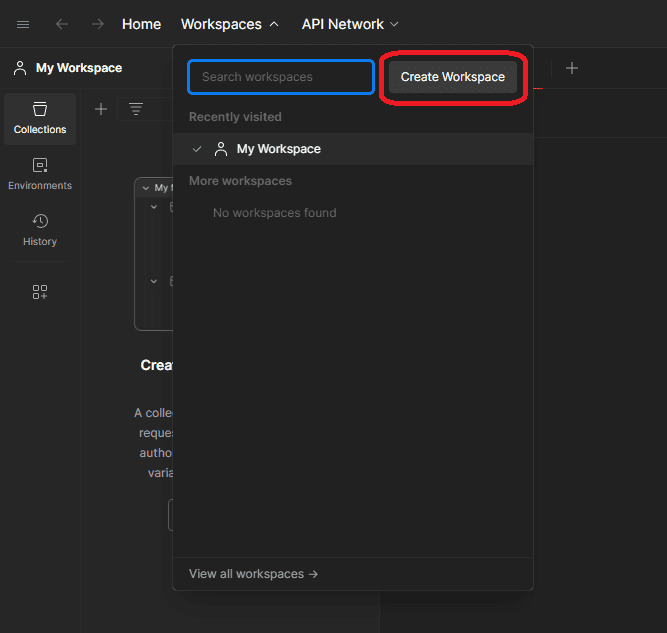
- After successfully creating the account, proceed to create a new workspace by clicking on “Create Workspace” located in the header under the Workspaces section.
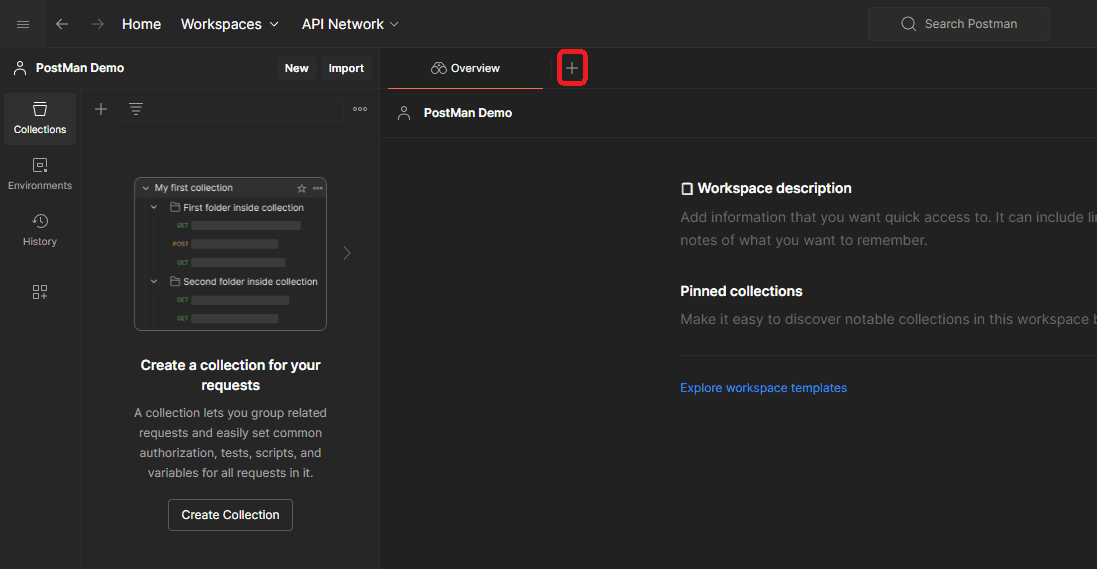
- After creating the workspaces successfully, the interface will appear like this. From there, simply click on the plus (+) icon to create a new HTTP request and save it within the designated workspace.
Component Tabs in Postman
1. Request Components
- The interface includes various components that contribute to the request process. Let’s explore each of them in detail :
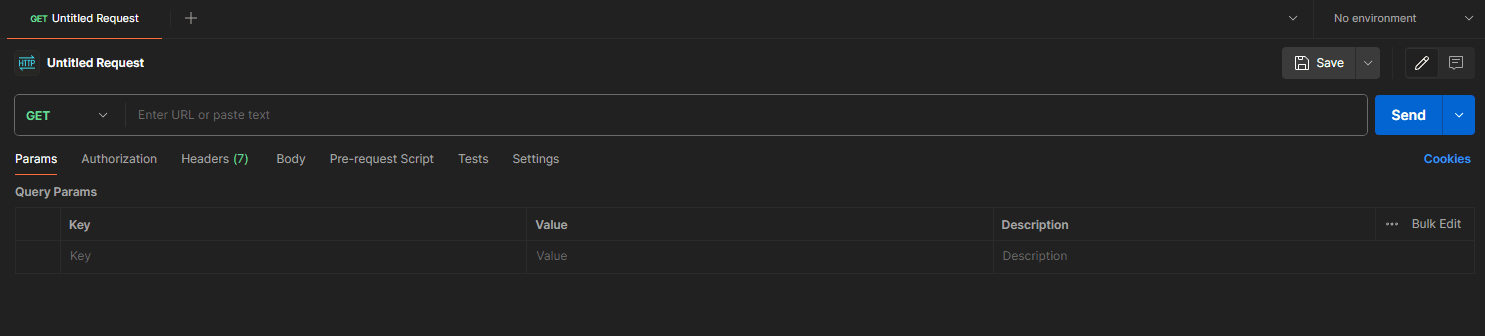
- Request Name: At the top, where “Untitled Request” is displayed, you can assign a name to your request.
- Method Type: The default method type is “GET,” but you can change it according to your requirements.
- URL: Enter the URL of the request in the text box.
- Send Button: Clicking this button sends the request along with any payloads to the specified URL and will provide us with a response in return.
- Navbar for Creating Payload :
- Params: Include query parameters as needed. These parameters are appended to the URL and are used to filter or narrow down the results returned by the server.
- Authorization: Provide authentication tokens here. Postman supports various authentication methods such as Bearer tokens, Basic Auth, OAuth 1.0, OAuth 2.0, API Key, etc.
- Headers: Headers contain additional information about the request, such as authentication tokens, content type, accepted response formats, etc. You can add custom headers as needed.
- Body: Place any Body or JSON data here, such as in a “POST” request where data needs to be created. However, for a “GET” request, no data is required.
- Pre-Request Script: This allows to write JavaScript code that will be executed before sending the request. It can be used to set up variables, authenticate the request, or perform any other pre-processing tasks. This script runs before the request is sent.
- Tests: After receiving a response from the server here we can perform simple tests like validating JSON responses or verifying status codes.
- Settings: Access basic and advanced settings, such as enabling the SSL section and more.
2. Response Components
- The interface comprises several components that play a crucial role in the response process, similar to the request process. Let’s explore each of them in detail :
- Body: This part shows what the server sends back. It can be in different formats like JSON, XML, or just plain text. Postman makes it easier to read by organizing and beautifying the response.
- Cookies: Shows any cookies created by the API, such as HTTP cookies generated after authenticating.
- Headers: Headers sent by the server along with the response. These headers contain metadata about the response, such as content type, content length, server information, etc. Postman displays both the standard headers and any custom headers returned by the server.
- Tests: The test results created in the request data section are displayed here.
- Status Code: This indicates the status of the HTTP request. Status codes are three-digit numbers that convey whether a request was successful, encountered an error, or requires further action. Examples include 200 for success, 404 for not found, 500 for server error, etc.
- Time: Displays the response time, showing how long it took to receive a response.
- Size: It usually indicates the size of the response.
API Automated Test Case Creation
1. Write a Case for the GET Endpoint
- After successfully creating the HTTP request, we’ll begin with our first request example, focusing on the “GET” endpoint from the demo website mentioned previously and save it. We named the request “List Users” and set the URL as https://reqres.in/api/users/2 Enter the response test in the “Tests” section.
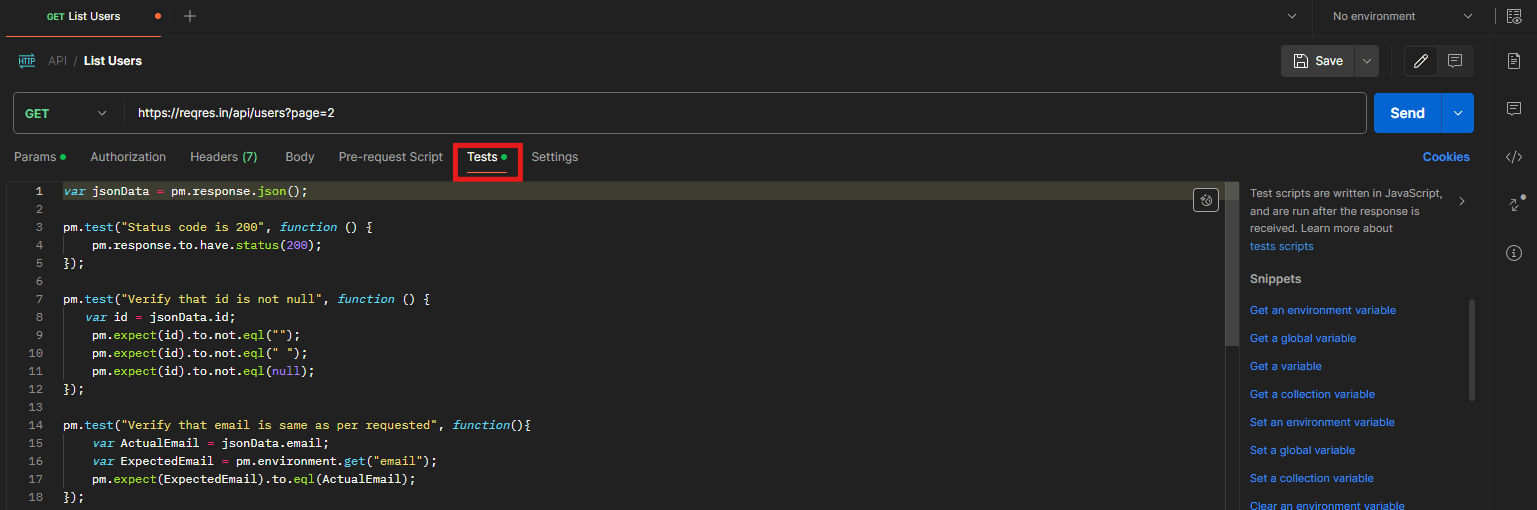
- Here’s the test script mentioned below.
var jsonData = pm.response.json();

pm.test("Status code is 200", function () {
    pm.response.to.have.status(200);
});

pm.test("Verify that id is not null", function () {
   var id = jsonData.id;
    pm.expect(id).to.not.eql("");
    pm.expect(id).to.not.eql(" ");
    pm.expect(id).to.not.eql(null);
});

pm.test("Verify that email is same as per requested", function(){
    var actualEmail = jsonData.email;
    var expectedEmail = pm.environment.get("email");
    pm.expect(expectedEmail).to.eql(actualEmail);
});

pm.test("Verify that first name is same as per requested", function(){
    var actualFirst_Name = jsonData.first_name;
    var expectedFirst_Name = pm.environment.get("first_name");
    console.log(actualFirst_Name);
    pm.expect(expectedFirst_Name).to.eql(actualFirst_Name);
});

pm.test("Verify that last name is same as per requested", function(){
    var actualLast_Name = jsonData.last_name;
    var expectedLast_Name = pm.environment.get("last_name");
    console.log(actualLast_Name);
    pm.expect(expectedLast_Name).to.eql(actualLast_Name);
});

pm.test("Verify that avatar is same as per requested", function(){
    var actualAvatar = jsonData.avatar;
    var expectedAvatar = pm.environment.get("avatar");
    console.log(actualAvatar);
    pm.expect(expectedAvatar).to.eql(actualAvatar);
});

pm.test("Verify that response time is below 2000m ms", function(){
      var actResponse = jsonData.responseTime;
      var expectedTime = pm.environment.get(responseTime);
      pm.expect(pm.response.responseTime).to.be.below(2000);

 });
- This code is written in JavaScript and is used within Postman’s scripting environment for testing API responses. Here’s a breakdown of what it does:
- var jsonData = pm.response.json(); – This line extracts the JSON data from the response of the API request and stores it in the variable `jsonData`.
- pm.test(“Status code is 200”, function () { … }); – This block of code defines a test to verify that the status code of the API response is 200.
- pm.test(“Verify that id is not null”, function(){ … }); – This test ensures that the `id` field in the response JSON is not null or empty.
- pm.test(“Verify that email is same as per requested”, function(){ … }); – This test compares the `email` field in the response JSON with the expected email stored in the Postman environment.
- pm.test(“Verify that first name is same as per requested”, function(){ … }); – Similar to the previous test, this one compares the `first_name` field in the response JSON with the expected first name stored in the environment.
- pm.test(“Verify that last name is same as per requested”, function(){ … }); – This test compares the `last_name` field in the response JSON with the expected last name stored in the environment.
- pm.test(“Verify that avatar is same as per requested”, function(){ … }); – Similar to the previous tests, this one compares the `avatar` field in the response JSON with the expected avatar stored in the environment.
- pm.test(“Verify that response time is below 2000 ms”, function(){ … }); – This test checks if the response time of the API request is below 2000 milliseconds.
- Each test uses assertions provided by the Postman test framework (`pm.expect`) to verify specific aspects of the API response against expected values or conditions. After examining all the request components and performing the request test, let’s receive the response. Click on the “Send” button located on the right side of the URL field.
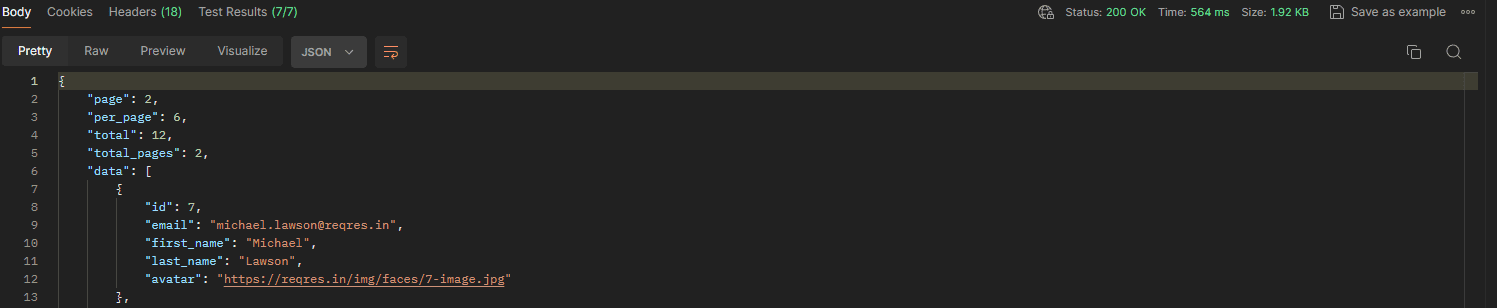
- Once we click the Send button, the response is swiftly displayed in the response window within milliseconds. Additionally, various tabs such as Cookies, Headers, and Status provide additional information.
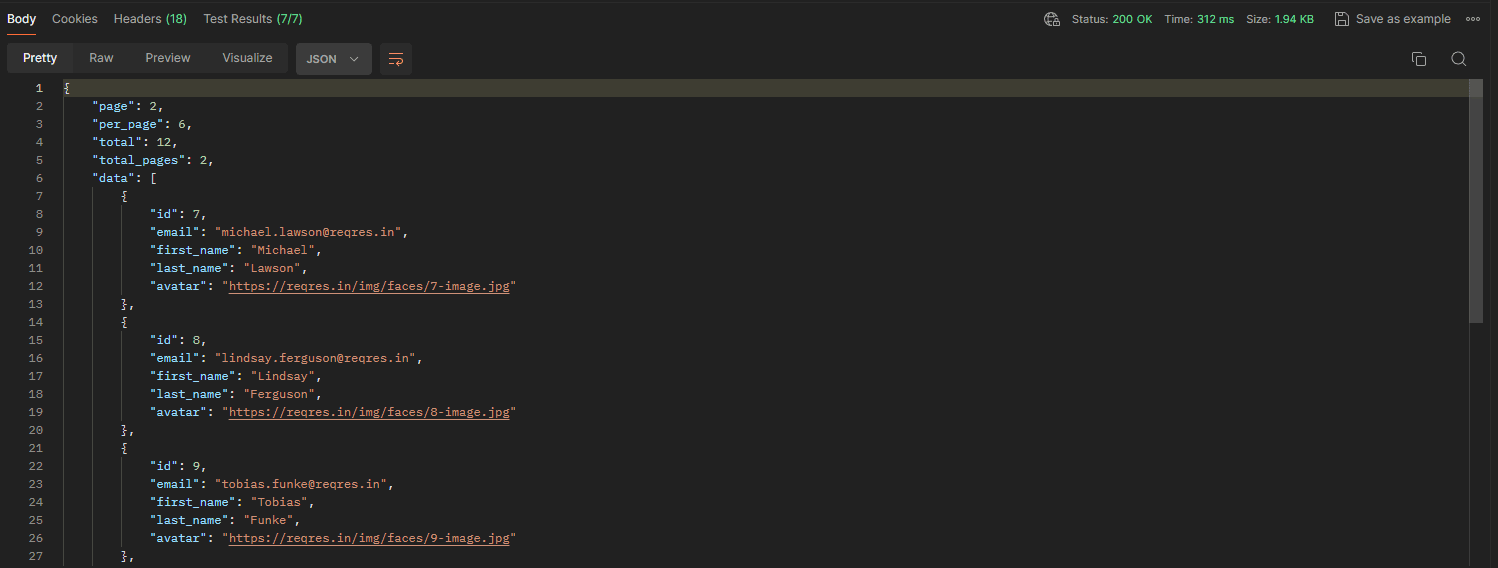
- The test results created in the request data section are displayed here. All tests (7/7) have passed, as expected which covered the verification of the Status code and validating the response body. Refer to the image presented below.

2. Write a Case for the POST Endpoint
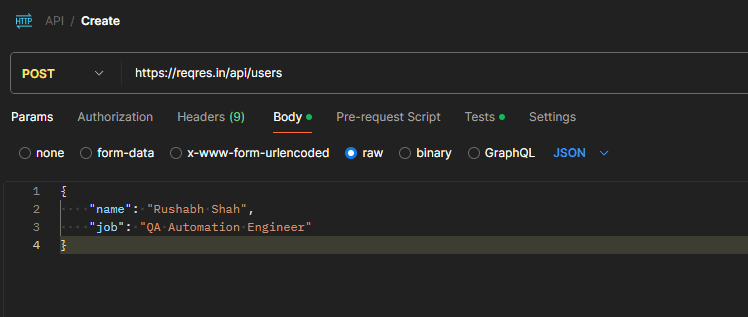
- After successfully setting up and gaining familiarity with the “GET” request endpoint, we will now shift our focus to the “POST” request. Let’s create another new HTTP request in Postman. Enter the URL of the “POST” request in the text box https://reqres.in/api/users
- Additionally, include the request body for the “POST” call, which is already provided on the demo website.
- Request Body :
{
    "name": "Rushabh Shah",
    "job": "QA Automation Engineer"
}
- Next, let’s create tests to validate JSON responses, including those passed in the request body, and verify status codes, similar to what we did for the “GET” request endpoint earlier.
var jsonData = pm.response.json();

pm.test("Status code is 201", function () {
    pm.response.to.have.status(201);
});

pm.test("Verify that name is not null.", function()
   var actualName = jsonData.name;
    pm.expect(actualName).to.not.eql("");
    pm.expect(actualName).to.not.eql(" ");
    pm.expect(actualName).to.not.eql(null);
});

pm.test("Verify that name is same as per requested", function(){
    var actualName = jsonData.name;
    console.log(actualName);
    pm.expect("Rushabh Shah").to.eql(actualName);
});

pm.test("Verify that job is not null.", function(){
    var job = jsonData.job;
    pm.expect(job).to.not.eql("");
    pm.expect(job).to.not.eql(" ");
    pm.expect(job).to.not.eql(null);
});

pm.test("Verify that job is same as per requested", function(){
    var actualJob = jsonData.job;
    console.log(actualJob);
    pm.expect("QA Automation Engineer").to.eql(actualJob);
});

pm.test("Verify that id  is not null.", function(){
   var actualId = jsonData.id;
    pm.expect(actualId).to.not.eql("");
    pm.expect(actualId).to.not.eql(" ");
    pm.expect(actualId).to.not.eql(null);
});

pm.test("Verify that time is not null.", function(){
   var actualCreationTime = jsonData.createdAT;
    pm.expect(actualCreationTime).to.not.eql("");
    pm.expect(actualCreationTime).to.not.eql(" ");
    pm.expect(actualCreationTime).to.not.eql(null);
});

pm.test("Verify that response time is below 2000m ms.", function(){
    pm.expect(pm.response.responseTime).to.be.below(2000);
 });
- Let’s explore a comprehensive explanation of each step to enhance our understanding further.
- var jsonData = pm.response.json(); – This line extracts the JSON response data from the API response and stores it in the `jsonData` variable.
- pm.test(“Status code is 201”, function () { … }); – This block defines a test using Postman’s testing syntax. It checks whether the HTTP status code of the response is 201 (Created).
- pm.test(“Verify that name is not null.”, function(){ … }); – This test ensures that the “name” attribute in the JSON response is not null or empty.
- pm.test(“Verify that name is same as per requested”, function(){ … }); – This test compares the “name” attribute in the JSON response with the expected name “Rushabh Shah”.
- pm.test(“Verify that job is not null.”, function(){ … }); – This test ensures that the “job” attribute in the JSON response is not null or empty.
- pm.test(“Verify that job is same as per requested”, function(){ … }); This test compares the “job” attribute in the JSON response with the expected job “QA Automation Engineer”.
- pm.test(“Verify that id is not null.”, function(){ … }); – This test ensures that the “id” attribute in the JSON response is not null or empty.
- pm.test(“Verify that time is not null.”, function(){ … }); – This test ensures that the “createdAT” attribute in the JSON response is not null or empty.
- pm.test(“Verify that response time is below 2000m ms.”, function(){ … }); – This test ensures that the response time of the API call is below 2000 milliseconds.
- Now, Press the “Send” button positioned to the right of the URL field to obtain the expected response.
- After clicking the “Send” button, the response will be promptly displayed, similar to what we observed in the “GET” request endpoint.

- The response components are comparable to what we’ve observed in the GET response explanation. Nevertheless, there are a few distinctions to note here as well. Therefore, our focus will be solely on comprehending these differences.
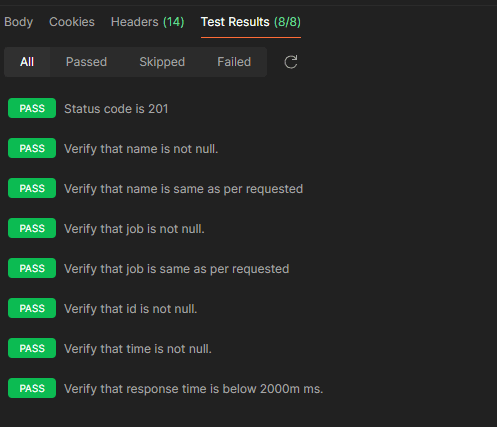
- Same as the “GET” request endpoint the test results created in the request data section are displayed in the test section.
- All tests (8/8) have passed, as expected as the Status code should be 201 for “POST” endpoint instead of 200 and that’s exactly what we received in return for the “OK” status.
- Also, the response we received is the same as what we sent in the request. You can see this in the image below.
Conclusion
In conclusion, we found that Postman API testing works really well. It’s easy to use and has great features, making testing APIs faster and easier for developers.
Our experience with Postman API testing has shown both its strengths and weaknesses. On the positive side, it’s really helpful for making sure APIs work well. It’s easy to use and has lots of useful features that make testing quicker and easier for developers. But, it might be a bit tricky for beginners because it has so many options. Even with its drawbacks, Postman is still a valuable tool that helps a lot in testing APIs.
We also did some hands-on demonstrations on GET and POST calls, which are important in web development. We learned that GET gets data from servers, while POST sends data to them. Knowing how they work is important for making good web solutions.
In simple terms, getting good at using Postman for API testing helps us make great APIs for today’s apps. This makes sure they work smoothly and make users happy.
Keep practicing and exploring to master these powerful tools further with Jignect.
Witness how our meticulous approach and cutting-edge solutions elevated quality and performance to new heights. Begin your journey into the world of software testing excellence. To know more refer to Tools & Technologies & QA Services.
If you would like to learn more about the awesome services we provide, be sure to reach out.
Happy Testing 🙂


")