
Are you just starting with Appium Java mobile automation testing? You’re in the right place! This blog is your guide to crafting your inaugural test case. We’ll guide you through setting up your environment, mastering fundamental Appium commands, and automating a simple action on your mobile app. Prepare to embark on your appium mobile testing journey, step by step!
If you haven’t already, feel free to explore our Appium Setup blog post, where we cover Appium setup and basic command navigation. It’s an excellent resource to jumpstart your appium testing adventure! Take a look to kick off your learning! With that groundwork laid, let’s proceed to construct your first test case!
Create project in IntelliJ with maven build systems
- Maven is an open-source build automation and project management tool that is based on POM (project object model).
- It uses a project object model (POM) file to describe the project structure, dependencies, and build configurations.
- It is used for projects build, dependency management and documentation.
- It’s written in Java and can also be used to create projects written in other languages, such as C#, Scala, and Ruby.
- Apache Maven 3.9.6 is the latest release. It is the recommended version for all users.
We can build a Maven project in IntelliJ by doing the following
- Open IntelliJ IDE
- Click on the Main Menu
- Select File > New > Project
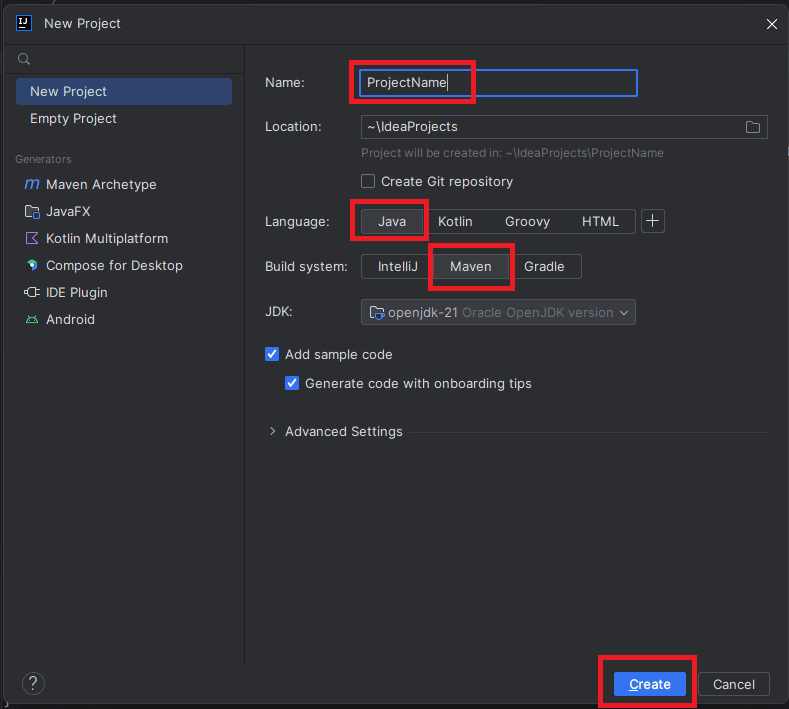
- In New Project Popup window, provide a project name
- Select Maven as build System
- Click on the create button.
- After create a project with Maven build system, pom.xml file will automatically generated under project structure
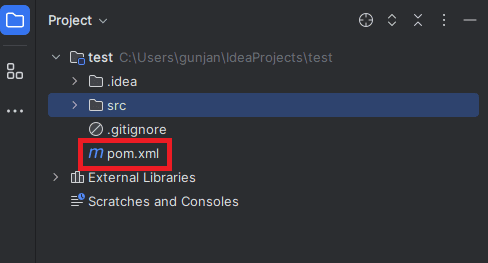
Pom.xml file will look like the below
<?xml version="1.0" encoding="UTF-8"?>
<project xmlns="http://maven.apache.org/POM/4.0.0"
        xmlns:xsi="http://www.w3.org/2001/XMLSchema-instance"
        xsi:schemaLocation="http://maven.apache.org/POM/4.0.0 http://maven.apache.org/xsd/maven-4.0.0.xsd">
   <modelVersion>4.0.0</modelVersion>

   <groupId>org.example</groupId>
   <artifactId>AppiumTest</artifactId>
   <version>1.0-SNAPSHOT</version>

   <properties>
       <maven.compiler.source>21</maven.compiler.source>
       <maven.compiler.target>21</maven.compiler.target>
       <project.build.sourceEncoding>UTF-8</project.build.sourceEncoding>
   </properties>
- In order to create our first test case, we would need the following dependency
- java-client
- testng
- Add below Appium Java Client dependency in pom.xml file. Take the latest dependencies from this URL (https://mvnrepository.com/).
<dependencies>
  <dependency>
   <groupId>io.appium</groupId>
   <artifactId>java-client</artifactId>
   <version>9.2.2</version>
</dependency>
</dependencies>
- After adding the dependencies, follow the below steps to download it to the local computer
- Save the pom.xml and update the Maven Project by right-clicking on the project and updating the Project inside Maven.
- After saving the project, all the dependencies start downloading from the Maven Repository to the local computer.
- All the dependencies are downloaded to the C drive under the m2 folder.
- Before downloading the dependencies, Maven first verifies whether these dependencies are already present in the m2 folder or not. If yes, then Maven directly takes it from there, else Maven downloads it.
- As appium-java dependency we can add more dependencies in pom.xml as per our need.
Configure the TestNG dependency in pom.xml
- When working on Java Selenium projects, the TestNG dependency is used to integrate the TestNG testing framework into the project.
What is TestNG Framework?
- TestNG is an open-source test automation framework for Java. TestNG provides advanced features such as annotations, data-driven testing, test sequencing, and parallel testing to help you organize and execute your Selenium tests more efficiently and effectively.
Some of the benefits of using TestNG in appium mobile app testing:
- Group test cases into logical units, making managing and maintaining your test suite easier.
- Run tests in parallel, significantly reducing the time it takes to execute your test suite.
- TestNG provides a wide range of annotations that you can use to customize your tests, such as @Test , @BeforeSuite, @AfterSuite, @BeforeTest, @AfterTest, @BeforeMethod, and @AfterMethod.
- It supports data-driven testing, allowing you to run the same test case with multiple test data sets.
- Better reporting and logging features than other testing frameworks make identifying and debugging issues in your tests easier.
- To include the TestNG dependency in your project configuration file pom.xml, you need to add the following snippet within the <dependencies> section of the <project> node
<dependency>
   <groupId>org.testng</groupId>
   <artifactId>testng</artifactId>
   <version>7.8.0</version>
   <scope>test</scope>
</dependency>
- Start the appium server from the cmd by writing appium.
- Start the emulator and appium inspector as explained in our previous blog.
- In IntelliJ, Open the folder src/main/java and create a new java class file within it and write our first test as per below.
First sample test for Appium Java as below
import io.appium.java_client.AppiumBy;
import io.appium.java_client.android.AndroidDriver;
import org.openqa.selenium.remote.DesiredCapabilities;
import org.testng.Assert;
import org.testng.annotations.Test;
import java.net.MalformedURLException;
import java.net.URL;
import java.time.Duration;

public class FirstSampleTest{
   @Test
   public void verifyThatUserIsAbleToNavigateProductListingPage() throws MalformedURLException {

	//This line declares an AndroidDriver object, which will be used to interact with the Android device.
       AndroidDriver driver;

DesiredCapabilities capabilities = new DesiredCapabilities();
capabilities.setCapability("platformName", "Android");
capabilities.setCapability("appium:automationName","UiAutomator2");
capabilities.setCapability("appium:deviceName","Pixel_7");
capabilities.setCapability("appium:app", "C:\\Users\\{your pc name}\\Documents\\resources\\General-Store.apk");

//This line creates a new AndroidDriver instance, connecting to the Appium server on localhost (127.0.0.1)and port 4723, passing the previously configured options.
driver = new AndroidDriver(new URL("http://127.0.0.1:4723"), capabilities);

//Sets an implicit wait of 10 seconds.
driver.manage().timeouts().implicitlyWait(Duration.ofSeconds(10));

//Find the element with id and enter any name
driver.findElement(AppiumBy.id("nameField")).sendKeys("Gunjan Donga");

//Hide the keyboard after entering the name.
driver.hideKeyboard();

//Click on the element
driver.findElement(AppiumBy.id("radioFemale")).click();
driver.findElement(AppiumBy.id("android:id/text1")).click();

//Scroll to the element
driver.findElement(AppiumBy.androidUIAutomator("new UiScrollable(new UiSelector()).scrollIntoView(text(\"Argentina\"));"));
       driver.findElement(AppiumBy.xpath("//android.widget.TextView[@text='Argentina']")).click();

driver.findElement(AppiumBy.id("btnLetsShop")).click();

String title = driver.findElement(AppiumBy.xpath(              "(//android.widget.TextView[@resource-id='com.androidsample.generalstore:id/productName'])[1]")).getAttribute("text");

//Assert and verifies navigation to the product listing page.
Assert.assertEquals(title, "Air Jordan 4 Retro", "The user is not navigated on the product listing page.");
   }
}
Let’s understand our first test case
- Desired Capabilities : Which is a concept explained in our previous appium blog .It is a type of key-value combination information, which tells the Appium about our device, what kind of device to use (Android), how to control the app (UiAutomator2), and where to find the app. These capabilities are essential for establishing a connection with the emulator or physical device during test automation.
- Connect and Launch: We connect to the Appium server and use it to open the app on the device. We also set a short wait time in case the app takes a moment to load.
- Play the User: The code acts like a user by finding buttons, text fields, and other elements on the screen. It then enters text, clicks buttons, and scrolls through lists just like a real person would.
- Check the Work: Finally, the code makes sure everything works as planned. It grabs the title of the first product on the list and compares it to what we expect (like “Air Jordan 4 Retro”). If they don’t match, it means something went wrong, and the test fails.
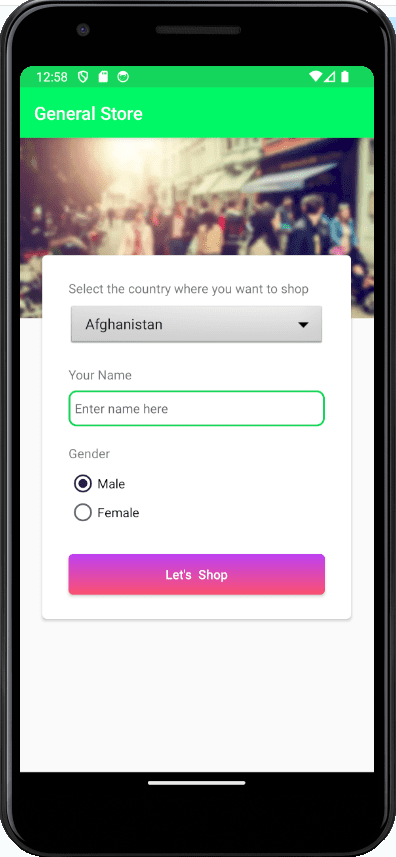
- Below is a screenshot of the application page for which we wrote the above test script using appium mobile app testing with Java.
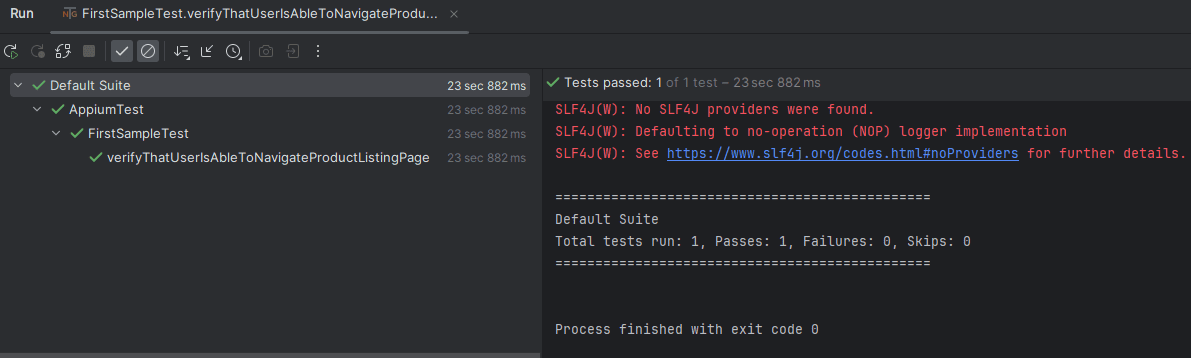
- Executing the appium test script : Once the code is written, you can execute/run it by right clicking on the test and clicking on ‘Run’. It will launch the mobile app on the connected device or emulator and perform the actions specified in the test script. Once the execution is complete you can see the execution logs in the console as shown below
Conclusion
Appium and Java together create a powerful solution for automating mobile app testing, saving time and resources throughout the development process. This allows you to deliver high-quality apps. This guide has equipped you to begin your journey by setting up your environment and writing your first tests. But this is just the start! As you explore further, Appium can integrate with other tools and test different app types, allowing you to build a robust testing process. By embracing Appium and Java, you can automate repetitive tasks, find bugs early on, and deliver exceptional mobile apps with confidence. So start your Appium and Java testing adventure today!
Keep practicing and exploring to master these powerful tools further with Jignect.
Witness how our meticulous approach and cutting-edge solutions elevated quality and performance to new heights. Begin your journey into the world of software testing excellence. To know more refer to Tools & Technologies & QA Services.
If you would like to learn more about the awesome services we provide, be sure to reach out.
Happy Testing 🙂


