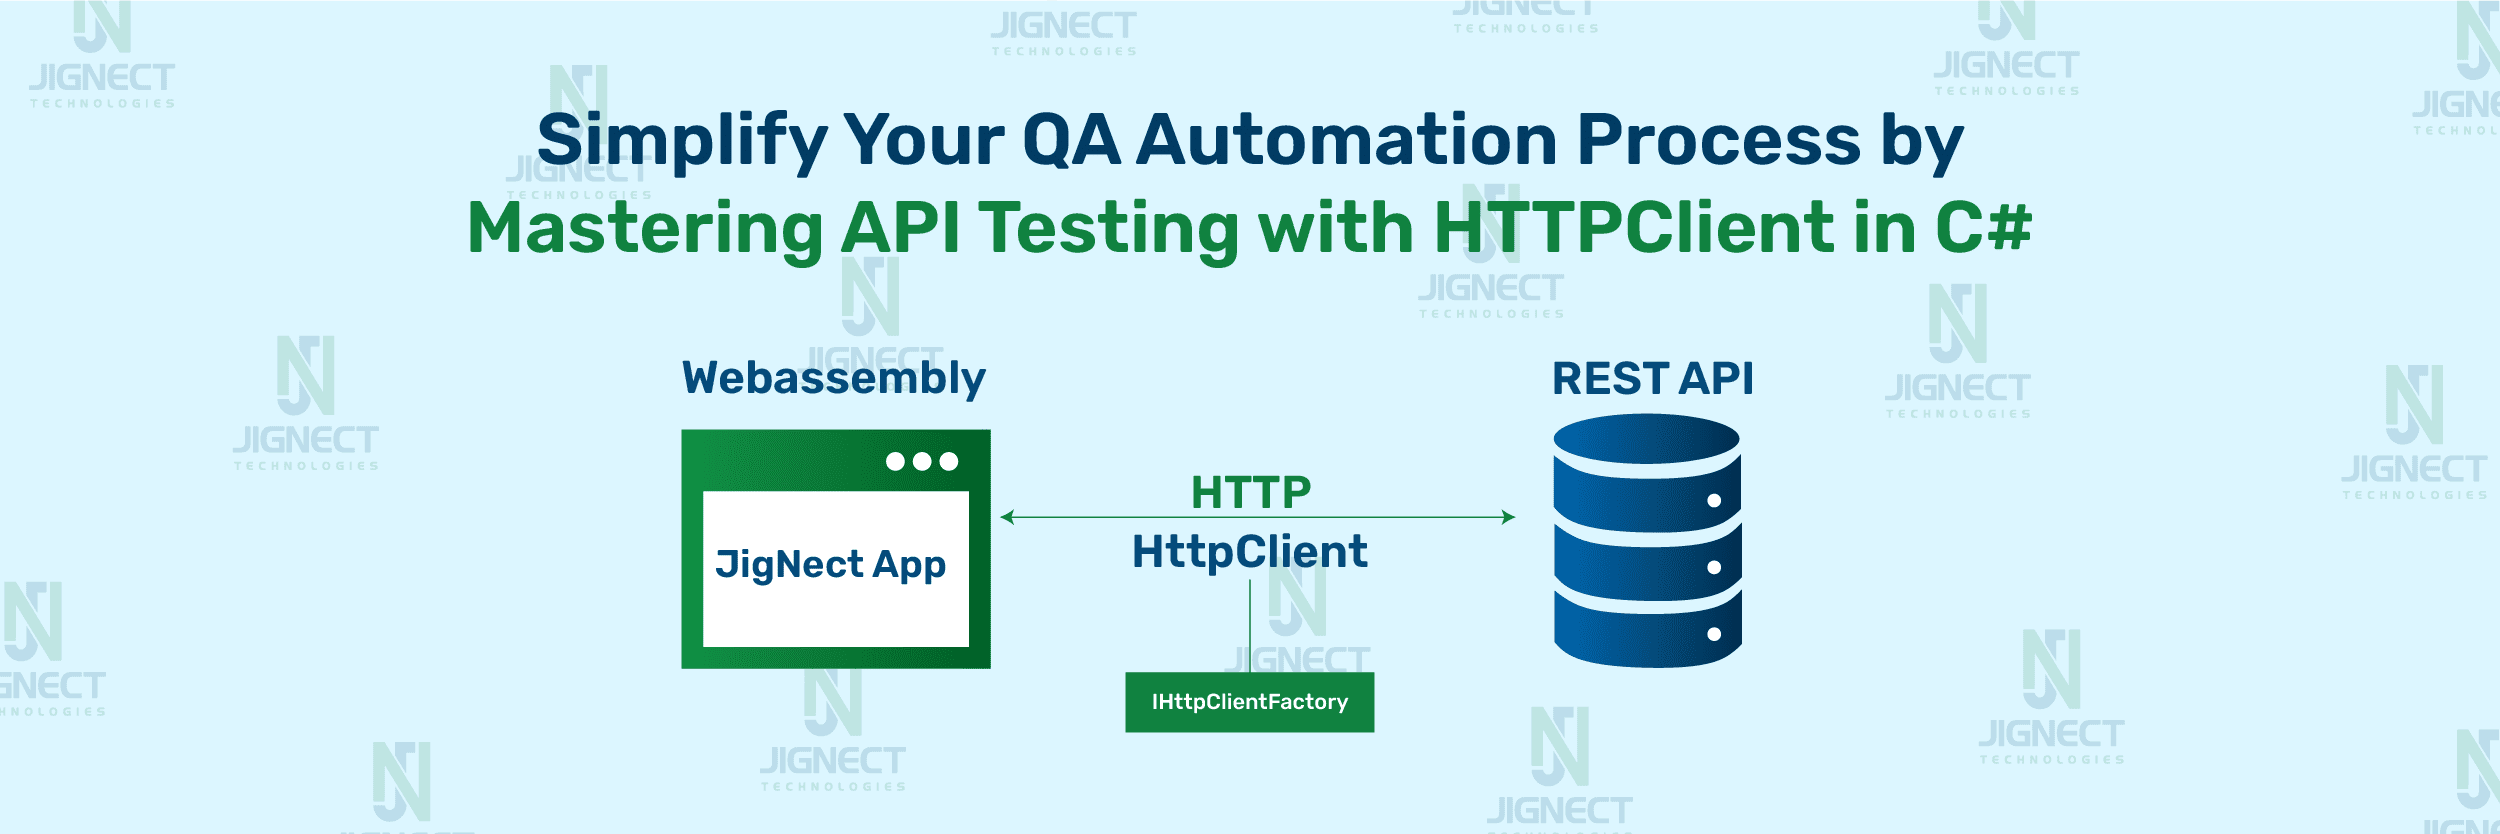
In today’s digital world, automation testing and API automation play critical roles in modern software development practices. Automation testing involves leveraging specialized tools to efficiently execute test cases, while API automation is dedicated to automating tasks related to API validation.
In C# The HTTP Client class is fundamental for API automation, empowering developers and QA professionals to execute HTTP requests and manage API interactions seamlessly.
This blog will delve into practical implementations of the HTTP Client in C# for API automation. It will cover essential topics such as creating requests, handling authentication, and conducting automated API testing. Whether you’re a developer improving API interactions or a QA professional enhancing testing abilities, this blog will give you the tools you need for successful API automation using C# and the HTTP Client.
What is HTTPClient?
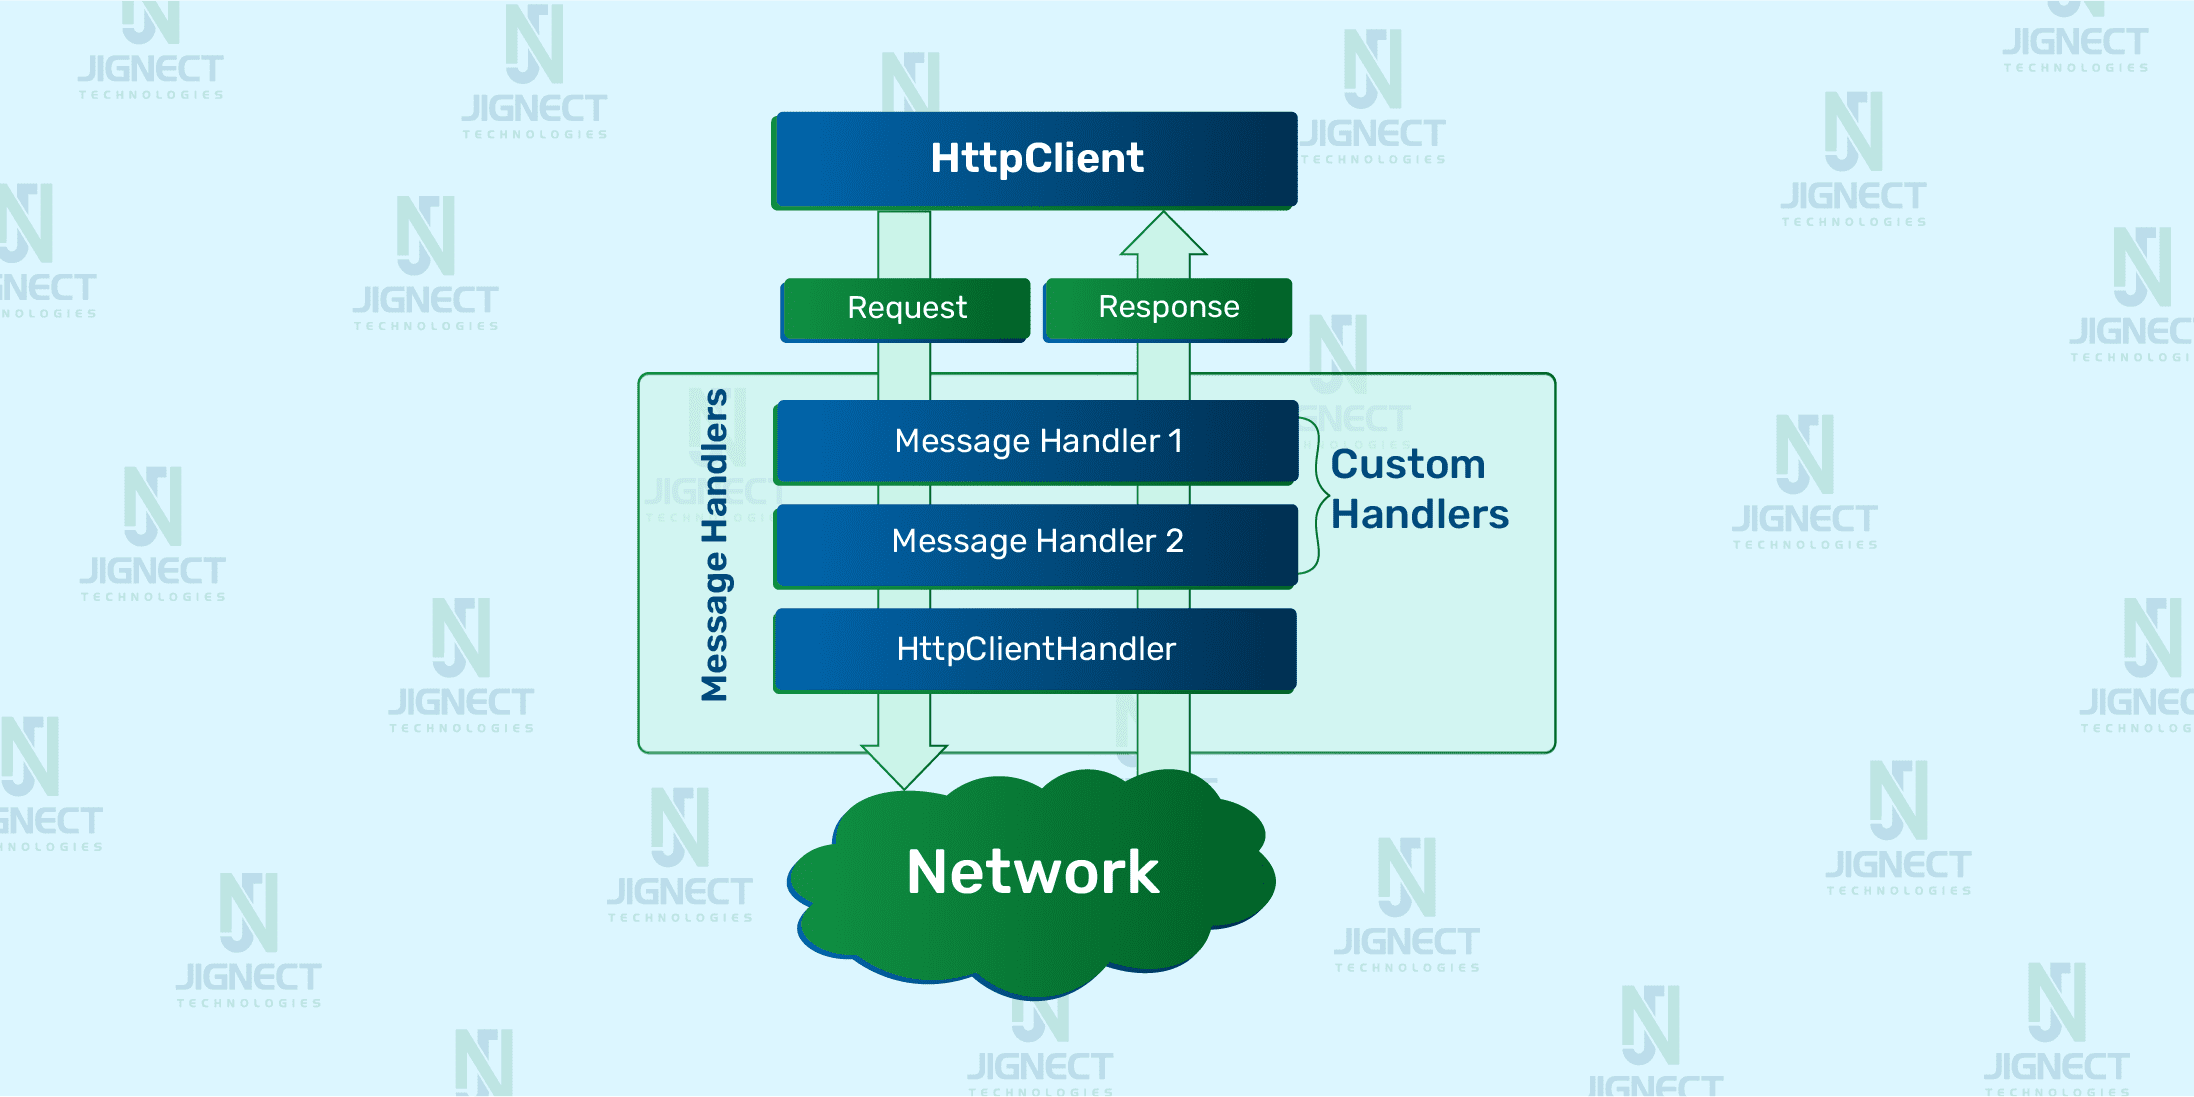
HttpClient is a crucial component in the .Net Core & .NET framework, designed to simplify and streamline communication between applications and web services over the HTTP protocol. It provides a flexible interface for sending HTTP requests, including GET, POST, PUT, DELETE, and others, catering to the diverse needs of modern web development. By leveraging HttpClient, developers can efficiently handle asynchronous operations, customize request headers, and process response data effectively. In essence, HttpClient plays a vital role in enhancing the connectivity and responsiveness of C# applications in the digital landscape.
HttpClient is a powerful tool for making HTTP requests in C# applications, and it’s readily available in Visual Studio projects without any additional installation steps.
Understanding the Core of C#
C# is an advanced, “Object-oriented programming” language developed by Microsoft as part of the .NET framework. It encompasses a rich set of features, including strong typing, component-based architecture, and support for asynchronous programming paradigms. Widely utilized in the creation of various software solutions, ranging from traditional desktop applications to web services and mobile apps, C# is esteemed for its elegant simplicity, flexible scalability, and extensive versatility. As a result, it has become the preferred choice for developers aiming to engineer robust and efficient applications across diverse platforms.
Why HTTPClient?
Using HTTPClient is essential in QA automation for several reasons when testing applications that interact with web services or APIs. Here are some key reasons why HTTPClient is commonly used:
- Customization and Versatility: The HttpClient library offers extensive customization options, empowering testers to tailor its functionality to suit diverse testing scenarios. With features such as configurable timeouts, proxy settings management, and flexible SSL/TLS configuration, testers can adapt the HttpClient to meet the specific requirements of their testing environment with precision and ease.
- Asynchronous Capability: A notable feature of HttpClient is its robust support for asynchronous programming methodologies. This functionality empowers testers to initiate HTTP requests without blocking the main execution thread, thereby enhancing the responsiveness and scalability of software applications.
- Cross-Platform Compatibility: HttpClient, being an intrinsic facet of the .NET framework, harmoniously integrates with various platforms and environments where C# applications are deployed. Its cross-platform compatibility enhances its versatility across a spectrum of contexts including desktop applications, web services, mobile apps, and server-side components.
- Comprehensive Feature Set: HttpClient offers a broad spectrum of functionalities, including support for a variety of HTTP methods such as GET, POST, and PUT, proficient handling of headers and cookies, seamless integration with authentication protocols, and proficient management of diverse response formats including JSON, XML, and HTML.
- Authentication: HttpClient offers support for a variety of authentication mechanisms, including basic authentication, OAuth, and client certificates. This empowers your application to securely authenticate with web servers and access protected resources.
- Streaming Support: HttpClient facilitates the streaming of request and response bodies, which is advantageous for managing large payloads or processing data in a streaming fashion. This can lead to improved memory efficiency and reduced latency when working with extensive datasets.
- Error Handling: HttpClient comes with robust error handling capabilities, allowing for graceful handling of various error types. This encompasses handling connection errors, server errors (such as 4xx and 5xx status codes), and other network-related issues.
Methods for Hypertext Transfer Protocol (HTTP) Requests
The HTTP protocol defines a set of methods or verbs that specify the desired action to be performed on a given resource. These methods allow clients (such as web browsers) to communicate with servers and retrieve or manipulate data. Let’s explore some of the commonly used HTTP methods:
- GET: This method retrieves a representation of the specified resource.
- HEAD: Similar to a GET request, but devoid of the response body.
- POST: utilized for sending data to a resource, often resulting in state changes or side effects.
- PUT: Either create a new resource or updates an existing one.
- DELETE: Deletes the specified resource.
- CONNECT: Commences two-way communications with the requested resource.
- OPTIONS: Conveys the communication options applicable to the target resource.
- TRACE: Reflects the entire HTTP request back, primarily for debugging purposes.
- PATCH: Facilitates partial modifications to the resource.
HTTP Status Codes
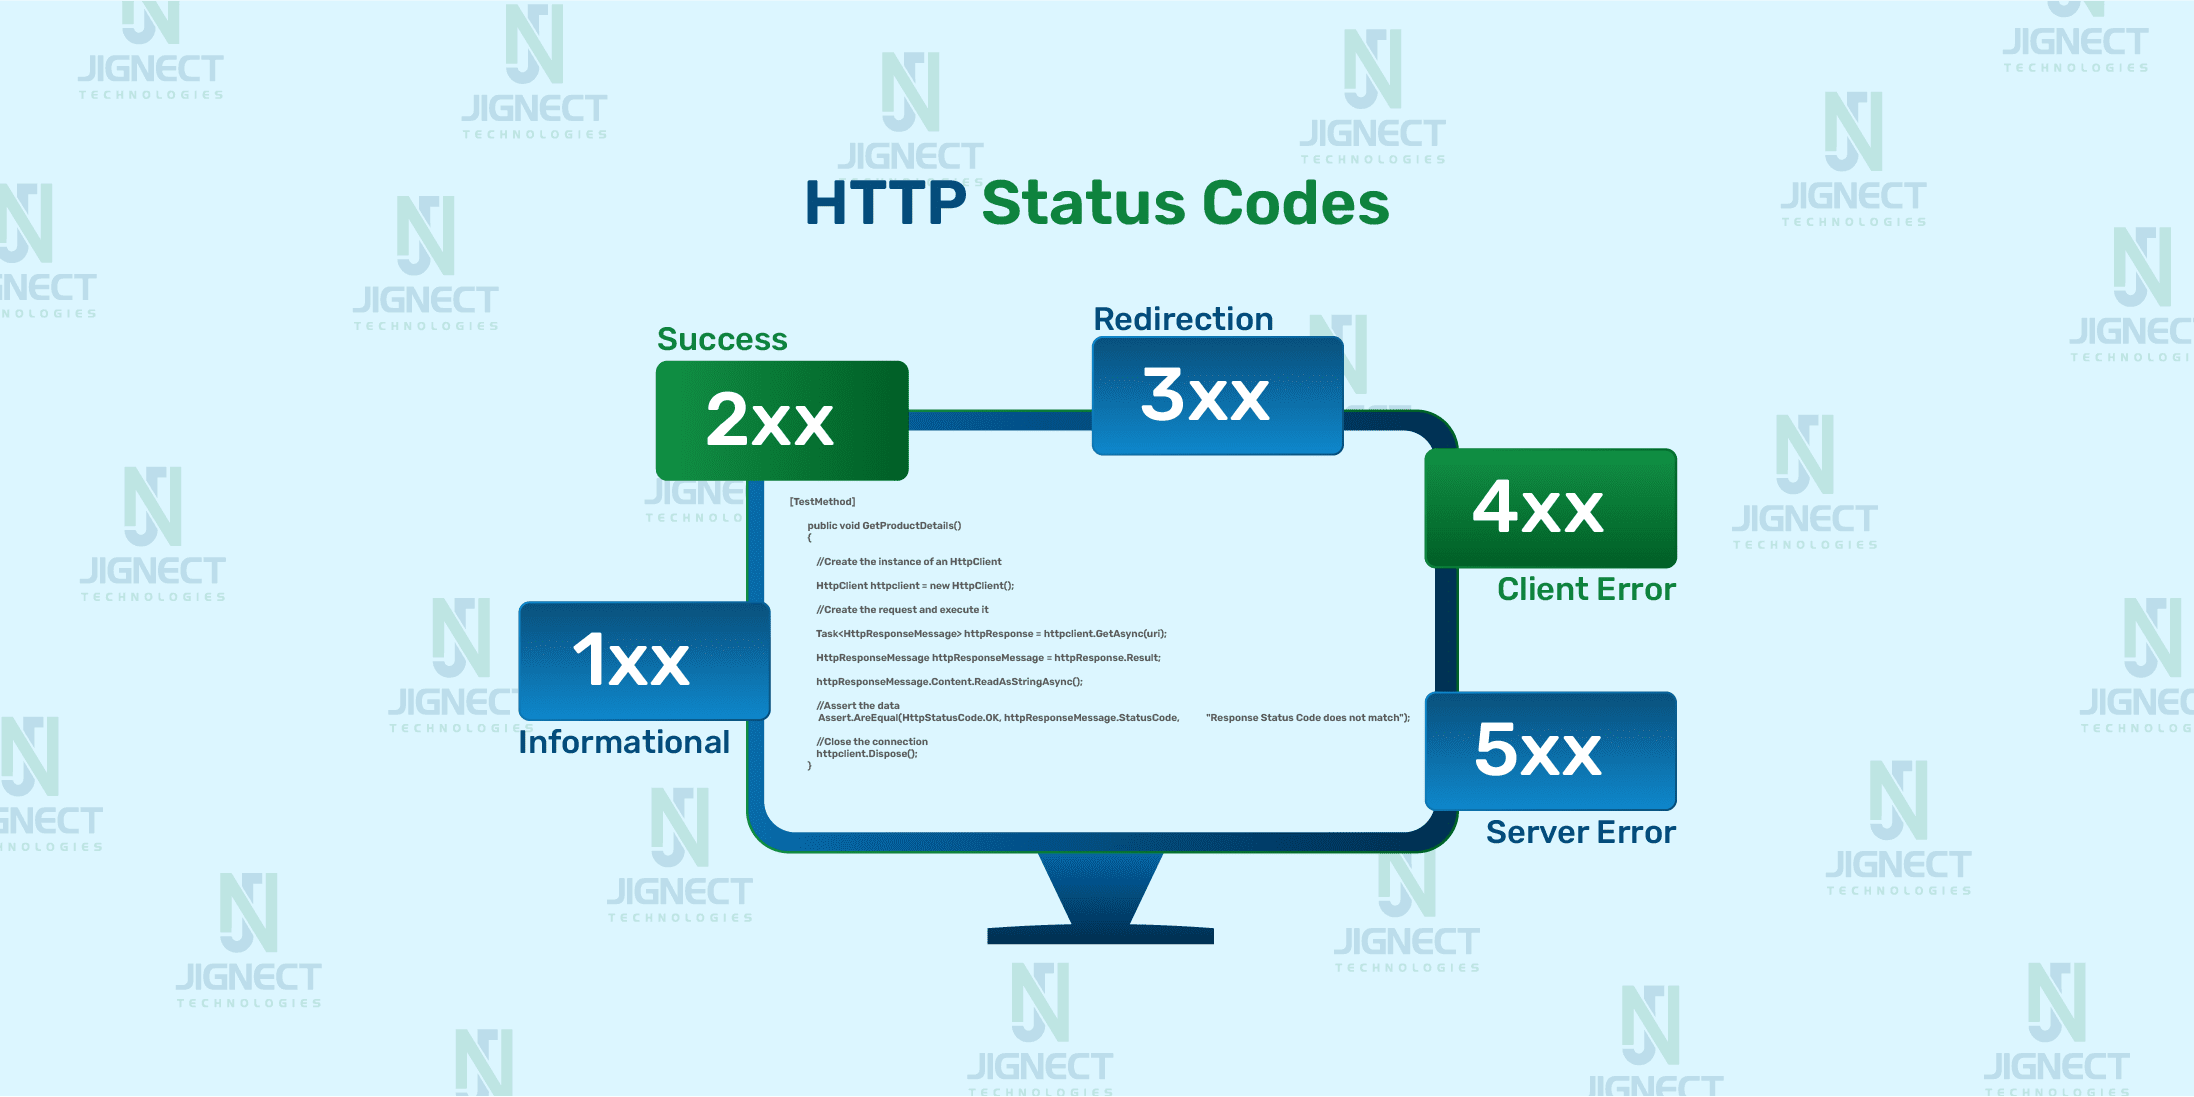
HTTP status codes are three-digit numbers that provide information about the result of a client’s request to a web server. These codes are grouped into different categories, each indicating a specific type of response. Let’s explore the most common HTTP status code categories and their meanings:
- 200 OK: The request has succeeded. The client’s request has been fulfilled by the server, and the response contains the requested data.
- 201 Created: The request has been successfully processed, leading to the creation of a new resource.
- 204 No Content: The server has successfully fulfilled the request, but there is no content to return. This status code is often used for DELETE operations where no response body is needed.
- 400 Bad Request: The server cannot process the request due to a client error, such as malformed syntax or invalid parameters in the request.
- 401 Unauthorized: The client needs to authenticate itself to access the resource but has not provided valid credentials. This status code indicates that authentication is required.
- 403 Forbidden: The user is authenticated but lacks the necessary permissions to access the requested resource. This status code is employed to signify that access has been denied.
- 404 Not Found: The server is unable to locate the requested resource. This status code indicates that the URL provided in the request does not match any existing resources.
- 500 Internal Server Error: This status code signifies a server-side error that prevents it from fulfilling the request. It’s a generic message indicating an unexpected condition encountered on the server, unrelated to the client’s actions.
HTTP status codes are further categorized into:
- Informational responses (100–199)
- Successful responses (200–299)
- Redirects (300–399)
- Client errors (400–499)
- Server errors (500–599)
Check out our blog post on HTTP Status Code if you want to learn more about status codes.
HTTP Content
The HttpContent type serves to represent the body of an HTTP entity along with its corresponding content headers. It is utilized particularly for HTTP methods that necessitate a body, such as POST, PUT, and PATCH. In such cases, the HttpContent class is employed to specify the content of the request. While many illustrations depict the utilization of the StringContent subclass with a JSON payload, alternative subclasses are available for different content (MIME) types:
- ByteArrayContent: Offers HTTP content based on a byte array.
- FormUrlEncodedContent: Supplies HTTP content for key-value pairs encoded using the “application/x-www-form-urlencoded” MIME type.
- JsonContent: Delivers HTTP content formatted as JSON.
- MultipartContent: Manages a set of HttpContent objects serialized using the “multipart/*” MIME type specification.
- MultipartFormDataContent: Supplies a container for content encoded using the “multipart/form-data” MIME type.
- ReadOnlyMemoryContent: Provides HTTP content based on a ReadOnlyMemory<T>.
- StreamContent: Delivers HTTP content based on a stream.
- StringContent: Furnishes HTTP content based on a string.
HttpContent class is used to represent the response body of the HttpResponseMessage, which is accessible via the HttpResponseMessage.Content property.
Prerequisite Steps
In this blog, we used the following versions of the respective libraries and applications during our practical demonstrations:
- Visual Studio 2022 [Version 17.9.5]
- HTTPClient 4.3.4
Download & Install Visual Studio
- Navigate to the official website of Visual Studio.
- Select the desired edition of Visual Studio (Community, Professional, or Enterprise) and click on the corresponding “Download” button.
- Follow the prompts to download the Visual Studio installer executable file.
- Once the download is complete, run the downloaded Visual Studio installer executable file.
- Upon launching the installer, it will prompt you to select workloads and optional components to install. For C# development, choose the “.NET desktop development” workload.
- Proceed with the installation process by clicking on the “Install” button.
- Allow the installer to complete the installation process. This may take some time depending on your internet connection and selected components.
- Follow the official Visual Studio Documentation for further guidance on using VS and setting up it for Automation test case development.
Creating an HTTPClient Project in C#
- Open Visual Studio after the installation process is complete.
- Select “Create a new project” from the startup window or navigate to “File” > “New” > “Project” from the menu bar.
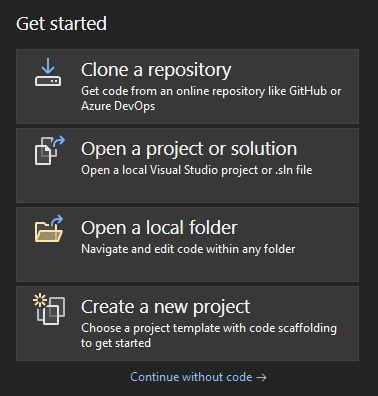
- Choose the appropriate project template based on your preferences. For a console application, opt for either “Console App (.NET Framework)” , “Console App (.NET Core)” or “MSTest (Test Framework)” and click on the “Next” button.
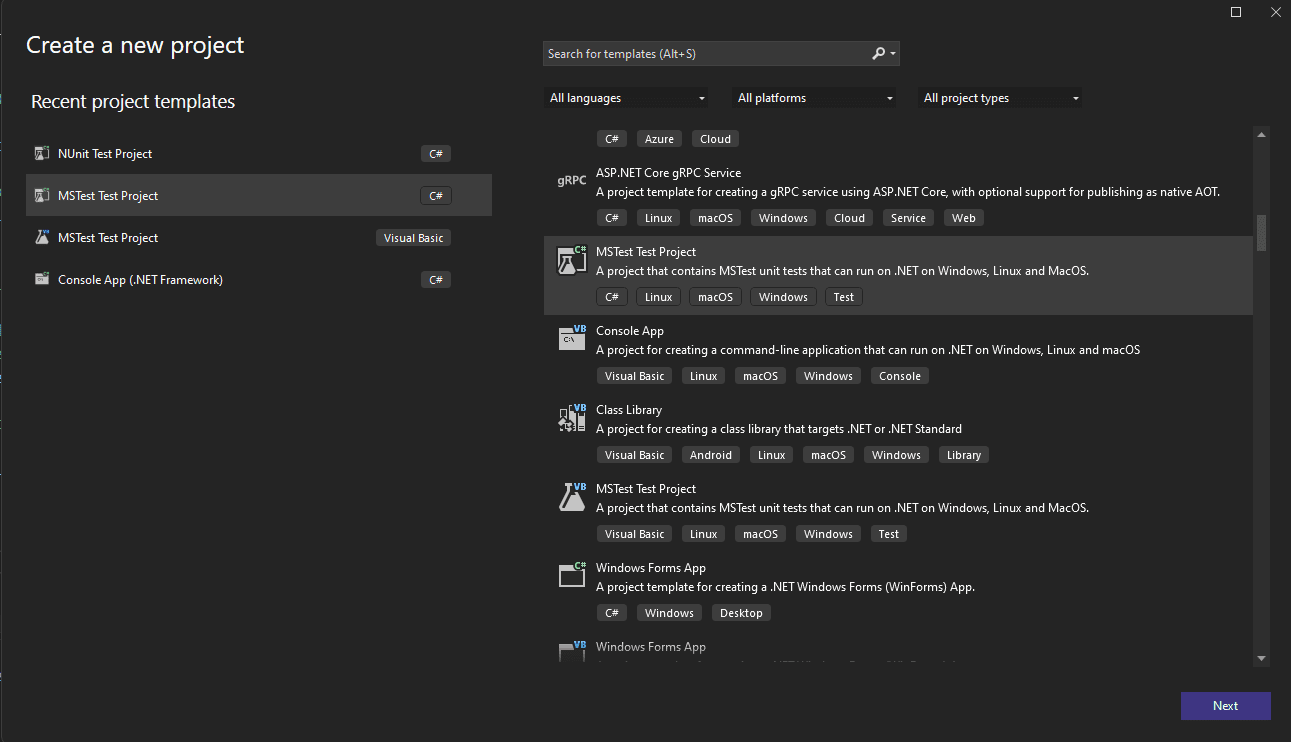
- Provide a name and location for your project, then click on the “Next” and “Create” button.

- Once the project is created, you can begin writing code to implement an HTTP client.
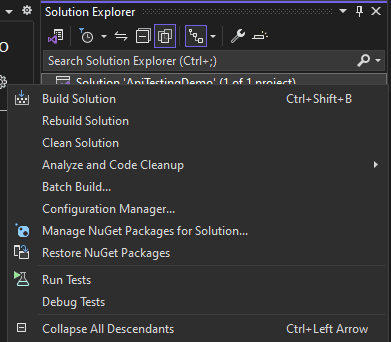
- Right-click on the solution in Visual Studio.
- From the context menu, select “Manage NuGet Packages for Solution.”
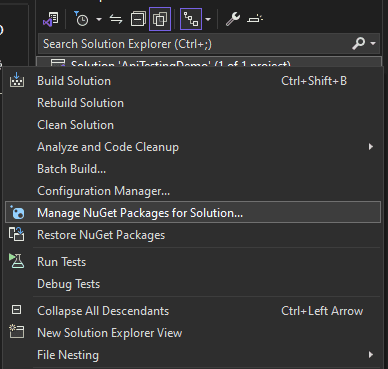
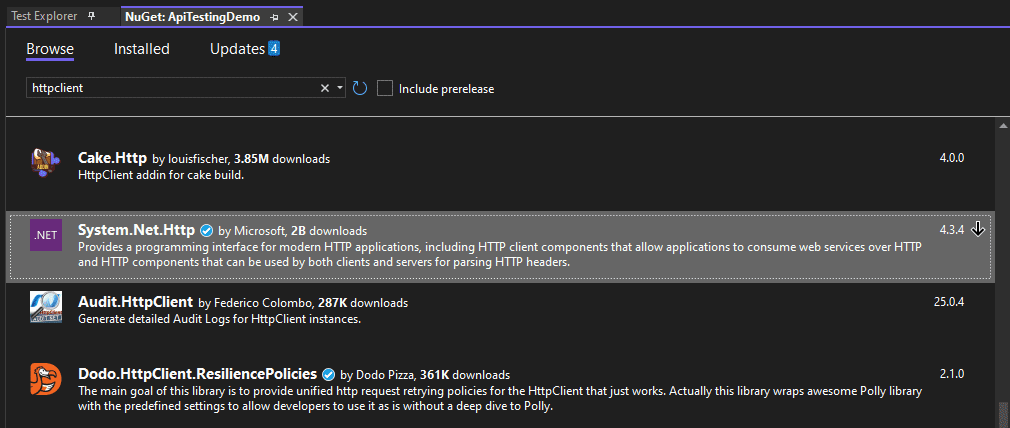
- Go to the “Browse” tab and search HttpClient.Select the option “System.Net.Http”.
- Select the Project and Click on “Install”.
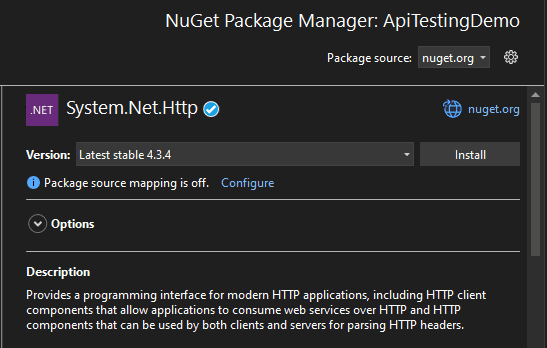
- After completing the installation ‘Clean & Rebuild’ the project.
Test Case Creation
- Create C# class and Write the Test Script for Get, POST, PUT, and DELETE API Request.
- Generate C# Classes for GET, POST, PUT and DELETE request endpoints naming them as “GetProductDetailsTest”, “AddProductDetailsTest”, “UpdateProductDetailsTest” and “DeleteProductDetailsTest” within the Project Folder > Tests> HTTP methods directory.
- Once the C# classes are created, begin writing a basic test code for GET, POST, PUT and DELETE request endpoints and validating them as described below.
- We’ll use a demo website called fakestoreapi to practice testing APIs with HTTPClient. This hands-on approach will help us understand how APIs work by using basic HTTP requests like GET, POST, PUT and DELETE.
▶️GET Request
Here’s an example where we are performing an HTTP GET request to fetch product details from a server for a specific API endpoint (`https://fakestoreapi.com/products`).
Coding snippets:
using System.Net;

namespace ApiTestingDemo.Tests{

    [TestClass]

    public class GetAllProductDetailsTest
    {
     private string uri = "https://fakestoreapi.com/products";

        [TestMethod]

        public void GetProductDetails()
        {

            //Create the instance of an HttpClient

            HttpClient httpclient = new HttpClient();

            //Create the request and execute it

            Task<HttpResponseMessage> httpResponse = httpclient.GetAsync(uri);

            HttpResponseMessage httpResponseMessage = httpResponse.Result;

            httpResponseMessage.Content.ReadAsStringAsync();

            //Assert the data
             Assert.AreEqual(HttpStatusCode.OK, httpResponseMessage.StatusCode, "Response Status Code does not match");

            //Close the connection
            httpclient.Dispose();
        }
    }
}
Let’s break down the code:
- using System.Net: This line imports the System.Net namespace, which provides classes for networking operations, including HTTP requests and responses.
- new HttpClient(): Inside the test method, an instance of HttpClient is created. HttpClient is used to send HTTP requests and receive HTTP responses.
- httpclient.GetAsync(uri): This line sends an asynchronous GET request to the specified URI (https://fakestoreapi.com/products) using the GetAsync method of the HttpClient instance. The result is a Task representing the asynchronous operation of sending the request and awaiting the response.
- httpResponse.Result: Here, the response of the HTTP request is obtained by accessing the Result property of the Task<HttpResponseMessage> returned by GetAsync. This blocks the execution until the request is completed and the response is available.
- httpResponseMessage.Content.ReadAsStringAsync(): This line attempts to asynchronously read the content of the HTTP response body as a string. However, the result of this operation is not captured or utilized in the provided code.
- httpclient.Dispose(): The Dispose method is called on the HttpClient instance to release the associated resources and close the underlying connection.
▶️POST Request
Here’s an example of performing an HTTP POST request to add product details to the server, handle the response, and handle potential errors that may occur during the operation.
Coding snippets:
using Newtonsoft.Json;
using System.Text;

namespace ApiTestingDemo.Tests
{
    [TestClass]
    public class AddProductDetailsTest
    {
        [TestMethod]
        public async Task AddProductDetails()
        {
            using (HttpClient httpClient = new HttpClient())
            {
                var uri = "https://fakestoreapi.com/products";
                var productDetails = new
                {
                    title = "Test Product",
                    price = 100,
                    description = "This is the test description",
                    image = "https://i.pravatar.cc",
                    category = "electronic"
                };
                var productDetailsJson = JsonConvert.SerializeObject(productDetails);
                var payload = new StringContent(productDetailsJson, Encoding.UTF8, "application/json");

                try
                {
                    HttpResponseMessage response = await httpClient.PostAsync(uri, payload);
                    response.EnsureSuccessStatusCode();

                    string responseBody = await response.Content.ReadAsStringAsync();
                    var product = JsonConvert.DeserializeObject<Product>(responseBody);

                    Assert.AreEqual(System.Net.HttpStatusCode.OK, response.StatusCode);
                    Assert.IsNotNull(product,"Product details are null");
                    Assert.IsNotNull(product.id,"product id is null");
                    Assert.AreEqual("test product", product.title,"Product title isn't matched");
                    Assert.AreEqual(100, product.price, "Product price isn't matched");
                    Assert.AreEqual("lorem ipsum set", product.description, "Product description isn't matched");
                    Assert.AreEqual("https://i.pravatar.cc", product.image, "Product image isn't matched");
                    Assert.AreEqual("electronic", product.category, "Product category isn't matched");
                }
                catch (HttpRequestException ex)
                {
                    Assert.Fail($"HTTP request failed: {ex.Message}");
                }
            }
        }
    }

    public class Product
    {
        public int id { get; set; }
        public string title { get; set; }
        public double price { get; set; }
        public string description { get; set; }
        public string image { get; set; }
        public string category { get; set; }
    }
}
Let’s break down the code:
- Defining Request URI and Product Details: Here, the URI (uri) points to the API endpoint (https://fakestoreapi.com/products). productDetails is an anonymous object representing details of a product to be added.
- JsonConvert.SerializeObject(productDetails): The productDetails object is serialized into JSON format using JsonConvert.SerializeObject from Newtonsoft.Json.
- new StringContent(productDetailsJson, Encoding.UTF8, “application/json”): A StringContent object (payload) is created with the serialized JSON (productDetailsJson) and specified content type (“application/json”).
- httpClient.PostAsync(uri, payload): A POST request is sent asynchronously to the specified URI (uri) with the request payload (payload) using httpClient.PostAsync.
- response.EnsureSuccessStatusCode(): This method ensures that the HTTP response indicates success (status code 200).
- response.Content.ReadAsStringAsync(): This method reads the content of the HTTP response (response.Content) as an asynchronous operation, converting it into a string.
- JsonConvert.DeserializeObject<Product>(responseBody): This method deserializes the JSON string responseBody into an object of type Product, where Product is a class representing a product entity.
▶️PUT Request
Here’s an example of performing an HTTP PUT request to update product details on the server, handle the response, and manage potential errors that may occur during the operation.
Coding snippets:
using Newtonsoft.Json;
using System.Net;
using System.Text;

namespace ApiTestingDemo.Tests
{
    [TestClass]
    public class UpdateProdutcDetailsTest
    {
        [TestMethod]
        public void updateProductDetails()
        {
            HttpClient httpClient = new HttpClient();
            var uri = "https://fakestoreapi.com/products/1";
            var updateproductdetails = new updateProductDetails()
            {
                    title = "Test update product",
                    price = 13,
                    description= "This is for test updation",
                    image= "https://i.pravatar.cc",
                    category= "electronic"
            };
            var productdetailsJson = JsonConvert.SerializeObject(updateproductdetails);
            var payload = new StringContent(productdetailsJson, Encoding.UTF8, "application/json");
            Task<HttpResponseMessage> httpResponse = httpClient.PutAsync(uri, payload);
            HttpResponseMessage httpResponseMessage = httpResponse.Result;
            httpResponseMessage.Content.ReadAsStringAsync();

            Assert.AreEqual(HttpStatusCode.OK, httpResponseMessage.StatusCode, "Response statuscode doesn't matched");
            Assert.IsNotNull(httpResponseMessage.Content);
        }

    }
}
public class updateProductDetails
{
    public string title { get; set; }
    public string description { get; set; }
    public int price { get; set; }
    public string image { get; set; }
    public string category { get; set; }
}
Let’s break down the code:
The remaining code for the PUT request follows similar patterns to that of the POST requests. For more in-depth code details, please refer to the explanation provided for the POST requests. Here, I will specifically focus on detailing the PUT request.
- httpClient.PutAsync(uri, payload): This method asynchronously sends an HTTP PUT request to a specified URI using an instance of HttpClient. It includes an HttpContent object (payload) containing the JSON payload (serialized product details) that will be sent as the request body. This method is commonly used to update resources on a server by sending data in the request body.
▶️DELETE Request
Here’s an example of performing an HTTP DELETE request to delete product details on an API endpoint, handle the response, and manage potential errors that may occur during the operation.
Coding snippets:
using System.Net;

namespace ApiTestingDemo.Tests
{
    [TestClass]
    public class DeleteProductDetailsTest
    {
        private string uri = "https://fakestoreapi.com/products/1";

        [TestMethod]
        public void deleteProductDetails()
        {

            HttpClient httpclient = new HttpClient();

            Task<HttpResponseMessage> httpResponse = httpclient.DeleteAsync(uri);
            HttpResponseMessage httpResponseMessage = httpResponse.Result;
            httpResponseMessage.Content.ReadAsStringAsync();

            Assert.AreEqual(HttpStatusCode.OK, httpResponseMessage.StatusCode, "Response Status Code does not match");

            httpclient.Dispose();
        }
    }
}
Let’s break down the code:
The remaining code for the DELETE request follows similar patterns to that of the GET or POST requests. For more in-depth code details, please refer to the explanation provided for the GET or POST requests. Here, I will specifically focus on detailing the DELETE request.
- httpclient.DeleteAsync(uri): This method is used to request the deletion of a resource on the server identified by the given URI.
Run the Created Test Case and Check the Result
1️⃣ After composing the test script, proceed with the execution of the test and meticulously analyze the outcomes.
- To execute the test case, navigate to the test class, right-click on it, and select the “Run” option. The outcomes will be exhibited in Visual Studio’s Run tool window.
2️⃣ Test Run Results
- The results shown in Visual Studio’s Run tool window provide valuable insights into how the tests were executed.
- As seen, the test we created has passed as expected, demonstrating its intended functionality.
- By reviewing these results, we can identify which tests succeeded, failed, or were skipped.
- This analysis helps us improve our testing approaches and fine-tune our scripts for better accuracy and effectiveness.
Conclusion
In conclusion, utilizing HttpClient for API automation testing in C# offers a powerful way to interact with web services. This approach enables QAs to send requests, receive responses, and validate data seamlessly. By leveraging HttpClient’s flexibility and ease of use, testers can efficiently automate the testing of APIs, ensuring reliability and accuracy in their applications. Adopting this approach gives testers a strong set of tools to create dependable, efficient, and trustworthy automated tests for their APIs.
Keep practising and exploring to master these powerful tools further with Jignect.
Witness how our meticulous approach and cutting-edge solutions elevated quality and performance to new heights. Begin your journey into the world of software testing excellence. To know more refer to Tools & Technologies & QA Services.
If you would like to learn more about the awesome services we provide, be sure to reach out.
Happy Testing 🙂

