In today’s fast-paced automation testing environment, it is essential to generate clear, detailed test reports to improve automation testing effectiveness. Test reports assist teams in understanding the test scenarios and making decisions based on information obtained from the test reports.
Automation testing can be simplified with Selenium, one of the most popular tools.. It supports multiple programming languages, such as Java, C#, and Python, and comes with reporting features by default. Selenium also allows you to create tailored test reports using its APIs for more customised insights.
This blog will explore how test reports can enhance your automation testing workflow. We’ll dive into the importance of detailed reporting, how to use Selenium’s reporting features, and how to create custom reports. With these techniques, you can boost your test clarity and improve your overall testing efficiency.
Key objectives of effective reporting
When working on test automation projects, especially with Selenium and Java, reporting is essential. After all, test reports are where we go to see test results, verify functionality, and understand the health of our application. Without effective reports, it’s challenging to assess the success of automated tests or even identify problem areas in our application.
Good test reports in automation help teams:
- Quickly identify issues in software under test.
- Track testing trends over time.
- Share results easily with other team members or stakeholders.
- Improve test quality and coverage through clear insights.
Ultimately, reporting transforms raw test data into meaningful, actionable insights that help the entire team make informed decisions about product quality.
Qualities of a Good Report
Not all reports are equally useful, though. Here are a few qualities that make a report effective:
- Clarity: The report should present data in an understandable way, showing which tests passed, failed, or were skipped.
- Detail: It should provide insights into individual test cases, including the test status, logs, and screenshots if available.
- Conciseness: Reports should be detailed but not overwhelming. Summary sections help users quickly understand the results.
- Customisable: Different audiences might need different information, so reports that can be tailored are valuable.
- Interactivity: Interactive features (like collapsible sections or visual charts) can make reports more accessible and engaging.
With these qualities in mind, let’s look at specific reporting options in Selenium with Java.
Using TestNG to Generate Reports
TestNG is a popular testing framework for Java that’s also commonly used in Selenium automation. One of its core features is built-in reporting, which helps developers and testers understand test results right from the IDE or via HTML reports.
Getting Started:
- Add TestNG to your project’s dependencies.
- Run your tests with the testng.xml file, it will automatically generate a basic HTML report.
After completing the run it will generate the test-output folder and HTML report as index.html. The folder hierarchy will be as follows.
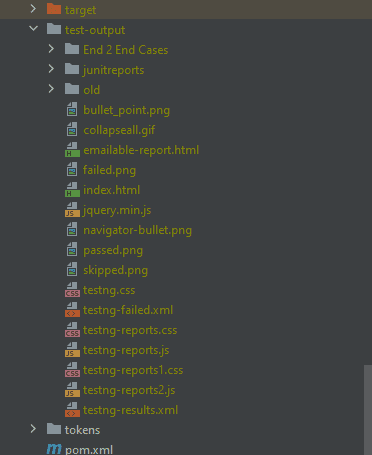
While TestNG’s default reports are simple, they do provide an essential overview, including the number of tests that passed, failed, and skipped.
By default, there are two types of reports
- Detailed Selenium Report with TestNG
- Summary Report with TestNG
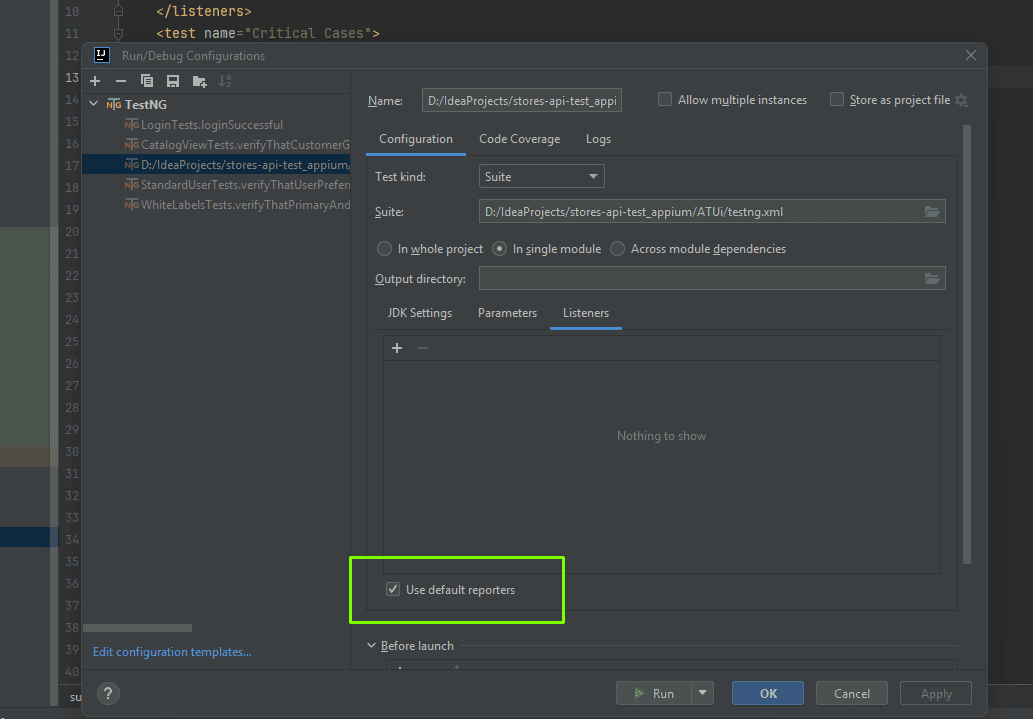
If the report is not generated by default then apply the following settings in Intellij
Click on the Run > Edit Configurations and make sure that the “Use default Reports” checkbox is checked
Detailed Selenium Report in TestNG
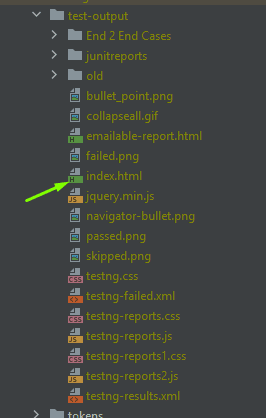
Run your tests with testng.xml file, it will automatically generate a basic HTML report.
After completing the run it will generate the test-output folder and generate HTML report as index.html.The folder hierarchy will be as below.
To get more from TestNG, you can customise its default reports. By implementing TestNG’s ITestListener interface, you can add custom events to your report, like:
- Test steps with custom log messages.
- Screenshots for failed test cases.
- Detailed test status, which can be filtered for better readability.
This approach gives you more control over the data shown in your reports and lets you enhance TestNG’s output with custom information.
The Detailed report will displayed as below:

Summary Report in TestNG
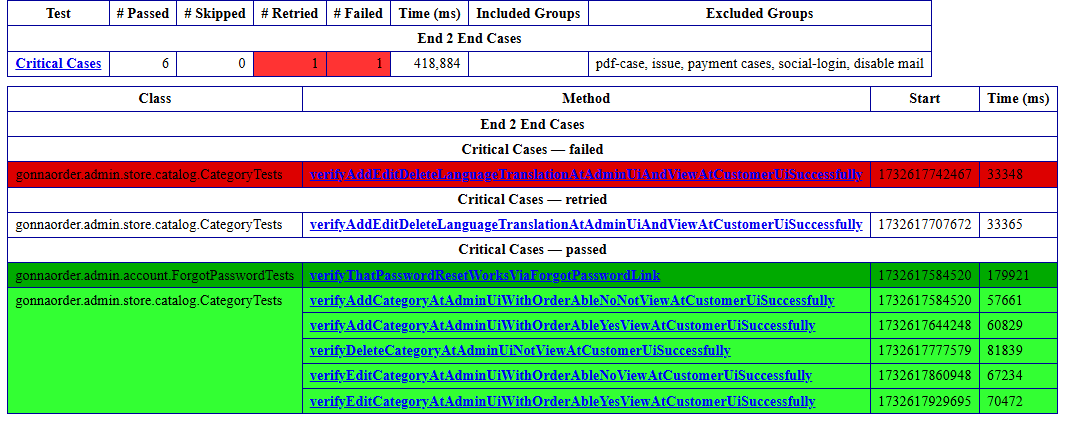
A summary report offers a high-level view of all tests, displaying just enough detail to understand the test status. You can generate a summary report by customising TestNG’s report XML to include only the essentials:
- Total tests run
- Passed tests
- Failed tests
- Skipped tests
Summary reports are ideal for sharing with non-technical stakeholders who only need an overview of testing progress. The report is stored as emailable-report.html.
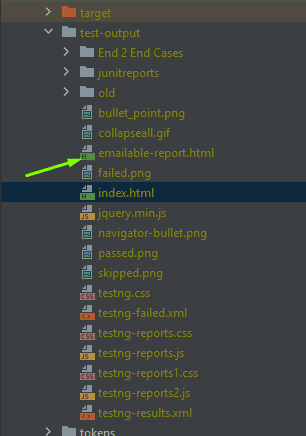
The summary report will be displayed as below:
Using Extent Report
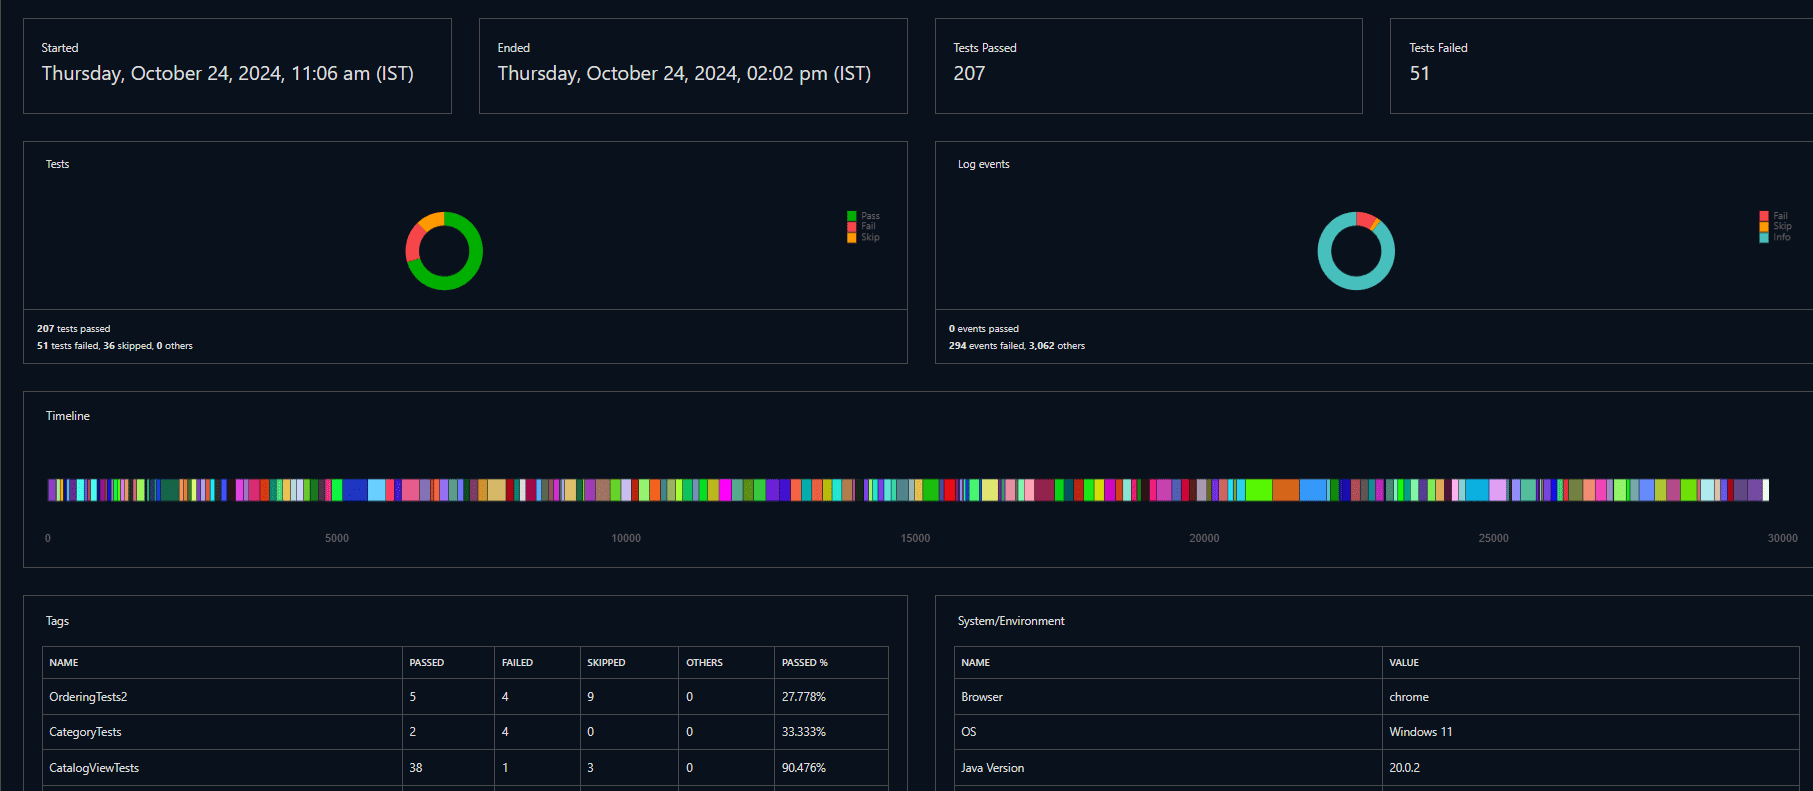
Extent Reports is a powerful and widely used reporting library in the Selenium community. With features like dashboards, charts, and enhanced visual styling, Extent Reports make it easy to generate polished, professional reports.
Why Use Extent Reports?
- Custom dashboards with metrics and trend graphs.
- Interactive elements: Collapsible sections, screenshots, and logs.
- Highly customizable for different themes and layouts.
Basic Setup:
- Add Extent Reports as a Maven or Gradle dependency.
- Configure the reporter with your project to generate reports in your desired format (e.g., HTML).
We have to implement the ITestListener interface to implement the extent report.
We have to override the methods of the ITestListener according to the requirements
Here is an example of how we can add an extent report with TestNG.
public class ExtentReport implements ITestListener {


 public static ExtentSparkReporter sparkReporter;
 public static ExtentReports extent;
 public static ExtentTest extentTest;
 static ThreadLocal<ExtentTest> test = new ThreadLocal<>();


 public void initializeReports() {
   sparkReporter =
       new ExtentSparkReporter(System.getProperty("user.dir") + "/Reports/extentReports.html");
   sparkReporter.config().setDocumentTitle("Automation Report");
   sparkReporter.config().setReportName("Gonna Order Test Execution Report For " + Constants.Env);
   sparkReporter.config().setTheme(Theme.DARK);
   sparkReporter.config().setTimeStampFormat("EEEE, MMMM dd, yyyy, hh:mm a '('zzz')'");
   sparkReporter.config().setProtocol(Protocol.HTTPS);
   extent = new ExtentReports();
   extent.attachReporter(sparkReporter);


   extent.setSystemInfo("Browser", Constants.Browser);
   extent.setSystemInfo("OS", System.getProperty("os.name"));
   extent.setSystemInfo("Java Version", System.getProperty("java.version"));
   extent.setSystemInfo("User", System.getProperty("user.name"));
   extent.setSystemInfo("Environment", Constants.Env);
 }


 //  Using this function Reporter.log test will be displayed in extent report
 public void accessReporterTest(ExtentTest extentTest, ITestResult result) {
   String[] logs = Reporter.getOutput(result).toArray(new String[0]);
   for (String log : logs) {
     extentTest.info(log);
   }
 }


 public void onTestStart(ITestResult result) {


   // Get the class name
   String className = result.getTestClass().getRealClass().getSimpleName();
   ExtentTest extentTest = extent.createTest(result.getMethod().getMethodName());
   extentTest.assignCategory(className); // Assign class as a category
   test.set(extentTest); // Initialize ThreadLocal test
 }


 public void onTestSuccess(ITestResult result) {
   ExtentTest extentTest = test.get();
   accessReporterTest(extentTest, result);
 }


 @SneakyThrows
 public void onTestFailure(ITestResult result) {


   if (result.getStatus() == ITestResult.FAILURE) {


     ExtentTest extentTest = test.get();
     accessReporterTest(extentTest, result);
     StringWriter stringWriter = new StringWriter();
     PrintWriter printWriter = new PrintWriter(stringWriter);
     result.getThrowable().printStackTrace(printWriter);
     JavaHelpers javaHelpers = new JavaHelpers();
     String stackTrace =
         "<pre>" + stringWriter.toString().replace(System.lineSeparator(), "<br>") + "</pre>";
     extentTest.log(
         Status.FAIL, "<pre>" + "<b>Name of Failed Case: </b>" + result.getName() + "</pre>");
     extentTest.log(Status.FAIL, "<b>Cause By error is : <b>" + stackTrace);
     extentTest.log(
         Status.INFO, "<pre>" + "<b>Case Info Status: <b>" + result.getStatus() + "</pre>");
     String screenshotsPath =
         File.separator + "screenshots" + File.separator+ result.getName()  +javaHelpers.getTimeStamp("_yyyyMMdd_HHmmss")  + ".png";
     extentTest.log(Status.FAIL, "test case failed").addScreenCaptureFromPath(screenshotsPath);
   }
 }


 public void onTestSkipped(ITestResult result) {


   ExtentTest extentTest = test.get();
   extentTest.log(Status.SKIP, "Test case skipped: " + result.getMethod().getMethodName());
   if (result.getThrowable() != null) {
     extentTest.log(Status.SKIP, "Reason for skip: " + result.getThrowable().getMessage());
   }
 }


 public void onFinish(ITestContext context) {
   extent.flush();
 }
}
We can call the method initializeReports() in the base test before executing the suit.
@BeforeSuite
public void cleanUpData() throws IOException, ParseException {
 extentReportListener.initializeReports();
}
When we run the testng.xml file, the extent report will be generated according to the provided path in the initializeReports() method.

Using Allure Report
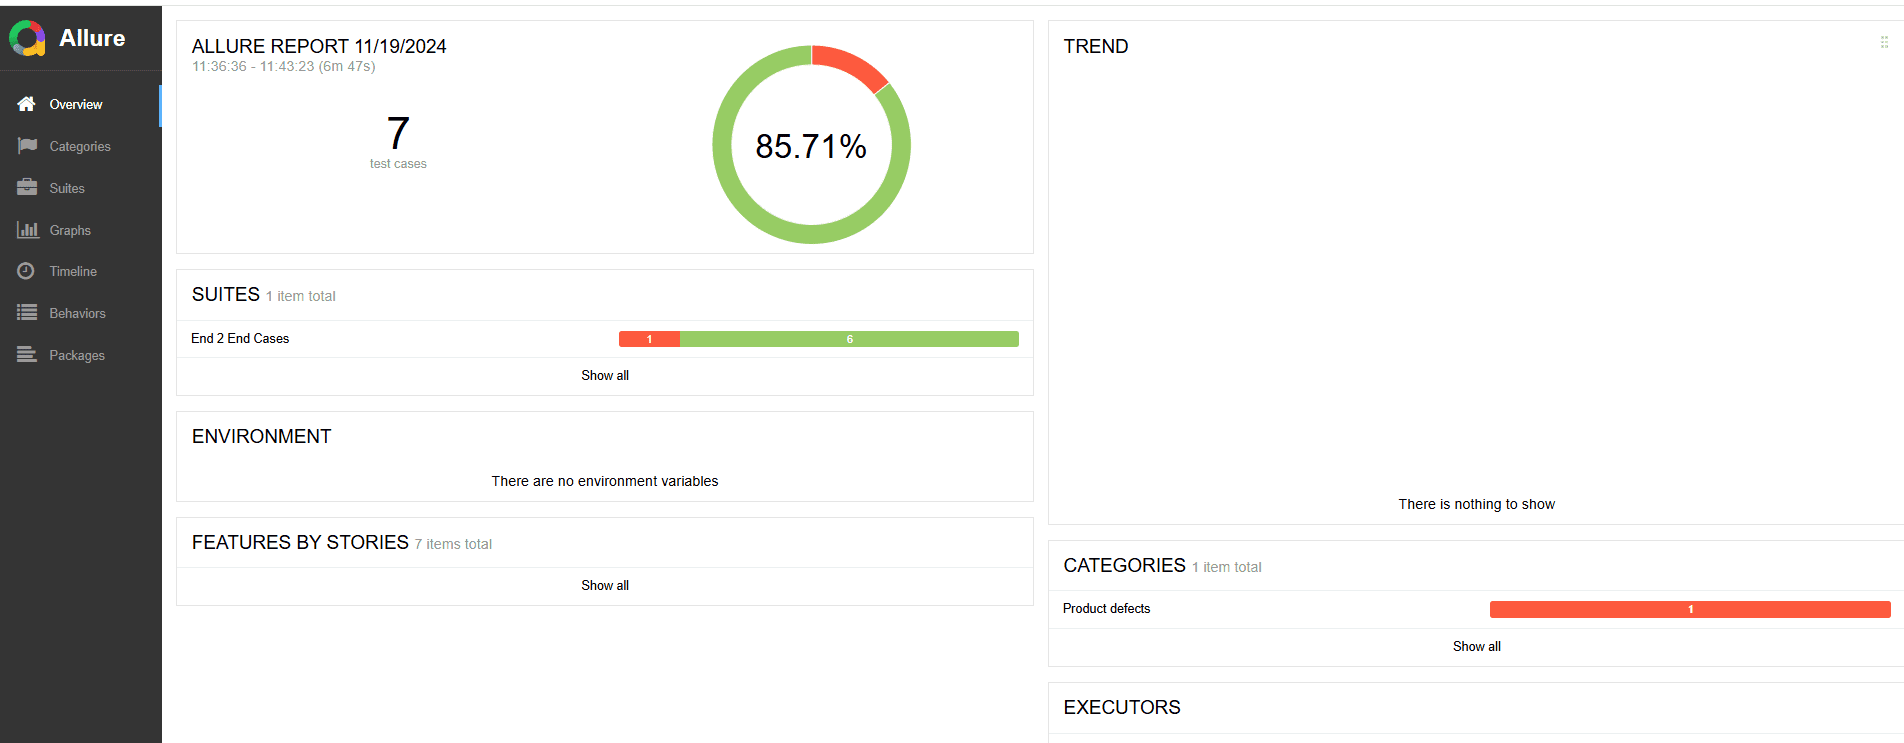
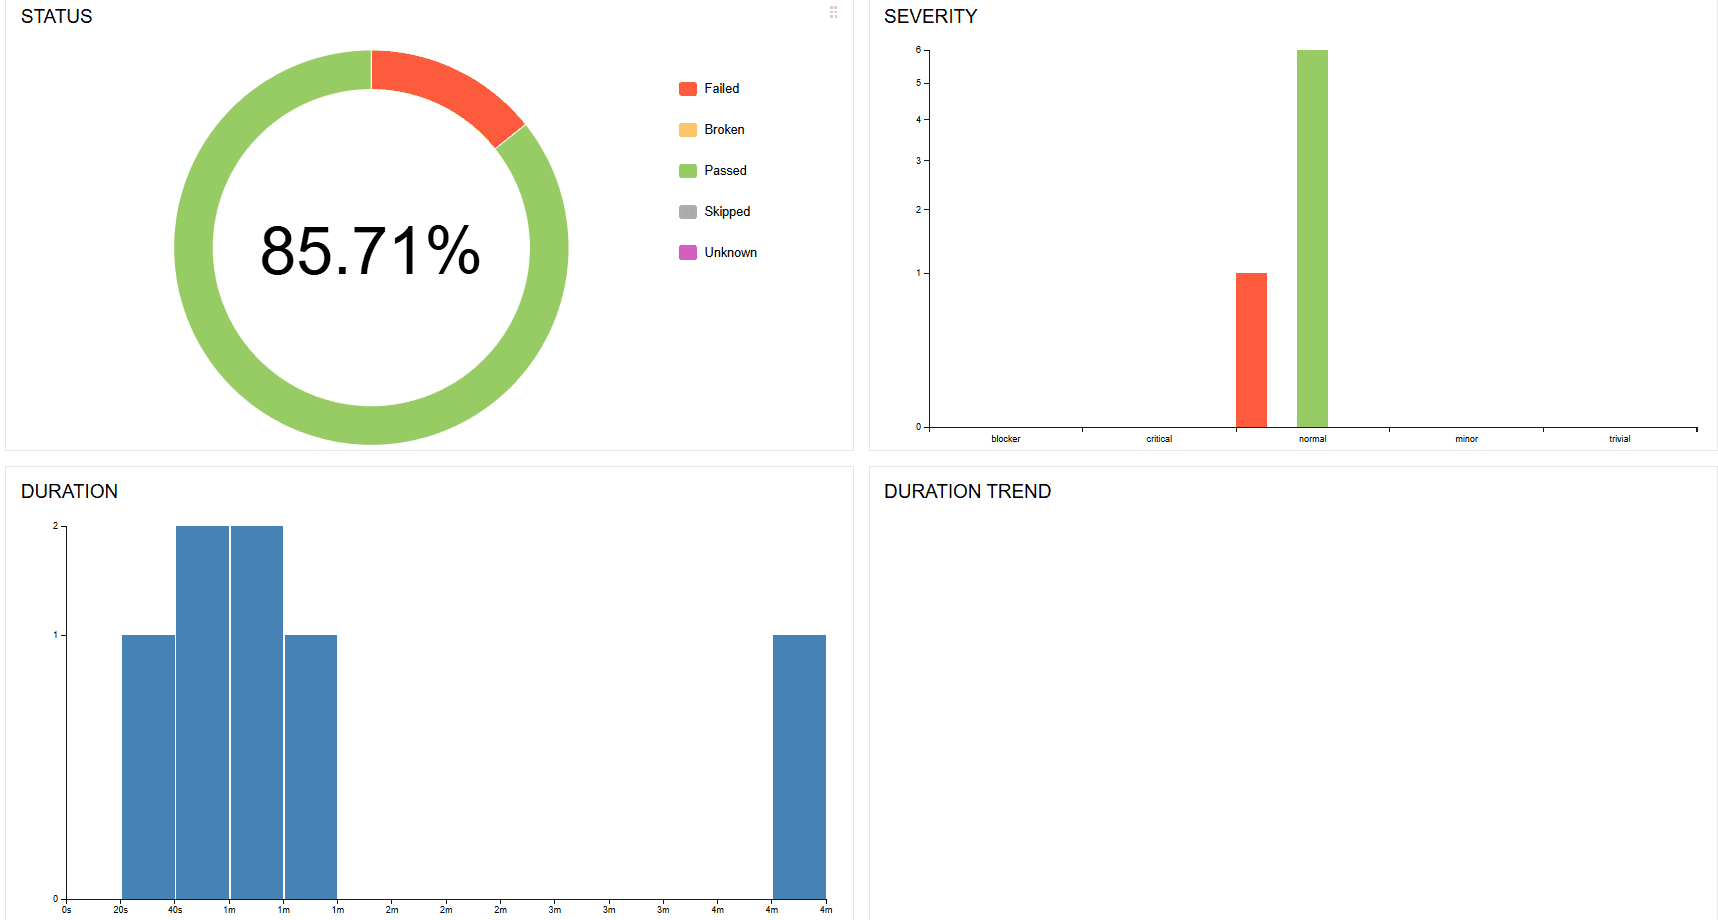
Allure Reports is another popular choice for generating advanced reports in Java-based automation projects. Allure stands out for its user-friendly interface and real-time report generation, making it easy to visualize test data as tests run.
Key Features:
- Real-time updates during test execution.
- Rich customization options for report themes and layouts.
- User-friendly UI with features like tagging, categorization, and filtering.
Integration Steps:
- Add Allure dependencies to your project.
<dependency>
   <groupId>io.qameta.allure</groupId>
   <artifactId>allure-testng</artifactId>
   <version>2.29.0</version>
</dependency>
2. Add a plugin for the Allure report
<plugin>
   <groupId>io.qameta.allure</groupId>
   <artifactId>allure-maven</artifactId>
   <version>2.14.0</version>
   <executions>
      <execution>
         <goals>
            <goal>report</goal>
         </goals>
      </execution>
   </executions>
</plugin>
3. Add Listener to the testng.xml file
<listeners>
       <listener class-name="io.qameta.allure.testng.AllureTestNg"/>
        </listeners>
Run tests with Allure commands, or configure your CI/CD pipeline to automatically generate Allure reports.
Steps to generate Allure report
1. Install Allure via the command line
- For Windows
1. Open the CMD and run the following command to install Scoop
– “ Set-ExecutionPolicy RemoteSigned -scope CurrentUser iwr -useb get.scoop.sh | iex “
2. Install Allue
“ scoop install allure “
- For Mac
1. brew install allure
- After installation, check that Allure is accessible by running:
allure –version - If you see Allure version it is installed properly
2. Run testng.xml file for your project
The folder allure-result will be created.
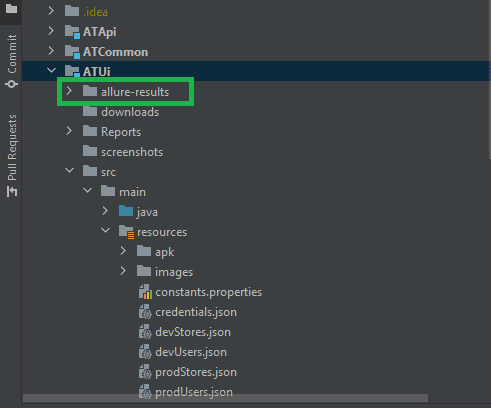
3. Run the following command it will generate the allure-report folder
“ allure generate allure-results –clean -o allure-report “
4. Run Open the index.html file from the folder allure- report.
Conclusion
Reports in Selenium test automation play a vital role in enhancing a team’s understanding of application quality. While TestNG provides basic reporting features, more advanced tools like Extent Reports and Allure offer visually rich and interactive elements that make reports easier to interpret. Each tool has distinct advantages. TestNG is well-suited for generating simple, straightforward test reports
Extent Reports shines with its polished, interactive design, offering superior visual clarity. Allure Reports, on the other hand, provides real-time updates and a seamless user experience, making it particularly valuable for teams requiring immediate feedback.
By selecting and tailoring the right reporting tool for your project, you can generate actionable test reports that drive informed decision-making and contribute to delivering high-quality software.
Witness how our meticulous approach and cutting-edge solutions elevated quality and performance to new heights. Begin your journey into the world of software testing excellence. To know more refer to Tools & Technologies & QA Services.
If you would like to learn more about the awesome services we provide, be sure to reach out.
Happy Testing 🙂


