In today’s digital age, the performance and reliability of web applications are more crucial than ever. With users expecting fast, seamless experiences, ensuring your application work flawless across all browsers and devices is a must. That’s where Cypress comes in. It’s not just a tool; it’s a complete solution designed to make testing less of a chore and more a part of the development process.
In this blog, We’ll explore the core features of Cypress and how to use this powerful tool to write tests and ensure your web UI runs flawlessly. Whether you’re a developer looking to write efficient tests or a QA engineer seeking a reliable testing framework, this blog has valuable insights for you.
Table of Contents
- Introduction to Cypress
- Why Cypress?
- Prerequisite Steps for Setting up Cypress Environment
- Download & Installations
- Download & Installation Node.js
- Download Visual Studio Code
- Install Cypress
- Launch Cypress
- Explanation of Cypress Folder Structure
- Download & Installations
- Test Case Creation
- Run the Created Test Case and Check the Result
- Assertions
- Plugins
- Cypress Best Practices
- Conclusion
Introduction to Cypress
Cypress is a cutting-edge solution for web application testing needs, offering a comprehensive suite of features like automation, debugging, and real-time feedback.
This tool stands out for its ability to execute tests directly in the browser, offering a streamlined testing workflow for both developers and QA engineers.
Built on Node.js and using JavaScript, Cypress simplifies the testing process with easy-to-understand commands and smooth integration.
With Cypress, writing, configuring, running, and debugging tests becomes effortless, making it the preferred choice for efficient and effective web application testing.
Why Cypress?
End-to-end (E2E) testing plays a vital role in achieving the goal of ensuring the quality and functionality of your web application, and Cypress has emerged as a popular choice for developers and testers alike. But what makes Cypress stand out from the crowd? Let’s dig into the compelling reasons why Cypress deserves a spot on your testing framework shortlist:
Main Features of Cypress
Time Travel: Cypress captures snapshots during tests, allowing you to review what happened at each step by hovering over commands in the Command Log.
Debuggability: Cypress makes it easy to debug failing tests by incorporating familiar tools like Developer Tools. You’ll find clear error messages and paths that help you quickly pinpoint and fix issues.
Automatic Waiting: Cypress intelligently waits for commands and assertions to finish before proceeding. This eliminates the need for you to insert manually waits or sleeps in your tests, saving you time and effort.
Spies, Stubs, and Clocks: Cypress lets you change how functions work, what servers say, and how timers run. This is handy for testing small parts of your code with features like spying on functions, changing responses with stubs, and controlling time with clocks. It’s especially useful for API and unit testing.
Network Traffic Control: Cypress enables easy management, stubbing, and testing of network traffic without relying on your server, giving you full control over network calls.
Consistent Results: Cypress utilizes its own testing framework instead of relying on Selenium or WebDriver. This approach ensures fast, reliable, and flake-free tests.
Screenshots, Videos, and Test Replay: Cypress automatically captures screenshots on failure and records videos of your test suite. Test replay facilitates easy debugging with zero-configuration setup.
Cross-Browser Testing: Cypress allows you to run tests locally or in a Continuous Integration pipeline on various browsers like Firefox and Chrome-family browsers.
Smart Management: Cypress makes it simple to run many tests at once(parallelization), focus on fixing the ones that didn’t work, and stop tests if something goes wrong to get quick results.
Prerequisite Steps for Setting up Cypress Environment
In this blog, during the practical demonstration, we utilized the following versions for the respective libraries and applications:
- Visual Studio Code version: 1.88.1
- Node JS version: v20.12.2
- Cypress version: 13.7.2
Download & Installations
1️⃣ Download Node.js and install Node.js in your system
2️⃣ Download Visual Studio Code and install VS code in your system
3️⃣ Install Cypress
Launch Visual Studio Code and open the integrated terminal to install Cypress using the following commands:
- Type ‘npm init’and follow the prompts as asked or just press Enter to continue. It will create a package.json file.

- Then type ‘npm install cypress –save-dev’ and press Enter.

4️⃣ Launch Cypress:
Launch Cypress by executing the command:
- npx cypress open

This will open Cypress in headed mode. Select ‘E2E Testing’ and then click on “Continue” on the Configuration files screen and Congratulations! Your Cypress project is now prepared to begin your first test.
Explanation of Cypress Folder Structure
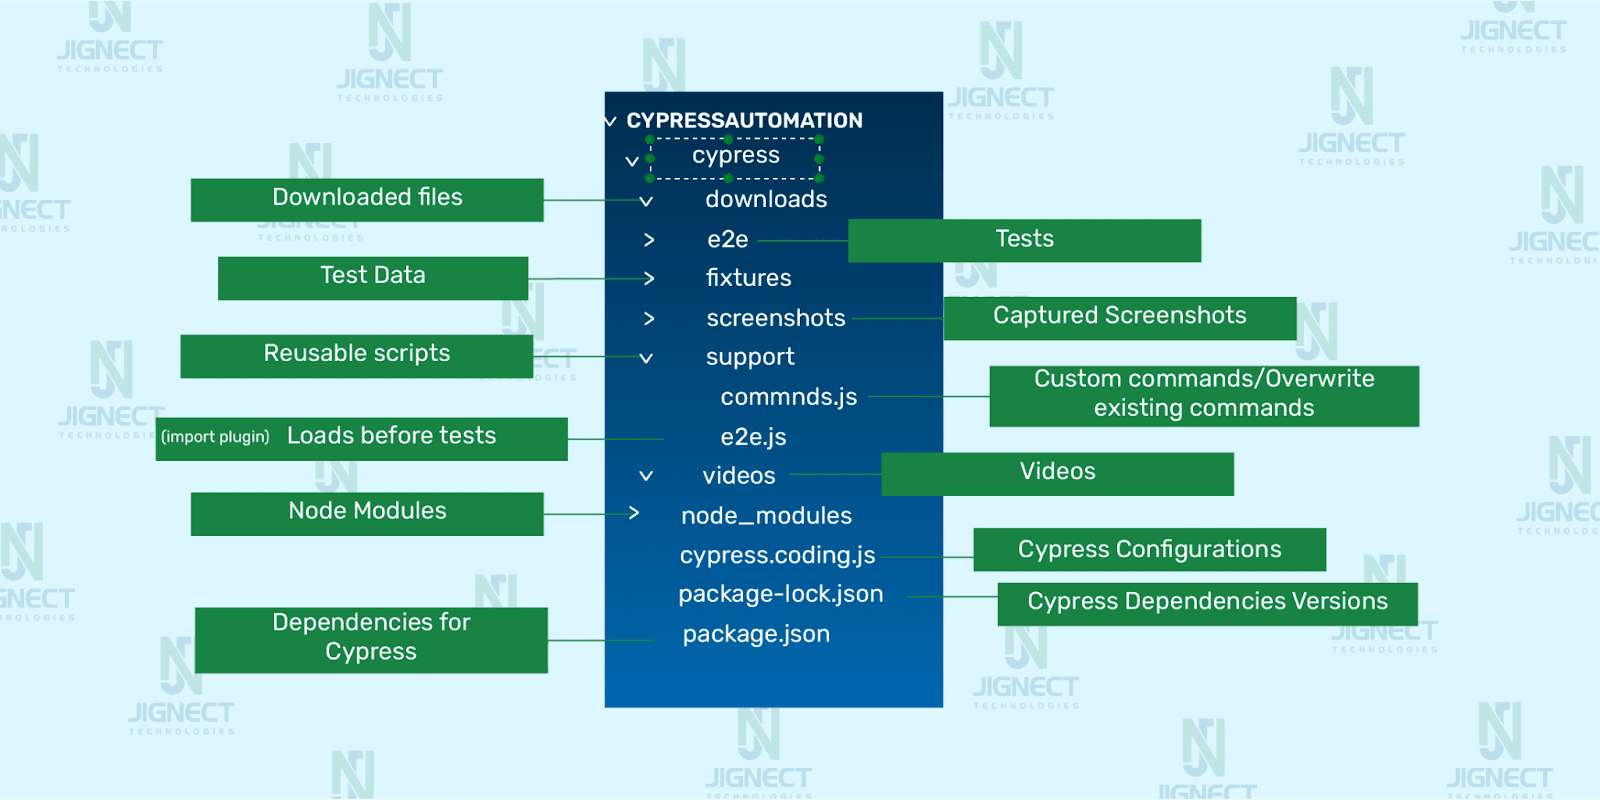
▶️ Cypress: This serves as the primary directory for your Cypress tests
- e2e: e2e, also called the Integration folder, is where you keep all your tests (Spec files). You can add different types of tests here like Basic, End to End, Visual, or Cucumber tests.
Spec files can be written in JavaScript (.js) or TypeScript (.ts), with additional support for formats like .jsx, .tsx, CoffeeScript (.coffee), and CoffeeScript with JSX (.cjsx). - Fixtures: The fixtures folder in Cypress is a directory where you can store various files that contain test data to be used in your Cypress tests. This data is typically in JSON format, but Cypress can handle other formats as well. By defining fixture files within the fixtures folder, you can access and utilize this test data in your test scripts using the cy.fixture() command
- Assets Folders: In Cypress, there isn’t a single “Assets Folder.” Instead, Cypress utilizes several folders to store various assets generated during test execution. These folders are not directly created by you, but rather by Cypress itself based on your configuration.
- cypress/downloads: This folder stores any files downloaded during your tests.
- cypress/screenshots: This folder stores screenshots captured using cy.screenshot() or automatically upon test failures.
- cypress/videos: This folder stores video recordings of test execution.
- Support: The support folder in Cypress is a powerful tool for organizing and reusing code across your tests. This folder contains 2 files:
- command.js: This file is used to add custom commands or override existing ones. This file is automatically loaded before any test files are executed, which ensures that any globally defined helper functions or utilities are available to all your test cases.
- e2e.js/component.js: This is a file that is executed before every single spec file. It is an ideal location for placing global configurations and behaviors that modify Cypress, like ‘before’ or ‘before Each’. The e2e.js file is used in e2e testing. In component testing, the equivalent file is called component.js.
▶️ node_modules: The node_modules folder is the backbone of your Cypress project. The node packages are installed in the “node_modules” directory and are accessible from all test files. So in short, this is the folder where NPM installs all the project dependencies.
▶️ cypress.config.js: It is a configuration file where you can define various settings and options for your Cypress test suite. These configurations can include settings such as the base URL, viewport size, environment variables, file paths for fixtures and plugins, and more.
▶️ package.json: This file specifies information about the Cypress project, such as its name, version, description, entry points, scripts, and dependencies. Additionally, you can define custom scripts in this file to run Cypress commands.
▶️ package-lock.json: The package-lock.json file locks the versions of all dependencies (and their sub-dependencies) used in the project. This means that it specifies the exact version of each dependency that was installed when you last installed them using npm.
Test Case Creation
- After installing and configuring Cypress, navigate to the e2e folder within your project and create a new subfolder named Cypress_tests.
- Inside the Cypress_tests folder, create a new JavaScript file named ‘first_cypress_test.cy.js’
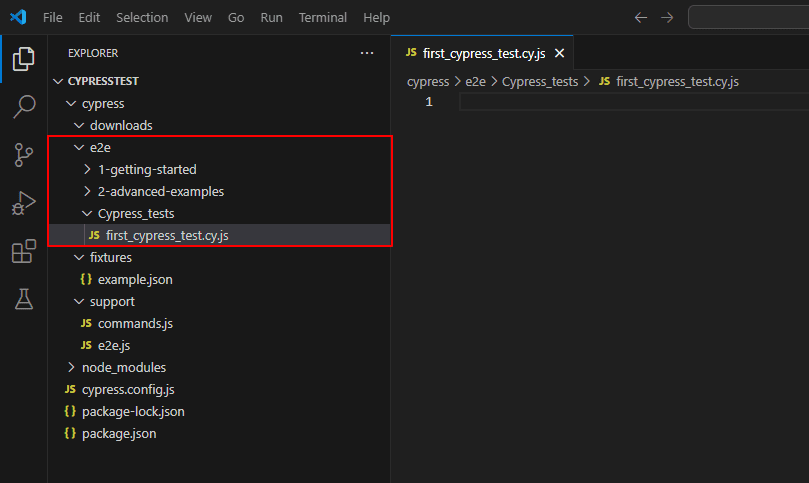
- Here’s an example of a Cypress test scenario where the code verifies that the contact-us page of the JigNect website loads successfully.
//first_cypress_test.cy.js

describe("JigNect Website Tests", () => {
  it("Visit to the JigNect Website and Navigate to Contact Us Page.", () => {

    // Visit the Website
    cy.visit("https://jignect.tech/");

    // Click the Contact Us Button
    cy.get("a[class*='button'][href*='contact-us']").click();

    // Verify the content of Contact-Us Page
    cy.get("div[class='contact-title'] h2").then(($el) => {
      expect($el.text()).to.contains("Let's talk");
    });
  });
});
- Let’s Breaking down the code:
- describe(): In Cypress, the describe() function is used to group together related test cases or specs. In this code, ‘JigNect Website Tests’ is the name of the group.
- it(): This function is used to define individual test cases within a describe() block. Each it() block typically represents one specific scenario or action being tested. In this code, “Visit to the JigNect Website and Navigate to Contact Us Page” is the name of the test case.
- cy.visit(): This is a command provided by Cypress for visiting a webpage. It instructs the Cypress browser to navigate to the specified URL, in this case, “https://jignect.tech/“.
- cy.get(): This command is used to select and interact with elements on the webpage. It’s similar to how you would use jQuery or JavaScript to select elements by their CSS selector, ID, class, etc. In this code, it’s used to find the Contact Us button and the Contact Us form title.
- .click(): This makes Cypress click on an element it is located using cy.get(). Here, it clicks on the ‘Contact Us’ button.
- .then(): In Cypress, .then() is used to handle the result of a previous command and perform additional actions or assertions on it. In this code, it’s used after cy.get() to perform an assertion on the text content of the selected element.
- expect(): In Cypress, the expect() function is used to make assertions about the state of the application under test. In this code, it’s used to assert that the text content of the selected element contains the expected text, “Let’s talk”.
Run the Created Test Case and Check the Result
▶️ Execute the Cypress Test
To execute the Cypress test, you have two options:
- Headed Mode: Running the Cypress test runner in a visible browser window where you can see the tests executing in real-time.
- Headless Mode: Running tests without a visible browser UI, executing them in the background via a command-line interface for faster test execution.
For executing in headed mode, follow these steps:
Run this command in your VS Code terminal: npx cypress open

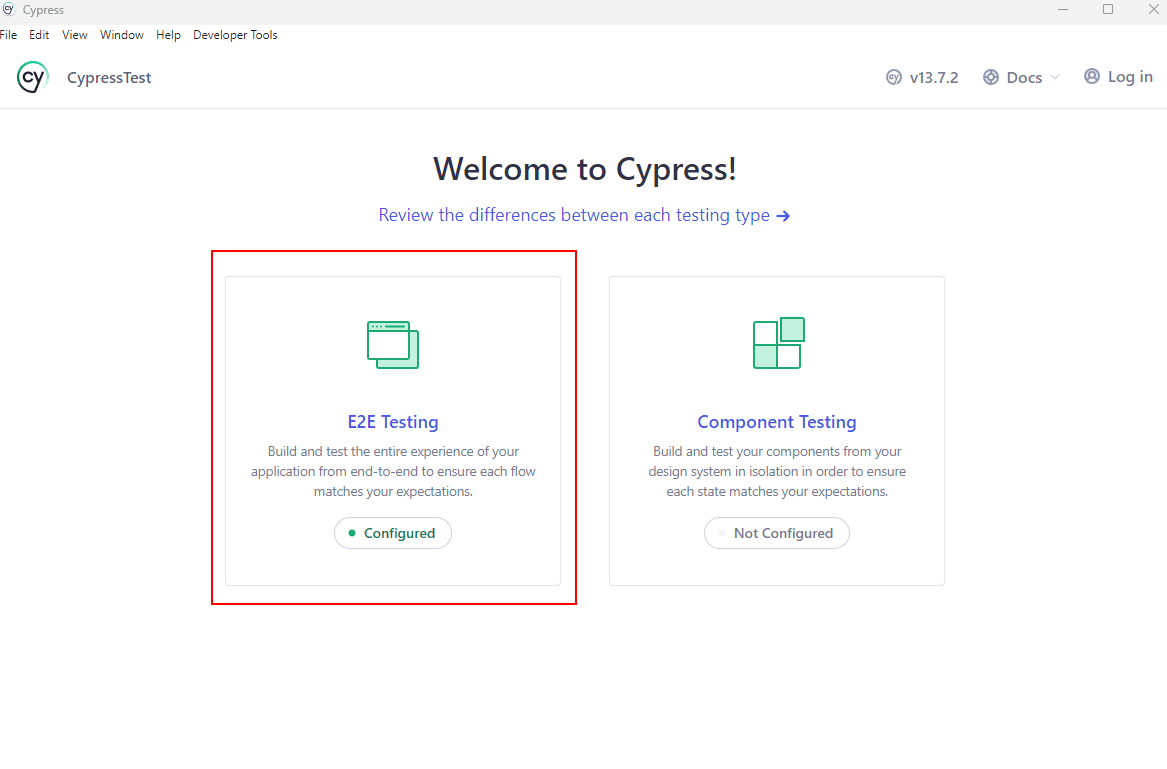
The Cypress Runner will open. Click on ‘E2E Testing’.
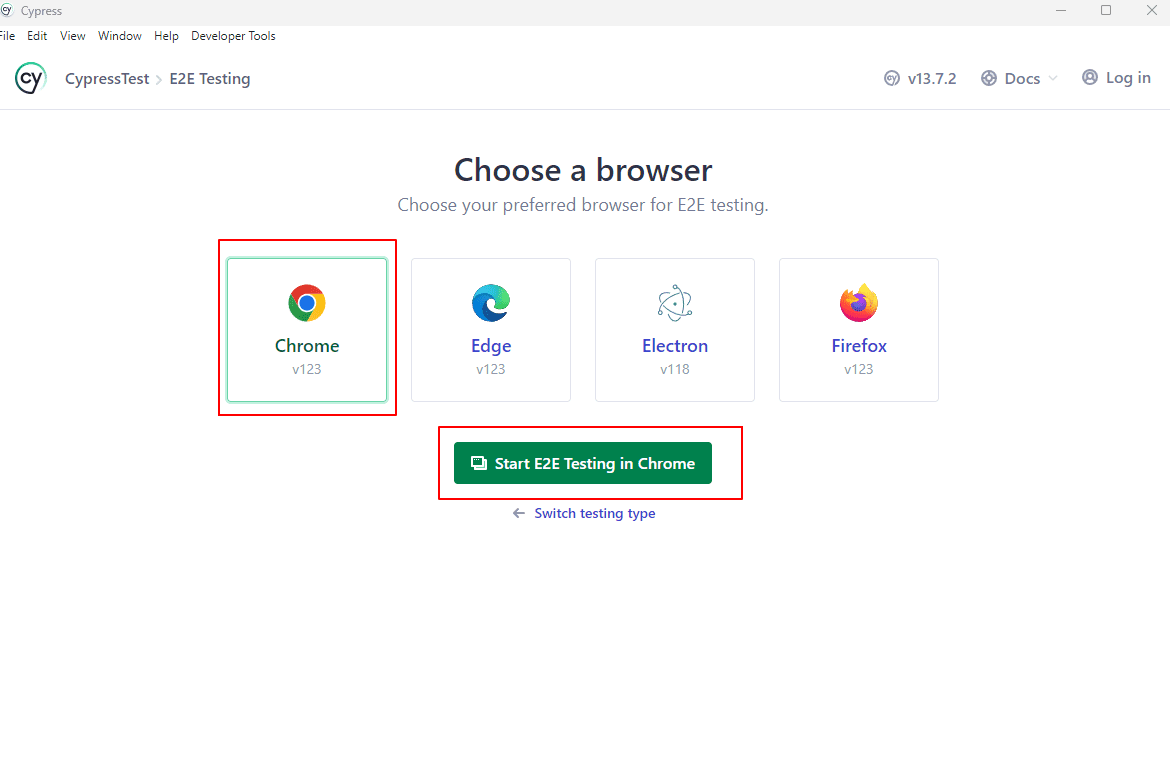
- Choose your preferred browser. In this case, select Chrome and click the ‘Start E2E Testing in Chrome’ button.
- Search your test file and click on it.
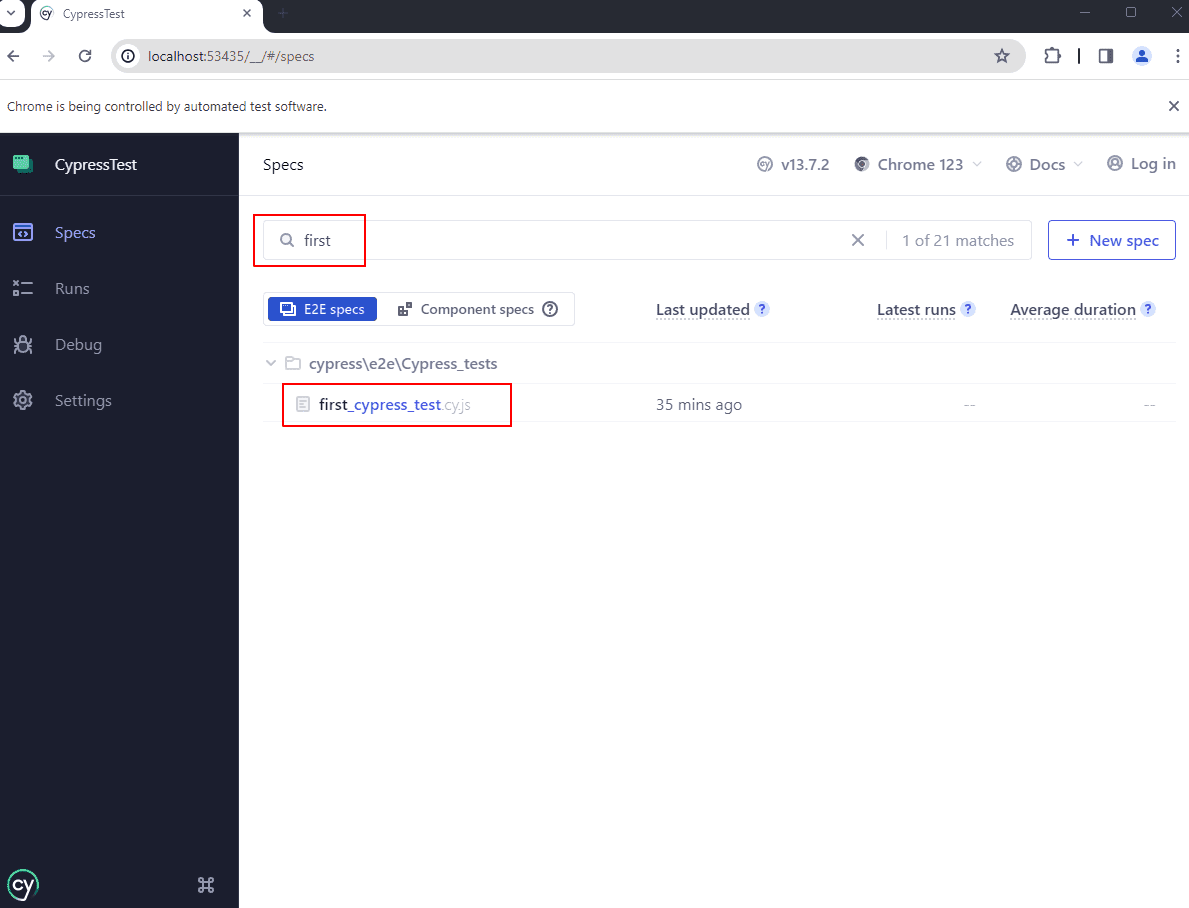
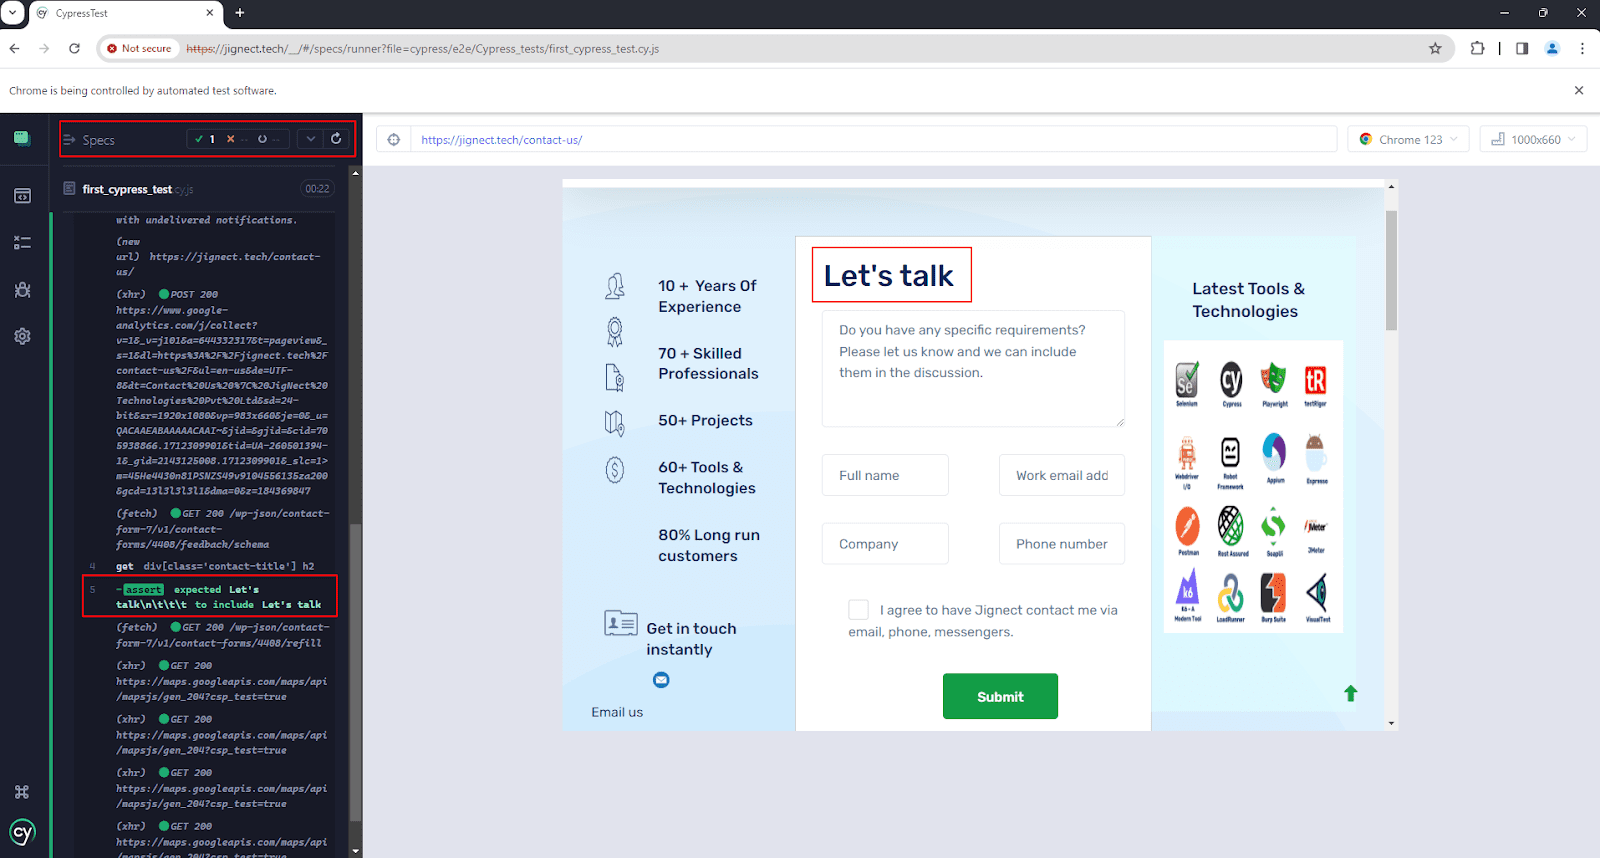
Congratulations! You will see your Cypress test running successfully in the Cypress Runner.
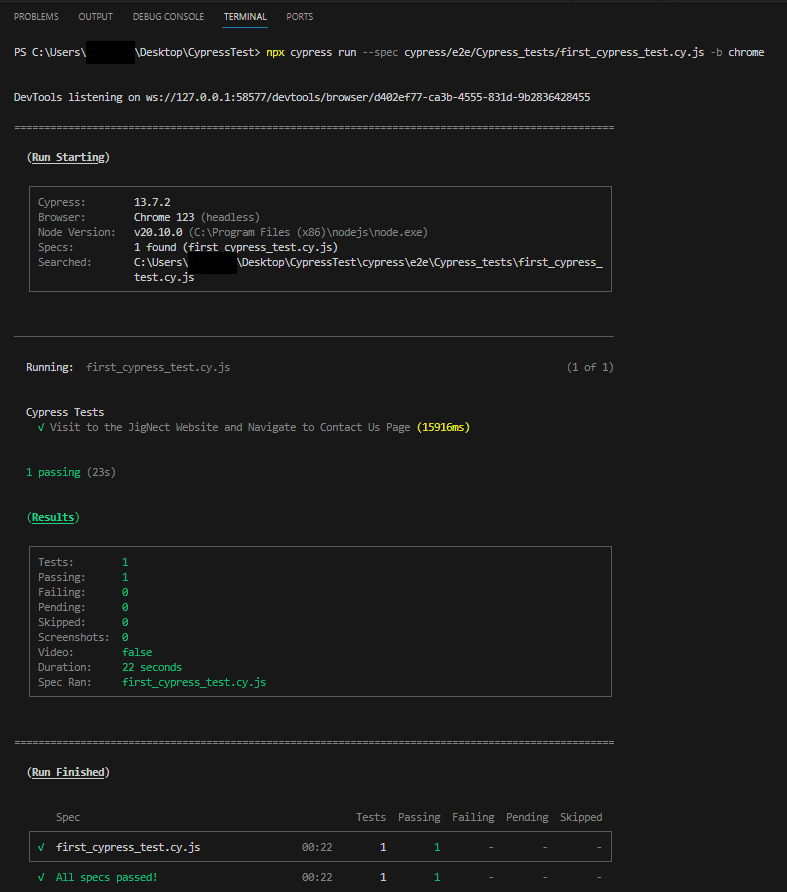
For Executing in Headless Mode, follow these steps:
- Run the below command in the VS Code terminal:
- npx cypress run –spec {Your test file’s relative path} -b {browser_name} and press Enter.

▶️ Test Run Result
Wait a few minutes after executing the test in headless mode, and There it is! Your test results will be displayed in the terminal.
Assertions
- Cypress Assertions serve as a way to verify that the application is behaving as expected, ensuring that elements exist, and have certain properties, attributes, or states.
- Cypress integrates seamlessly with popular assertion libraries such as Chai, and it enhances the experience by automatically waiting for assertions to pass, thus reducing the chances of flaky tests due to timing issues.
- Here are a few examples of Assertions in Cypress:
1️⃣ Chai Assertions
| Chainer | Example |
| include(value) Aliases: contain, includes, contains | .should(‘include’, 2) expect([1,2,3]).to.include(2) |
| exists | .should(‘exists’) expect(myVar).to.exist |
| equal(value) Aliases: equals, eq | .should(‘equal’, 42) expect(42).to.equal(42) |
| eql(value) Aliases: eqls | .should(‘eql’, { name: ‘Jane’ }) expect({ name: ‘Jane’ }).to.eql({ name: ‘Jane’ }) |
| greaterThan(value) Aliases: gt, above | .should(‘be.greaterThan’, 5) expect(10).to.be.greaterThan(5) |
| lessThan(value) Aliases: lt, below | .should(‘be.lessThan’, 10) expect(5).to.be.lessThan(10) |
| property(name, [value]) | .should(‘have.property’, ‘name’) expect(obj).to.have.property(‘name’) |
| attr(name, [value]) | should(‘have.attr’, ‘bar’) expect($el).to.have.attr(‘foo’, ‘bar’) |
| prop(name, [value]) | .should(‘have.prop’, ‘disabled’, false) expect($el).to.have.prop(‘disabled’, false) |
| text(text) | .should(‘have.text’, ‘I love testing’) expect($el).to.have.text(‘with Cypress’) |
| value(value) | .should(‘have.value’, ‘test@dev.com’) expect($el).to.have.value(‘test@dev.com’) |
| visible | .should(‘be.visible’) expect($el).to.be.visible |
| selected | .should(‘be.selected’) expect($option).not.to.be.selected |
| checked | .should(‘be.checked’) expect($input).not.to.be.checked |
| contain(text) | .should(‘contain’, ‘text’) expect($el).to.contain(‘text’) |
| true | .should(‘be.true’) expect(true).to.be.true |
| false | .should(‘be.false’) expect(false).to.be.false |
2️⃣ TDD Assertions
| Scenario | Example |
| Assert if object is truthy(ensures the object is neither undefined nor null) | assert.isOk(object, ‘Validate object is truthy’) |
| Assert if two objects are equal | assert.equal(“Welcome to Jignect QA blogs”, $el.text(), “Navigated to Jignect page”) |
| Assert if two objects are equal with all the keys values match | assert.deepEqual({name: “Jignect”, Date: 20}, {name: “Jignect”, Date: “20”}), “ This assertion will fail because the Date value in the second object is a string.”) |
| Assert if the given value is less than the expected value | assert.isBelow(1,5, “Check if 1 is less than 5”) |
| Assert if the given value matches a specific data type. | assert.typeOf(“Jignect”, “string”, “Check if the value is of type string”) |
Plugins
1️⃣ cypress-parallel
The Cypress-parallel plugin is used to run Cypress tests in parallel, enabling faster test execution by distributing the workload across multiple instances or environments simultaneously. This significantly reduces the overall time required to execute the tests.
Run your Cypress tests in parallel (locally):
Install the plugin:
npm i cypress-parallel
Add the below script in your package.json file:
"scripts": {
"cypressrun": "cypress run --browser chrome --headed",
“cy:parallel": "cypress-parallel -s cypressrun -t 4 -d 'cypress/e2e/API-Tests/*' -a"
},
-s (script): Your npm Cypress command
-t (threads): Number of threads
-d (spec/test directory): Cypress specs directory
Launch the Script:
npm run cy:parallel
2️⃣ cypress-if
The Cypress-if plugin allows you to write conditional logic within your tests. Cypress-if makes tests stronger and easier to manage by running actions only when conditions are met.
The plugin works by overriding Cypress commands like cy.get() and cy.find()
Install the plugin:
npm i -D cypress-if
Include this in your support > e2e.js file
import ‘cypress-if’
Example:
// Verify that the terms and conditions checkbox is checked or not. If it is not checked then check it else uncheck it

cy.get(`input[type='checkbox']`).if().check().else().uncheck()
3️⃣ Cypress-testing-library
- The Cypress Testing Library plugin extends Cypress’s already robust testing capabilities by adding a set of custom commands that encourage good testing practices.
- This plugin is built on top of the popular DOM Testing Library, which provides utility functions to work more effectively with DOM elements in a way that resembles how users interact with your app.
Key features:
- This plugin includes various queries like getByText, findBy, and queryBy selectors which allow developers to write tests that closely mimic how users find elements on the page
- Cypress Testing Library adds commands that handle promises and asynchronous behaviour better, such as findBy* queries that wait for elements to appear before proceeding with the test steps.
Install the plugin:
npm install –save-dev @testing-library/cypress
Include this in cypress.config.js
{
  "include": ["node_modules/cypress", "./cypress/**/*.js"]
}
Usage:
you’ll get IntelliSense by installing this plugin:

Here are some of the examples:
cy.findByRole('img', { name: 'JigNect Technologies Pvt Ltd' }).should('be.visible')
cy.findAllByAltText('JigNect Technologies Pvt Ltd').should('be.visible')
cy.findByText("Let's talk").should('be.visible')
cy.findAllByPlaceholderText('Full name').type('Ayushi Sharma')
cy.findByRole('button', { name: 'Submit' }).click()
cy.findAllByText('The field is required.').should('be.visible')
cy.findByRole('link', { name: 'Latest Tools & Technologies' }).should('have.attr', 'href', "https://jignect.tech/tools-techs/")
cy.findByRole('combobox', { name: 'I agree to all Terms and conditions' }).check()
cy.findByRole('radio', { name: 'Automation' }).click()
cy.findByRole('textbox', { name: 'Last name' }).type('Technologies')
cy.findByLabelText('Enter your Email Address').type('abc@gmail.com')
4️⃣ cypress-cucumber-preprocessor
Cypress works together with Cucumber, making it easy to write tests in the BDD style. Cypress uses all the cool features of Cucumber through the Cucumber-preprocessor node module. With this setup, you can describe your test steps and write tests using simple English with a language called Gherkin. So, if you know what BDD is, this combo makes testing a lot simpler.
Install the plugin:
npm install –save-dev cypress-cucumber-preprocessor
Include this in cypress.config.js:
const cucumber =require('cypress-cucumber-preprocessor').default
module.exports = (on, config) => {
  on('file:preprocessor', cucumber())
}
Example:
contactUs.feature
Feature: JigNect Contact Us page
Scenario: Verify the Contact Us form submitted Successfully
Given I open JigNect's Contact Us Page
When I fill the details of Contact Us form
Then I see a success message.
ContactUs.cy.js
import { Given } from "cypress-cucumber-preprocessor/steps";

Given("I open JigNect's Contact Us Page", () => {
  cy.visit('https://jignect.tech/contact-us/')
})

When("I fill all the details of Contact Us form", () => {
  cy.get(`[class*='textarea']`).type("Automation Testing")
  cy.get(`[placeholder*='Full name']`).type("Piyush Patel")
  cy.get(`[placeholder*='Work email address']`).type("abc@gmail.com")
  cy.get(`[placeholder*='Company']`).type("Abc Pvt.Ltd")
  cy.get(`[placeholder*='Phone number']`).type("9876543210")
  cy.get(`[type='checkbox']`).check()
  cy.get(`[value='Submit']`).click()
})

Then("I see a success message.", () => {
  cy.get(`[class*='response-output']`).should('have.text', 'Thank you for reaching out, we will revert to your request in 1-2 business working days.')
})
5️⃣ Cypress-grep
The Cypress grep plugin is a tool used to filter and run specific tests within your Cypress test suite based on certain criteria. This can be particularly useful when you have a large test suite and only want to run a subset of tests, such as those related to a specific feature or scenario.
Install the plugin:
npm i -D @cypress/grep
Include the below lines in Support > e2e.js
const registerCypressGrep = require('@cypress/grep')

registerCypressGrep()
Usage:
npx cypress run –headed –env grep=JigNect –spec “cypress\e2e\Cypress_tests”
This Cypress grep command will run the test cases from the Cypress_tests folder that contain “JigNect” in their test descriptions, and it will do so in headed mode.
Cypress Best Practices
- Use Descriptive Test Names:
- When writing automated tests with Cypress, it’s important to name your tests in a way that clearly communicates their purpose and functionality.
it("Navigates to the Contact Us page and fills out contact details in the Contact Us form")- Independent it() blocks:
- This practice involves writing the script for a test case within separate it() blocks, ensuring that each block is self-contained and not dependent on the others.
- By structuring tests in this way, if one it() block fails, it does not impact the execution of other blocks, allowing for better test isolation and more reliable results.
- This approach enhances the maintainability and readability of the code, making it easier to identify and address issues within specific test cases without affecting the overall test suite.
  it("should fill in the Contact Us form details successfully", () => {
    });

  it("should display an error message if all the details are not filled in the form", () =>{
    });
- Leverage Cypress Documentation:
- The Cypress documentation is a rich resource that covers everything from getting started with basic concepts to advanced topics like custom commands and plugins. It’s a one-stop shop for learning Cypress effectively.
- Use Custom Commands:
- When you find yourself repeating the same sequence of actions or assertions across multiple tests, creating a custom command is a great way to avoid code duplication. This makes your test suite more concise and easier to maintain.
- Give your custom commands clear and descriptive names that reflect their purpose.
//commands.js file

   Cypress.Commands.add("FillContactUsForm", (name, email) => {

   cy.get(`input[placeholder='Full name']`).type(name);

   cy.get(`input[placeholder='Work email address']`).type(email);   cy.get(`input[value='Submit']`).click();
//your test file
cy.FillContactUsForm('test', 'test@gmail.com')- Run Cypress Tests in Parallel:
- Running Cypress tests in parallel allows multiple tests to run simultaneously, significantly reducing the total execution time of the test suite.
- To run Cypress tests in parallel without using Cypress Cloud, you can use the cypress-parallel plugin.
- Keep Cypress Updated:
- Cypress frequently releases updates with new features, enhancements, and bug fixes. Keeping Cypress updated ensures that you have access to the latest capabilities, which can improve your testing process and make it more efficient.
- Refer to this link to check the latest and the previous versions along with detailed information.
Conclusion
Cypress shines for its user-friendly design and robust features, streamlining web application testing through effortless setup, real-time debugging visuals, and automatic element handling. It excels in cross-browser testing (Chrome and Edge) and integrates seamlessly with developer tools, even tackling API testing for comprehensive end-to-end coverage. However, Cypress isn’t without limitations. Cypress is limited to testing web applications and does not support testing mobile or desktop applications. While Cypress is optimized for JavaScript and TypeScript, using other programming languages requires transpiling the code to JavaScript which can lead to potential complications and restrictions. Furthermore, Cypress has limited browser support, focusing mainly on Chrome and Chromium-based browsers. It does not officially support Safari, Internet Explorer, or other non-Chromium browsers. Although Cypress can work with iFrames, its support is somewhat limited and requires the use of a third-party plugin. Additionally, Cypress does not provide built-in support for XPath locators, and users must rely on a third-party plugin to use this functionality. Despite these constraints, Cypress remains a powerful and popular option for testing frameworks, especially for those who value a streamlined, user-centric approach. Its intuitive features, reliable architecture, and focus on developer experience make Cypress an excellent choice for ensuring the quality and performance of modern web applications, saving time and resources throughout the development lifecycle.
In conclusion, Cypress is a powerful web application testing tool with a user-friendly design. While it has limitations in scripting language, browser support, rely on third-party plugins for non-JavaScript languages, its strengths in ease of use, debugging, reliability, and API testing make it a valuable asset for ensuring application quality and performance. For projects prioritizing a streamlined testing experience, Cypress remains an excellent choice.
Keep practising and exploring to master these powerful tools further with Jignect.
Witness how our meticulous approach and cutting-edge solutions elevated quality and performance to new heights. Begin your journey into the world of software testing excellence. To know more refer to Tools & Technologies & QA Services.
If you would like to learn more about the awesome services we provide, be sure to reach out.
Happy testing! 🙂


