
In today’s fast-paced development environment, ensuring your web applications are continuously tested is critical for delivering high-quality software. This blog is your complete guide to integrating Selenium Java tests into Jenkins pipelines for Continuous Integration (CI). Whether you’re a beginner just starting with test automation or looking to scale your CI setup, this step-by-step guide will take you from zero to hero. You’ll learn how to set up your environment, write and manage Selenium tests, configure Jenkins pipelines, run tests automatically on code changes, generate reports, and follow best practices for efficient test automation. By the end, you’ll have a solid, real-world-ready CI pipeline powering your test automation lifecycle.
- The Role of CI/CD and Jenkins in Modern Test Automation
- Environment Setup & Building Your Selenium Java Project
- Version Control with Git
- Jenkins Essentials
- Jenkins Dashboard Tour
- Integrating Jenkins with Your Project
- Writing and Using Jenkins Pipelines
- Jenkins Advanced Test Execution Techniques
- Reporting & Feedback
- Conclusion
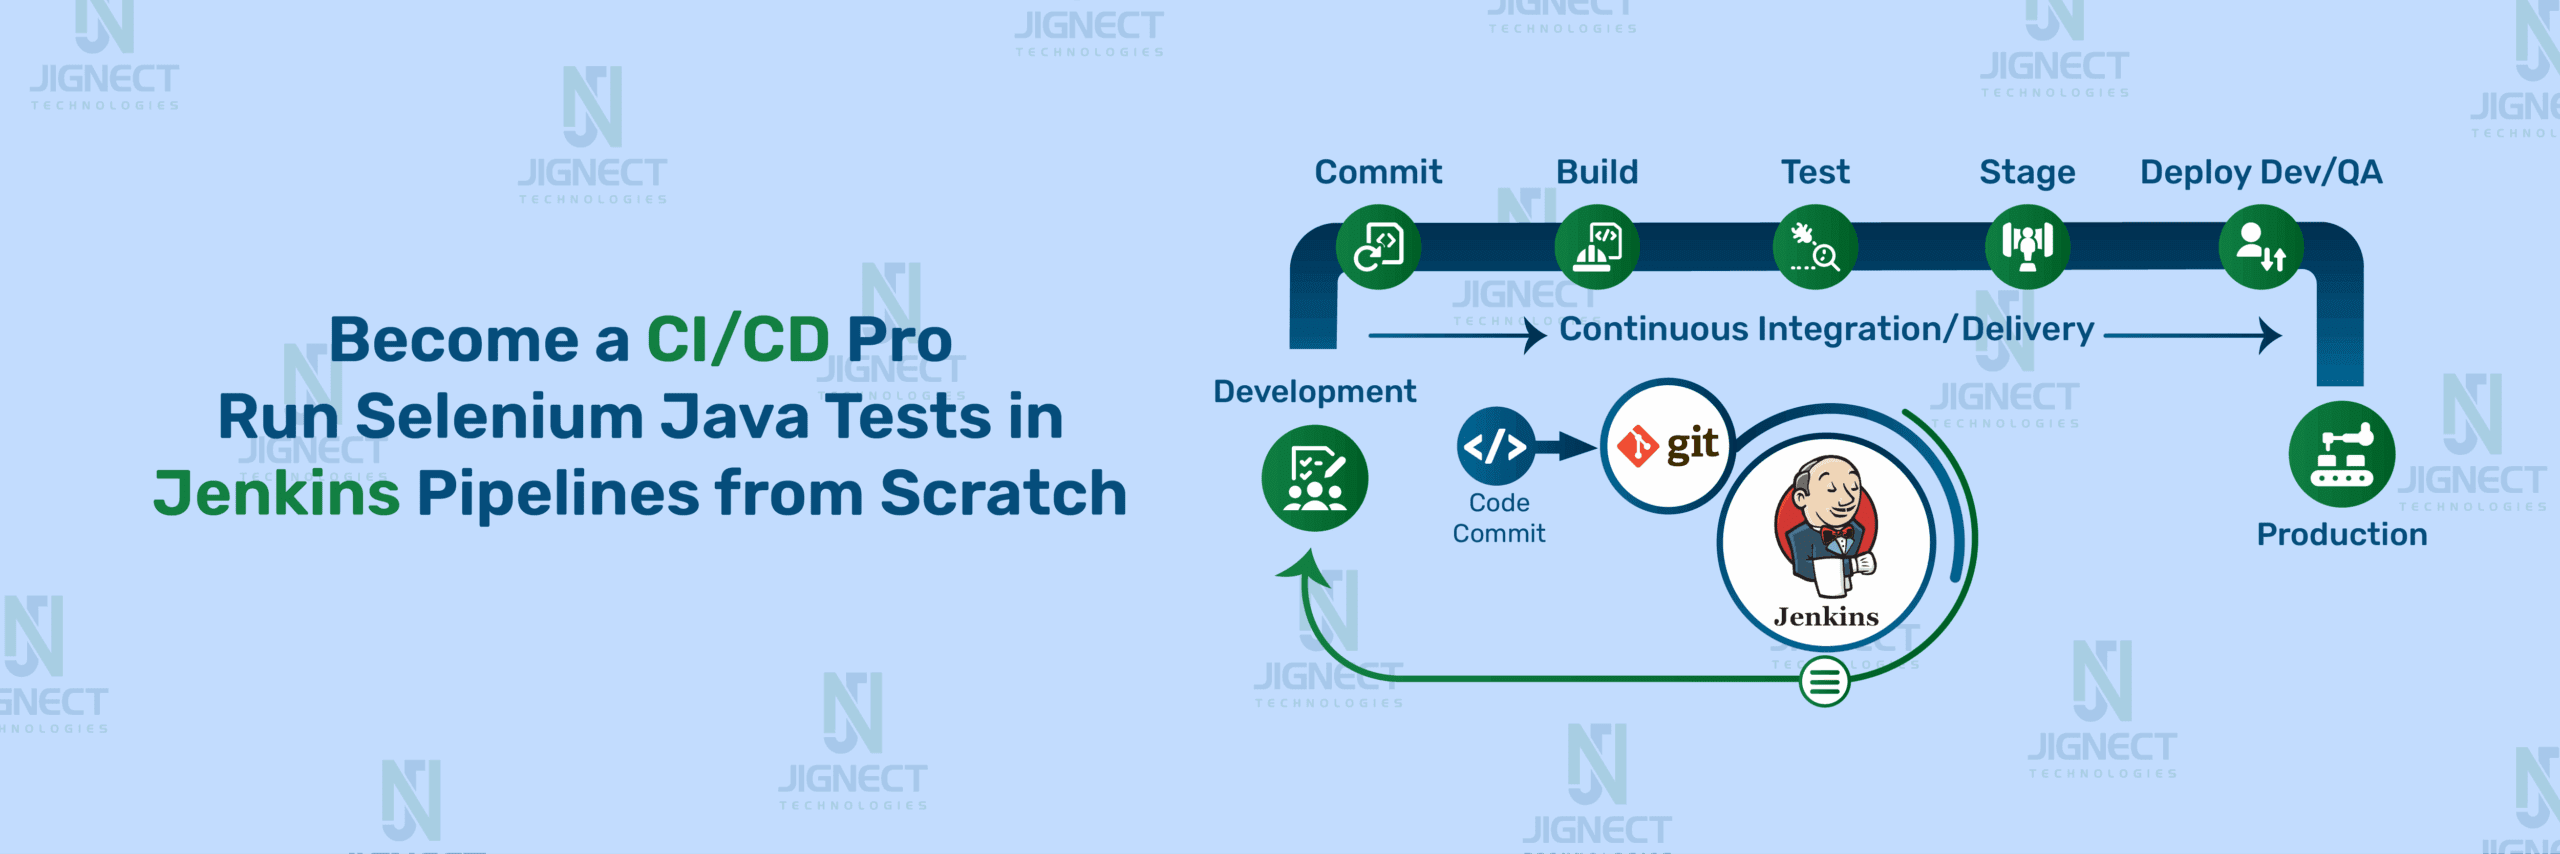
The Role of CI/CD and Jenkins in Modern Test Automation
What is CI/CD?
Continuous Integration (CI) is a development practice where developers frequently integrate code into a shared repository. Each integration can then be verified by an automated build and automated tests. This helps detect errors quickly, improve software quality, and reduce the time it takes to release updates.
Continuous Delivery (CD) extends Continuous Integration (CI) by ensuring the application is always in a deployable state. With CD, code changes are automatically prepared for a production release. In some cases, CD refers to Continuous Deployment, where every change that passes the tests is automatically deployed to production without manual intervention.
If you want to learn more about CI/CD and explore, check out our in-depth blog: The top tools every QA automation engineer should know
Overview of Jenkins as a CI/CD Tool
Jenkins is a powerful, open-source automation server that helps developers and QA teams build, test, and deploy software efficiently. It’s one of the most popular tools in the CI/CD ecosystem and acts as the glue that brings your automation workflow together. Whether you’re working on small personal projects or managing enterprise-scale pipelines, Jenkins offers the flexibility and extensibility to suit your needs.
What Makes Jenkins Essential in CI/CD?
Jenkins plays a central role in Continuous Integration and Continuous Delivery by automating key tasks such as:
- Pulling code from version control like GitHub or GitLab
- Building the code using tools like Maven or Gradle
- Running tests using TestNG, JUnit, Selenium, etc.
- Deploying builds to various environments like QA, staging, or production
- Notifying stakeholders of success or failure via email, Slack, or dashboards
Why Use Jenkins for Test Automation?
Jenkins is highly compatible with a wide variety of test automation frameworks and tools. It streamlines the process of executing test suites, capturing results, and providing continuous feedback to the development team. Its ability to integrate with popular tools like Selenium, TestNG, JUnit, Cucumber, and Allure makes it an ideal choice for automation projects.
Key Reasons to Use Jenkins for Test Automation:
- Automated Scheduling: Run tests at fixed intervals, after code commits, or before releases.
- Triggering on Code Changes: Jenkins can initiate tests automatically when new code is pushed to version control.
- Test Reporting: Jenkins supports native and plugin-based test result visualization (like TestNG reports, JUnit, and Allure).
- Integration with DevOps Tools: Seamlessly connects with Docker, Kubernetes, Slack, GitHub, and more.
- Scalability: Distribute test execution across multiple agents and environments.
Advantages of Using Jenkins for Automation
- Open-source & Free: Jenkins is backed by a vibrant community, making it cost-effective and well-supported.
- Extensible: With over 1500 plugins, you can tailor Jenkins to fit any workflow or toolchain.
- Cross-platform Compatibility: Runs on all major operating systems, including Windows, macOS, and Linux.
- Rich Plugin Ecosystem: Supports integration with virtually any testing, deployment, or monitoring tool.
- Easy Integration: Quick to connect with version control systems, build tools, and testing libraries.
- Stable & Reliable: Proven by thousands of organizations and teams around the world for CI/CD processes.
- Community & Documentation: Comprehensive documentation, active forums, and frequent updates make it beginner- and expert-friendly
Environment Setup & Building Your Selenium Java Project
Before integrating your tests with Jenkins, it’s essential to have a basic Selenium Java framework up and running.
- Installing Java, Maven, and Git: Java is required for both Selenium and Jenkins. Maven handles dependencies and builds, while Git enables version control.
- Setting Up IDE (IntelliJ/Eclipse): Choose your preferred IDE for writing and organizing test code efficiently.
- Building Your Selenium Java Project: Start with a Maven project to manage your test structure and dependencies easily.
- Creating a Maven Project & Managing Dependencies: Use the pom.xml file to add Selenium, TestNG, and other libraries.
- Writing Your First Test (TestNG or JUnit): Create simple test cases to validate your setup and ensure everything works.
- Running Tests Locally: Execute tests via IDE or using the Maven command mvn test.
Already covered in detail in our previous blog!
Read the full beginner-friendly Selenium with Java & TestNG guide here
Version Control with Git
Using Git ensures your test automation code is trackable, collaborative, and easily integrated into CI/CD pipelines.
- Initializing Git in Your Project: Start by running git init in your project directory to track changes locally.
- Pushing Code to GitHub: Add a remote repository and push your code using git push to share and collaborate with your team.
Want to learn Git commands in detail with test automation best practices?
Check out our full Git guide here
Jenkins Essentials
Download and Install Jenkins
- Go to the official Jenkins site:
https://www.jenkins.io/download/ - Click on Windows and download the .msi installer.
- Run the installer:
- Jenkins runs as a Windows Service after installation, or use java -jar jenkins.war
- The default port is 8080
- After installation, open your browser and go to: http://localhost:8080
- On first launch, Jenkins will ask for an initial admin password. Open this file to get the password: C:\Users\.jenkins\secrets\initialAdminPassword
- Replace with your system username

- Install Plugins:
- Choose Install suggested plugins.
- Wait for installation to complete.

- Create Admin User :
- Fill out the form to create your first admin account.

- Click Save and Continue
- Fill out the form to create your first admin account.


- Configure Jenkins URL :
- Keep the default: http://localhost:8080
- Click Save and Finish
- Jenkins is Ready!
- Click Start using Jenkins to go to the dashboard.

Jenkins Dashboard Tour
The Jenkins Dashboard is your central hub. From here, you can create and manage jobs, view build history, access system configurations via Manage Jenkins, and monitor the health of your automation workflows. Jenkins provides a web interface where you’ll spend most of your time:

- New Item: Create a new job (project)
- Build History: List of completed and ongoing builds
- Manage Jenkins: System configuration, plugin management, credentials
- People: View user accounts and permissions
- My Views: Custom dashboards
Installing Essential Plugins
Plugins make Jenkins powerful. You can install plugins anytime by navigating to Manage Jenkins > Manage Plugins and selecting the Available tab.
Key plugins for test automation:
- Git Plugin – Integrates with GitHub/GitLab
- Maven Integration Plugin – Runs Maven builds
- TestNG or JUnit Plugins – Parses and displays test results
- Allure or Extent Reports Plugins – Enhances reporting
Configuring JDK, Maven, and Git in Jenkins
Once Jenkins is installed and accessible from your browser (typically at http://localhost:8080), the next step is to configure essential tools like JDK, Maven, and Git so Jenkins can compile and run your automation scripts.

Step 1: Configure JDK
- Go to Manage Jenkins > Tools
- Scroll to JDK section.
- Click Add JDK.
- Uncheck Install automatically if Java is already installed on your system.
- Provide a name (e.g., JDK-17), and enter the JAVA_HOME path (e.g., C:\Program Files\Java\jdk-17).
- Click Save.

Note: If you check Install automatically, Jenkins will download JDK for you during the job run, but manual configuration is more stable for enterprise setups.
Step 2: Configure Maven
- In Tool, scroll to the Maven section.
- Click Add Maven.
- Uncheck Install automatically if Maven is installed.
- Set a name (e.g., Maven-3.9.1) and enter the MAVEN_HOME path (e.g., C:\apache-maven-3.9.1).
- Click Save.

Step 3: Configure Git
- Still in Global Tool Configuration, scroll to Git.
- Jenkins usually auto-detects Git if installed. If not:
- Click Add Git.
- Enter the Git executable path (e.g., C:\Program Files\Git\bin\git.exe).
- Save changes.

Note: You must install Git on your system beforehand: https://git-scm.com/downloads
Integrating Jenkins with Your Project
Need Expert guidance on Jenkins Automation?
Creating a Freestyle Project
A Freestyle Project is the most basic and flexible type of job in Jenkins. It enables you to run simple CI tasks, such as building and testing code.
Steps:
- Go to Jenkins Dashboard.
- Click on “New Item”.
- Enter a project name (e.g., MyAutomationProject).
- Select Freestyle project and click OK.
- You’ll be taken to the project configuration screen.

Connecting to GitHub
To pull your code from GitHub into Jenkins:
Steps:
- In your Freestyle job config:
- Scroll to Source Code Management.
- Choose Git.
- Paste your GitHub repository URL (e.g., https://github.com/your-username/your-project.git).

- Under Credentials, click Add if your repo is private.
- Choose Username/Password and enter your GitHub credentials or personal access token.
- Click Save.
Running Maven Build in Jenkins
If your project uses Maven (e.g., pom.xml exists), you can run Maven goals directly.
Steps:
- In the Freestyle job config:
- Scroll to the Build section.
- Click Add build step → choose Invoke top-level Maven targets.
- In Goals, enter:
clean test - Under Build Environment, ensure:
- Your Maven and JDK are configured correctly (set globally via Manage Jenkins > Global Tool Configuration).
- Save and Build Now.
Triggering Builds Automatically (Webhook Setup)
To automatically trigger Jenkins jobs whenever you push to GitHub:
In Jenkins:
- In your Freestyle job config:
- Scroll to Build Triggers.
- Check GitHub hook trigger for GITScm polling.
In GitHub:
- Go to your repo → Settings → Webhooks → Add webhook.
- Set:
- Payload URL: http:///github-webhook/
- Content type: application/json
- Events: Select just the push event.
- Save the webhook.
Now, whenever you push code to your GitHub repo, Jenkins will automatically trigger the build!
SCM Polling
SCM (Source Code Management) polling allows Jenkins to periodically check your Git (or other SCM) repository for changes. If changes are found, a build is triggered.
Use SCM Polling when:
- Webhooks are not supported or not configured.
- You want Jenkins to poll for updates on a schedule regularly.
Step-by-Step Setup:
- Open Jenkins and go to your job/project.
- Click “Configure” in the sidebar.
- Scroll to the Build Triggers section.
- Check the box: Poll SCM
- In the Schedule field, enter a cron-like expression.
- Click “Save”.
Example Cron Expressions:
| Expression | Meaning |
| H/5 * * * * | Poll every 5 minutes |
| H/15 * * * * | Poll every 15 minutes |
| H 9 * * * | Poll once daily at 9 AM |
Note: The H (Hash) is used to distribute polling evenly to avoid all jobs hitting at the same minute.
Scheduled Builds (CRON Jobs)
Jenkins Scheduled Builds allow you to run your jobs automatically at specific times, independent of source code changes.
Use CRON Jobs when:
- Nightly regression tests
- Performance testing at low-traffic hours
- Weekly reporting or health checks
Step-by-Step Setup:
- Click “Configure”.
- Open Jenkins and go to your job/project.
- Under Build Triggers, check the box: Build periodically
- In the Schedule field, enter your cron expression.
- Click “Save”.
Example Cron Expressions:
| Expression | Meaning |
| H 22 * * 1-5 | Run at 10 PM every weekday(Mon- Fri) |
| H 2 * * * | Run every day at 2 AM |
| H 0 1 * * | Run at 1 AM on the first day of each month |
Writing and Using Jenkins Pipelines
Jenkins Pipelines let you define your build, test, and deployment steps in code, making your automation setup reusable, version-controlled, and more powerful than freestyle projects.
Introduction to Jenkins file
A Jenkins file is a plain text file that contains the pipeline code. You add it to the root of your project repository so Jenkins can automatically detect and run the pipeline.
Why use Jenkinsfile?
- Stores CI/CD steps in code (version-controlled)
- Supports both simple and complex workflows
- Easier to debug, reuse, and share
Declarative Pipeline Syntax Explained
The Declarative Pipeline is the simplest way to define pipelines. It uses structured and readable syntax.

Here’s a step-by-step explanation of each section of our pipeline:
1. pipeline { }: This is the root block that defines the entire Jenkins pipeline.
pipeline {
…
}
2. agent any: Specifies that Jenkins can run this pipeline on any available agent (node).
You can also use:
- agent none → when you want to define agents per stage.
- agent { label ‘linux’ } → to target specific nodes.
3. Tools: Specifies required tools (like JDK and Maven) that Jenkins should set up in the environment before executing any stage.
tools {
jdk ‘JDK-22’
maven ‘Apache Maven 3.9.9’
}
These must be pre-configured in Jenkins → Tool.
4. Stages: This is a collection of steps where each stage performs a specific task in your CI/CD process.
- stage(‘Checkout’): This pulls your code from a Git repository.
- stage(‘Build’): This compiles the code and builds the project (runs mvn clean install).
- stage(‘Test’): This runs your test cases using Maven’s test phase.
- stage(‘Publish Results’): This publishes test results (JUnit reports) so you can view test output in Jenkins.
- The JUnit command picks up XML reports generated by the Maven Surefire plugin.
Step-by-Step Pipeline Script for Selenium Tests
- Create a Jenkinsfile in the root of your project.
- Add the pipeline code like the example above.
- In Jenkins:
- Create a new Pipeline project.
- Under “Pipeline” config, choose:
- Definition: Pipeline script from SCM
- SCM: Git
- Repo URL: https://github.com/your-username/your-repo.git
- Script Path: Jenkins file

- Save and Build Now.
Publishing Test Results in Jenkins
To view test results graphically in Jenkins:
- Make sure your Selenium tests generate test reports in JUnit format (e.g., via maven-surefire-plugin).
- Add this to your pipeline:
- junit ‘**/surefire-reports/*.xml’
- Jenkins will now show test results under the build job, including pass/fail counts, graphs, and trends.
- Step-by-Step to View Results:
- Go to Jenkins Dashboard
Open your Jenkins dashboard in the browser. - Select Your Project
Click on the name of the project (job) you ran. - Click on the Build Number
Under Build History (usually on the left), click on the specific build number you want to inspect (e.g., #12). - Click on Test results.
- Go to Jenkins Dashboard


- You can also check full log of the steps executed during the build
- Open Console Output
On the build’s page, click on “Console Output” in the left sidebar. - View Real-Time Logs
- This includes:
- Git checkout details
- Maven build logs
- Test execution output
- Any errors, stack traces, or skipped steps
- Troubleshoot or Verify Success
- If the build fails, this is the best place to identify what went wrong.
- If it passes, it confirms that all steps ran successfully.


Jenkins Advanced Test Execution Techniques
Optimize your test pipelines with parallelism, grouping, and environment-based execution.
As your Selenium or API test suites grow, managing their execution efficiently becomes crucial. Jenkins, when combined with tools like TestNG, Maven Surefire, and proper test structuring, can help you run tests faster and smarter. This article dives into advanced execution strategies to take your CI/CD pipeline to the next level.
Running Tests in Parallel (TestNG + Maven Surefire)
Why Parallel Execution?
Long test suites can slow down feedback cycles. Running tests in parallel reduces execution time and speeds up delivery.
Prerequisites:
- TestNG for test structuring
- Maven Surefire Plugin for execution
- Proper use of test classes and thread-safe coding practices
Step 1: Configure testng.xml
<suite name="ParallelSuite" parallel="classes" thread-count="4">
  <test name="ParallelTests">
    <classes>
      <class name="tests.LoginTest"/>
      <class name="tests.SearchTest"/>
    </classes>
  </test>
</suite>parallel="classes"run classes in parallelthread-count="4"allows 4 tests to run simultaneously
Step 2: Configure Maven Surefire Plugin in pom.xml
<plugins>
  <plugin>
    <groupId>org.apache.maven.plugins</groupId>
    <artifactId>maven-surefire-plugin</artifactId>
    <version>3.0.0</version>
    <configuration>
      <suiteXmlFiles>
        <suiteXmlFile>src/test/resources/testng.xml</suiteXmlFile>
      </suiteXmlFiles>
    </configuration>
  </plugin>
</plugins>
Run Command in Jenkins pipeline:
stage('Parallel Test Execution') {
  steps {
    sh 'mvn clean test'
  }
}
Using Tags or Groups for Selective Execution
Why Use Groups?
In large projects, not all tests need to run every time. Using TestNG groups, you can organize and selectively execute tests based on purpose (smoke, regression, sanity).
Example:
@Test(groups = {"smoke"})
public void verifyHomePageLoads() {
    // test logic
}

@Test(groups = {"regression"})
public void verifyUserCanLogin() {
    // test logic
}
testng.xml for Group Execution:
<groups>
  <run>
    <include name="smoke"/>
  </run>
</groups>
Jenkinsfile Integration:
stage('Smoke Test Execution') {
  steps {
    sh 'mvn test -Dgroups="smoke"'
  }
}
Reporting & Feedback
Generating HTML, Allure, and Extent Reports
1. HTML Reports (TestNG Default)
TestNG automatically generates basic HTML reports in the test-output directory.
Path: project-root/test-output/index.html
To view it:
- Open
index.htmlafter test execution - Provides test suite summary, passed/failed test counts
2. Extent Reports
Extent Reports offer a beautiful, customizable, and interactive HTML report with Logs, Screenshots, and Test steps and status.
Path: project-root/test-output/extent-report.html
How to Set Up Extent Reports:
Add dependency to pom.xml:
<dependency>
  <groupId>com.aventstack</groupId>
  <artifactId>extentreports</artifactId>
  <version>5.1.2</version>
</dependency>
3. Allure Reports
Allure provides beautiful test reports with step-by-step execution, logs, attachments, and a clear history.
Path: project-root/allure-results (we’ll focus on HTML reports here)
How to Set Up Allure:
Add dependency to pom.xml:
<dependency>
  <groupId>io.qameta.allure</groupId>
  <artifactId>allure-testng</artifactId>
  <version>2.29.1</version>
</dependency>
Attaching Reports to Jenkins Builds
Archive Artifacts
You can attach Extent or HTML reports to Jenkins build artifacts:
post {
  always {
    archiveArtifacts artifacts: 'test-output/**/*.html', fingerprint: true
  }
}
View in Jenkins:
- After the build finishes, go to the build number
- Find “Archived Artifacts”
- Download the HTML report from there
Conclusion
You’ve just built a complete, modern test automation pipeline using Jenkins, Selenium, and Java from project setup to smart reporting. With this CI/CD foundation, your testing is now faster, smarter, and fully automated. Whether you’re working on a small project or scaling to enterprise-level automation, this setup ensures you catch issues early and deliver quality confidently.
Integrating Selenium Java tests with Jenkins accelerates the CI/CD process and ensures higher code reliability through continuous, automated testing. Jenkins empowers teams to execute tests effortlessly, monitor results, and maintain consistent build quality across environments.
By implementing the strategies covered in this blog from setting up your environment to generating insightful reports you lay the foundation for a scalable and maintainable test automation framework. This integration is a vital step toward delivering robust software faster and with greater confidence.
Keep exploring, keep automating your testing workflow is now future-ready!
Witness how our meticulous approach and cutting-edge solutions elevated quality and performance to new heights. Begin your journey into the world of software testing excellence. To know more refer to Tools & Technologies & QA Services.
If you would like to learn more about the awesome services we provide, be sure to reach out.
Happy Testing 🙂


