

In today’s mobile-focused world, delivering high-quality applications across various devices and platforms is essential for success. Appium, an open-source automation framework, transforms mobile app testing for QA professionals. With Appium’s powerful automation features, testers can ensure consistent performance and functionality across different mobile environments. When combined with C#, a widely-used programming language, Appium offers testers numerous opportunities to simplify and improve their test automation processes. Join us as we explore the details of using Appium with C#, providing you with the knowledge and tools to boost your mobile testing strategy’s efficiency and effectiveness.
Why Appium with C#?
In the ever-evolving landscape of software testing, mobile applications have become integral components of digital experiences. Ensuring the quality and reliability of these mobile apps across various devices and platforms presents a significant challenge for QA professionals. In this context, leveraging Appium with C# emerges as a compelling solution, offering a potent combination for robust and efficient mobile testing.
- Cross-Platform Support: Appium, coupled with C#, simplifies mobile application testing across various platforms like iOS and Android. Testers can write code once and execute tests on multiple devices and operating systems, reducing effort and ensuring app compatibility.
- Unified Testing Framework: With C# Appium becomes a unified testing framework for both web and mobile applications. Testers familiar with C# can seamlessly conduct mobile testing without the need to learn new languages or frameworks.
- Rich Ecosystem: Leveraging C#’s extensive libraries, tools, and resources enhances Appium’s testing capabilities. Testers can streamline tasks like data manipulation, assertion handling, and reporting, improving productivity.
- Strong Typing and OOP: C# offers strong typing and robust support for object-oriented programming, facilitating the creation of reusable and maintainable test scripts with Appium. This ensures scalability, modularity, and long-term efficiency in testing projects.
- Integration with Development Ecosystem: C# integrates seamlessly with popular IDEs like Visual Studio, providing an efficient environment for test script development, debugging, and execution. It also integrates well with CI/CD pipelines, enabling automated testing as part of the development lifecycle.
These key features make Appium a powerful and versatile automation tool for mobile application testing, empowering QA teams to ensure the quality, reliability, and performance of mobile applications across various platforms and devices.
Prerequisites steps for creating MSTest project using Appium with C#.
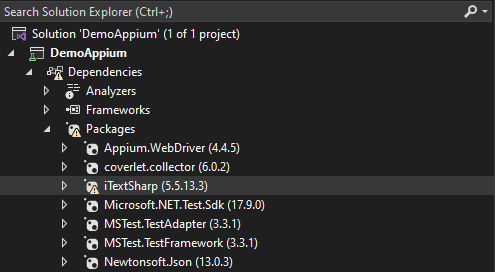
While writing this blog, we have used these versions of the libraries and applications:
Before getting started, we need to set up Appium and Android Studio. You can refer to our Appium SetUp guide.
- Visual Studio 2022 [Version 17.9.5]
- Node [Version 20.11.0]
- Appium [Version 2.5.1]
- Appium.Webdriver [Version 4.4.5]
- MSTest.TestFramework [Version 3.3.1]
We’ve already covered how to create project in Visual Studio IDE in a previous blog post on C# with Selenium.
Test case Creation
Steps for create C# Class:
- Start the appium server as explained above.
- Start the emulator and appium inspector as explained above.
- In Visual Studio, Right-click on your project in Solution Explorer.
- Select “Add” > “Class”.
- Name your class appropriately (e.g. DemoTest.cs) and click “Add”.
using OpenQA.Selenium.Appium;
using OpenQA.Selenium.Appium.Android;
namespace DemoAppium
{
[TestClass]
public class DemoTest
{
[TestMethod]
public void VerifyThatUserIsAbleToNavigateToTheHomescreen()
{
// Set the capabilities
AppiumOptions appiumOptions = new AppiumOptions();
appiumOptions.AddAdditionalCapability("appium:automationName", "uiautomator2");
appiumOptions.AddAdditionalCapability("appium:deviceName", "Pixel 4");
appiumOptions.AddAdditionalCapability("appium:platformVersion", "11.0");
appiumOptions.AddAdditionalCapability("appium:app", "C:\\Users\\aarti\\Downloads\\english-demo.apk");
appiumOptions.AddAdditionalCapability("appium:fullReset", true);
appiumOptions.AddAdditionalCapability("appium:automationName", "uiautomator2");
AndroidDriver<AndroidElement> driver = new(new Uri("http://127.0.0.1:4723/"), appiumOptions);
// Find an element by its ID and verify title is displayed or not and assert the result
AndroidElement alertBoxTitle = driver.FindElementById("android:id/alertTitle");
// Check if the alert box title is displayed
bool isTitleDisplayed = alertBoxTitle.Displayed;
// Assert the result
Assert.IsTrue(isTitleDisplayed, "Alert box title isn't displayed.");
//Find an element by it's ID and perform click action
AndroidElement okButton = driver.FindElementById("android:id/button1");
okButton.Click();
//Get license alert title text and verify the title
AndroidElement licenseAlertTitle = driver.FindElementById("android:id/alertTitle");
string getLicenseAlertTitle = licenseAlertTitle.Text;
Assert.AreEqual(getLicenseAlertTitle, "License", "License alert title doesn't match");
//Find an element by it's Xpath and perform click action
AndroidElement acceptButton = driver.FindElementByXPath("//android.widget.Button[@text='Accept']");
acceptButton.Click();
//Find an element by it's Xpath and verify that homescreen
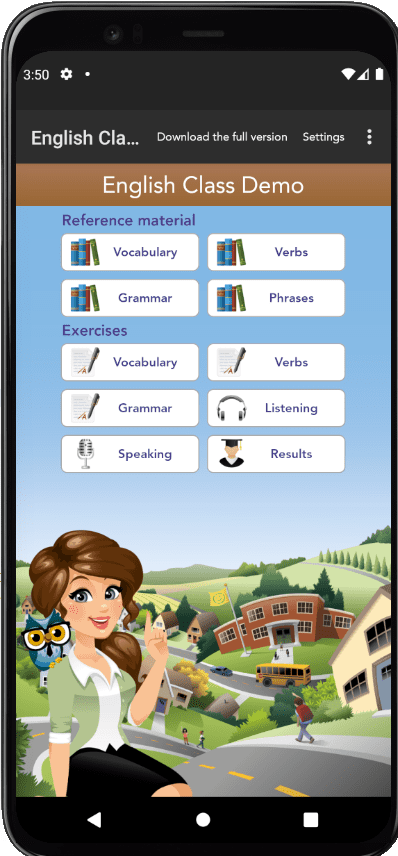
AndroidElement englishClassDemoText = driver.FindElementByXPath("//android.widget.TextView[@text='English Class Demo']");
AndroidElement referenceMaterialText = driver.FindElementByXPath("//android.widget.TextView[@text='Reference material']");
bool isEnglishClassDemoText = englishClassDemoText.Displayed;
bool isReferenceMaterialTextDisplayed = referenceMaterialText.Displayed;
Assert.IsTrue(isEnglishClassDemoText, "English class demo text isn't displayed");
Assert.IsTrue(isReferenceMaterialTextDisplayed, "Reference material text isn't displayed");
//Close the driver
driver.Quit();
}
}
}
This C# code represents a test case using Appium for automating the testing of a mobile application. Let’s break down each part of the code:
- Let’s start with the packages which we imported firstly “using OpenQA.Selenium.Appium;”, “using OpenQA.Selenium.Appium.Android;” these are the namespaces used to access classes and methods provided by the Appium C# bindings for interacting with mobile applications.
- This code defines a C# class named “DemoTest” within the “DemoAppium” namespace. The “[TestClass]” attribute indicates that this class contains test methods.
- This method is annotated with the “[TestMethod]” attribute, indicating that it is a test method. It verifies that the user is able to navigate to the home screen of the application.
- The desired capabilities for the Appium session are set using “AppiumOptions”. These capabilities include automationName, deviceName, platformVersion, app path, and fullReset. A new instance of “AndroidDriver<AndroidElement>” is created using the Appium server address and the specified capabilities.
- “driver.FindElementById” this line finds an element in the application with the specified ID, representing an alert box title.
- “isTitleDisplayed” this line checks if the alert box title element is displayed on the screen.
- “Assert.IsTrue” this line asserts that the alert box title is displayed. If it’s not displayed, the test will fail with the provided message.
- The code further contains similar blocks for finding elements, performing actions, and asserting results for different elements in the application. Finally, the “driver.Quit()” method is called to close the Appium session after the test is executed.
Here’s a screenshot of the application page for which we created the test script using Appium with C#.
Run the test case and observe the outcome
- Upon completion of the test script development, proceed to execute it and assess the outcomes. Right-click on the test class, select “Run,” and scrutinize the results within Visual Studio’s Run tool window.

Outcome Analysis:
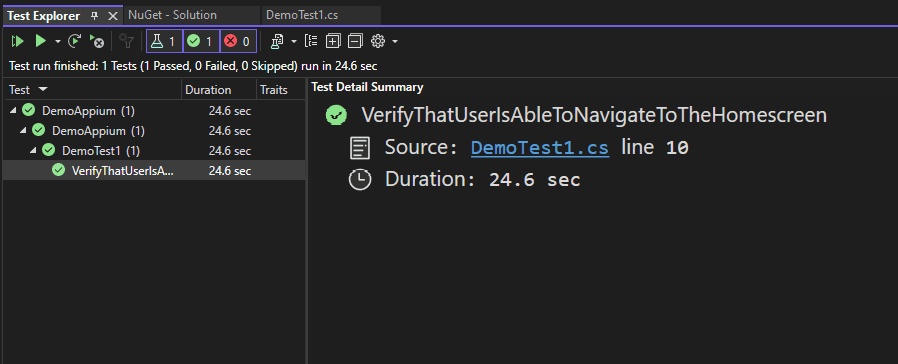
- The results displayed in Visual Studio’s Run tool window provide valuable insights into the test execution process.
- Upon review, it’s clear that the test has passed as expected, demonstrating its functionality and adherence to requirements.
- By carefully examining these results, we can identify successful tests, failures, or deliberate exclusions, informing us of areas for improvement.
- Such analysis aids in refining our testing approaches, leading to greater accuracy and effectiveness in our scripts.
Conclusion
Appium is well-known for its ability to automate mobile applications, offering significant advantages along with some limitations. One major benefit is its cross-platform functionality, which allows developers to write tests in one language (like Java, Python, or JavaScript) and run them on different platforms such as Android and iOS. This simplifies the testing process by eliminating the need for separate test suites for each platform. However, Appium also has its challenges. Setting it up and configuring it can be complex, especially for beginners. The process involves installing various dependencies and correctly setting up the environment, which can be difficult for newcomers. Additionally, while Appium has extensive documentation and community support, users might face ambiguities or delays in solving specific issues, which can slow down the automation process.
The combination of Appium and C# forms a strong partnership for mobile app testing, saving time and resources throughout the development process. This synergy allows developers to create high-quality apps more efficiently. With the knowledge from this guide, you are ready to start your testing journey by setting up your environment and creating your first tests. However, this is just the beginning. Appium integrates smoothly with other tools and supports various app types, helping to build a solid testing framework. Using Appium and C# together can automate routine tasks, find defects early, and ensure you deliver outstanding mobile applications. Take advantage of this combination and start your Appium and C# a testing journey today!
Keep practicing and exploring to master these powerful tools further with Jignect.
Witness how our meticulous approach and cutting-edge solutions elevated quality and performance to new heights. Begin your journey into the world of software testing excellence. To know more refer to Tools & Technologies & QA Services.
If you would like to learn more about the awesome services we provide, be sure to reach out.
Happy testing! 🙂

")
