Ensuring high quality mobile apps is very important. Appium is a free tool that can automate testing these apps, which saves time and money. This guide will teach you everything you need to know about Appium to get started testing your own mobile apps. You’ll learn how Appium works, how to set it up, and how to write your first test. By the end, you’ll be able to test mobile apps faster and make sure they are excellent!
- What is Appium?
- What are the Prerequisites for Appium Automation?
- What is an AVD? How to create a virtual device using Android Studio?
- How to set up an AVD?
- Run and stop an emulator and clear data
- Here are the steps on how to start an emulator from the command line
- Appium Inspector
- Steps to add capabilities in Appium Inspector
- Conclusion
What is Appium?
Appium is an open-source automation mobile testing tool. It is used to test native and hybrid mobile applications. Appium is similar to the Selenium Webdriver testing tool, making it easy to learn for those familiar with Selenium.
Some key features of Appium
- Open source: Appium is free to use and modify, which makes it a great option for individual developers and small businesses. There is a large and active community of Appium users who contribute to the project and provide support.
- Platform Independence: Appium does not depend on the mobile device’s operating system. You write your tests once, and Appium acts as the translator. It takes your instructions and converts them to the specific way each phone understands them (like UIAutomator for Android and UIAutomation for iPhone).
- Built-in inspector for element identification: Appium has a built-in inspector that can help you identify the elements on your app’s screen. This is useful for writing your test scripts.
- No app modification required: You don’t need to modify the source code of your app to use Appium. This makes it a great option for testing off-the-shelf apps or apps that you don’t have the source code for.
- Integration with continuous integration (CI) tools: Appium can be integrated with CI tools like Jenkins, which allows you to automate your mobile app testing process. This can help you to catch bugs early and improve the quality of your apps.
- Language Support: Appium supports multiple programming languages such as Java, PHP, C, C#, Python, JavaScript with node.js, Ruby, etc.
- Selenium Integration: Selenium serves as the backend of Appium, providing control over Selenium’s functionality for testing requirements.
- Parallel execution of tests: Appium can be used to run your tests in parallel, which can save you time.
How does Appium work?
- Installation of Appium Server: When Appium is installed, a server is set up on the user’s machine that exposes the REST API.
- Command Execution: The server receives command and connection requests from the client and executes these commands on mobile devices such as iOS or Android.
- Response Mechanism: After executing the commands, Appium responds with HTTP responses to the client.
- Mobile Test Automation Framework: To carry out these requests, Appium utilizes a mobile test automation framework to interact with the user interface of the application
- For Example –
- Apple instruments are used for iOS.
- Selendroid is utilized for Android API level 15 or lower.
- UIAutomator is employed for Android API level 16 or higher.
What are the Prerequisites for Appium Automation?
While writing this blog, we have used these versions of the libraries and applications
- Java version : 21.0.1
- IntelliJ version : 2023.2
- Appium dependency version : 9.2.2
- Appium server version : v2.5.1
- Appium driver uiautomator2 version : 3.0.5
- TestNG version : 7.9.0
- Android studio version: 2023.1.1
Prerequisites installation process step by step
- Java Development Kit (JDK)
- Integrated Development Environment (IDE)
- Appium Server
- Appium driver
- Application for Testing
- Android Studio
- Platform-Specific SDK
- Device or Emulator Configuration
- Appium Inspector
1. Download and install JDK and IntelliJ IDE
- We’ve already covered how to download and install Java Development Kit (JDK) and IntelliJ IDE in a previous blog post. Check it out to get started!
2. Install Appium Server
- To interact with mobile devices and execute automation scripts, installing the Appium server on your system is essential. It’s crucial to have Node.js and npm (Node Package Manager) installed because Appium is built on Node.js.
- There are 2 methods to install Appium
- From the terminal using Node.js
- Directly from the Appium desktop client
Below are the steps for install Appium on Windows From the terminal using Node.js
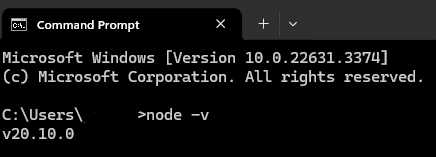
- The first step is to verify whether Node.js is already installed in the system.
To do so, open the terminal and run the command: node -v - If Node.js is already installed in the system, it’ll return the Node version, else it throws an error stating – ‘node is not recognized’, which means Node.js is not installed in the system.
- To install Node.js, visit the https://nodejs.org/en/download/.
- Once the installation is complete, restart the terminal and run the command -> node -v again. It will return the Node version.
- Run the command npm install -g appium which will install Appium from NPM.
- The command above will download and install Appium. Once done, verify the Appium installation on macOS or Windows by running the command below: appium –version
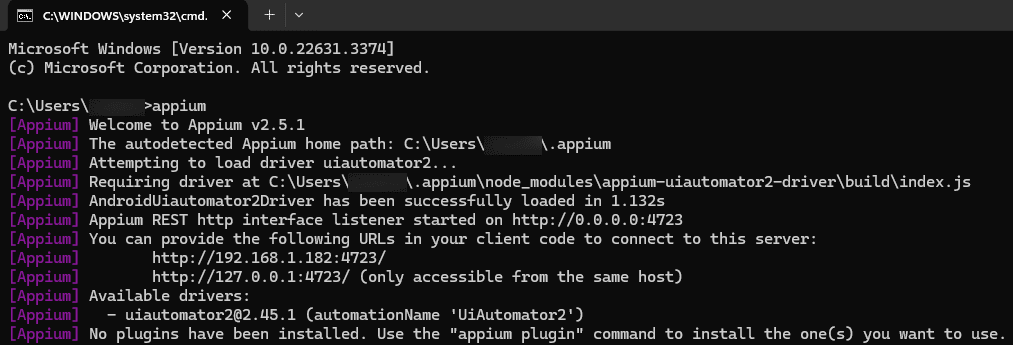
- To start Appium, you can now simply run appium from the prompt.
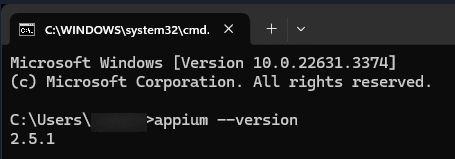
- You can also install Appium globally on your system by running the NPM command npm i –location=global appium. You can start Appium from the command line by running the appium command. For example, if you get an output that starts with a line like this: (Appium) Welcome to Appium v2.5.1, then the Appium server is up and running. You can quit the server by pressing CTRL-C.
3. Install Appium Driver
- Along with appium server , we would need to install appium driver
- Run the command appium driver install uiautomator2 which will install Appium driver for android.
- Run the command appium driver install xcuitest which will install Appium driver for iOS.
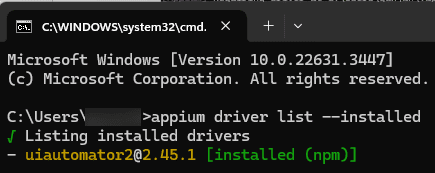
- Once done, verify the Appium driver installation by running the command:
- Appium driver list – -installed.
4. Install Android Studio
- For anyone who wants to test their Android apps, having Android Studio installed is a big plus. It’s the official development environment from Google and comes with all the tools you need, including the built-in AVD Manager for creating and managing Android emulators to test your apps on. You can download Android Studio directly from the official website.
5. Setup Emulator with Android Studio
- For installing Software Development Kit (SDK) on your machine,
- Once Android Studio is installed, Open it, and you will see below screen.
- Go to More Actions > SDK Manager.
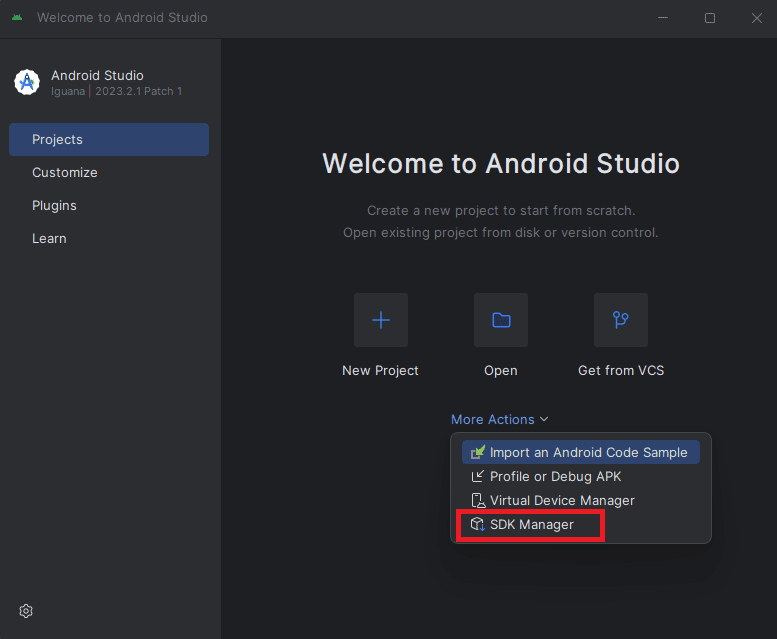
- If you have pre-installed android studio and you have any existing project in Android Studio, then you can go to Header Menu > Tools > SDK Manager – Open SDK Manager.
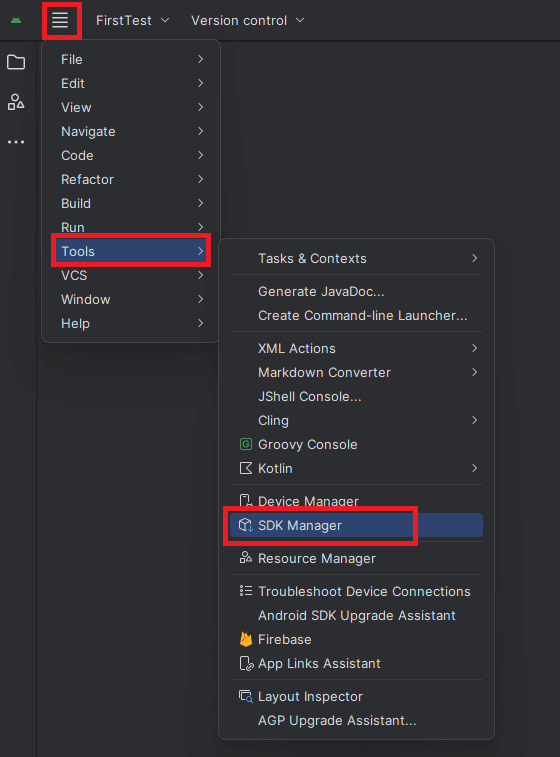
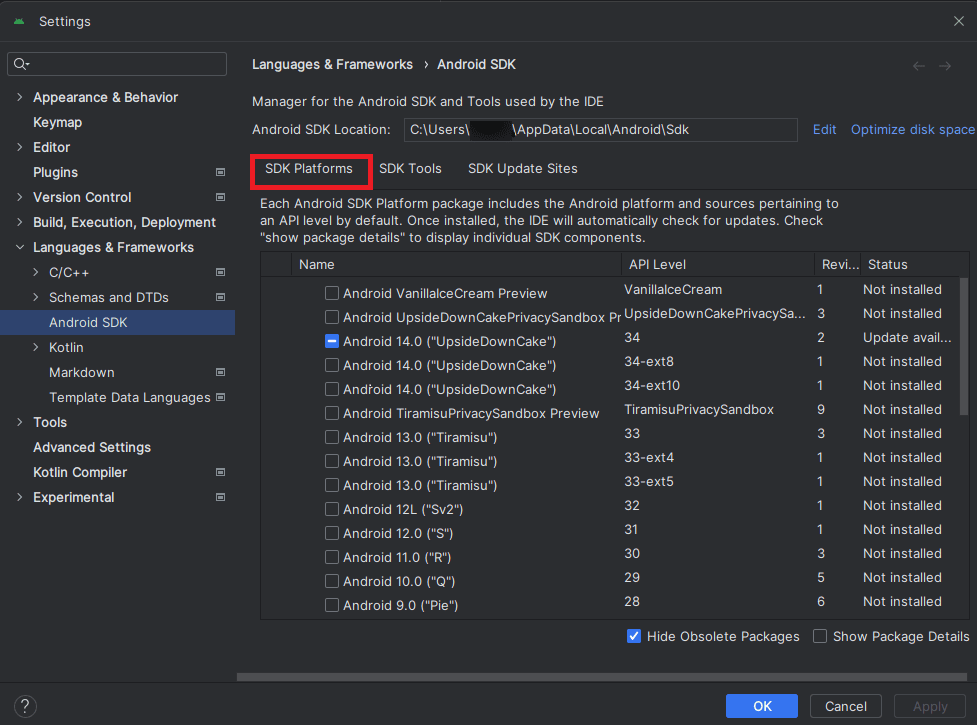
- In SDK Platforms, choose the Android version you want for your emulator and Install it. Even if it shows Partially Available or Update available, then it is ok for now.
- Please refer below image
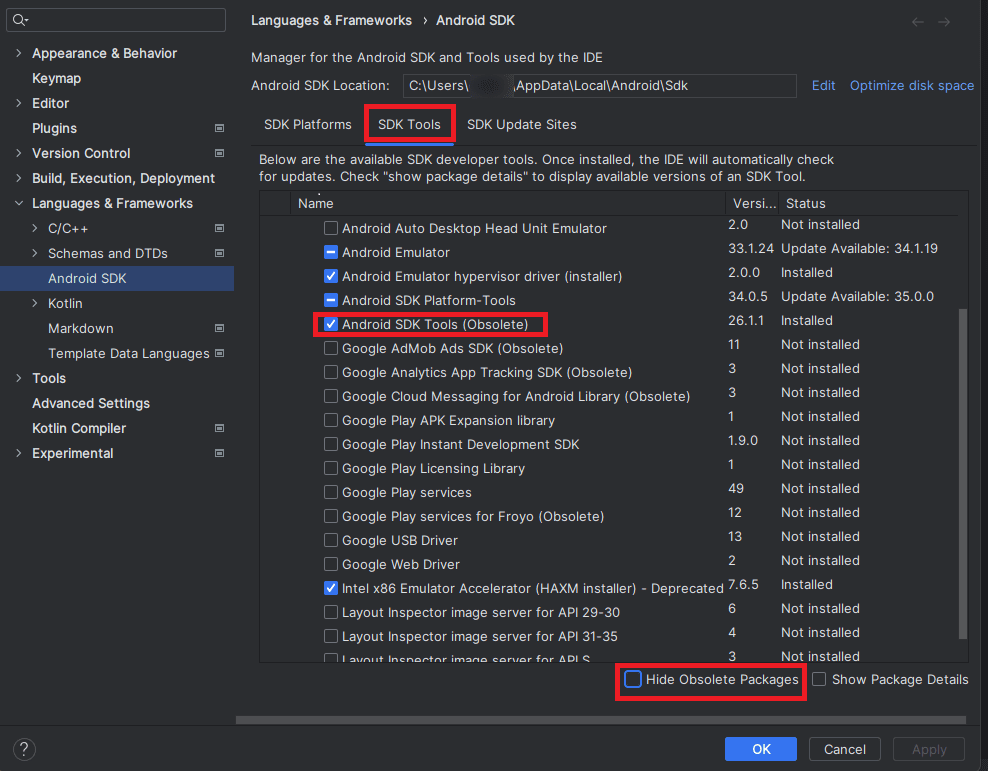
- In SDK Tools, Verify that the components marked with arrow marks in the below image are already installed, if not, then you can click on the checkbox against that component and then click on Apply button to install the component.
- Deselect “Hide obsolete packages” and install “Android SDK Tools (obsolete)”. This creates a “Tools” folder in your SDK directory (usually C:\Users\..\AppData\Local\Android\Sdk\tools).
- Please be aware that certain components may be labelled as “installed” while others may be labelled as “Update Available.” The “Update Available” status simply indicates that there’s an older version of the component currently installed. At this moment, it’s acceptable for components to be in either the “Installed” or “Update Available” state.
- If you’ve chosen any components for installation or update, a “Confirm Change” popup will appear. Click the OK button to proceed with installing or updating the components.
- After all the components are installed , you can click on the OK button to close this screen.
- Please refer below image
- You need to set up ANDROID_HOME variable path in environment variable for that follow below steps
1. Right click on ‘This pc’ and select properties, click on ‘Advance system setting’
2. In System properties click on ‘Environment variables’ then in system variables click on ‘new’
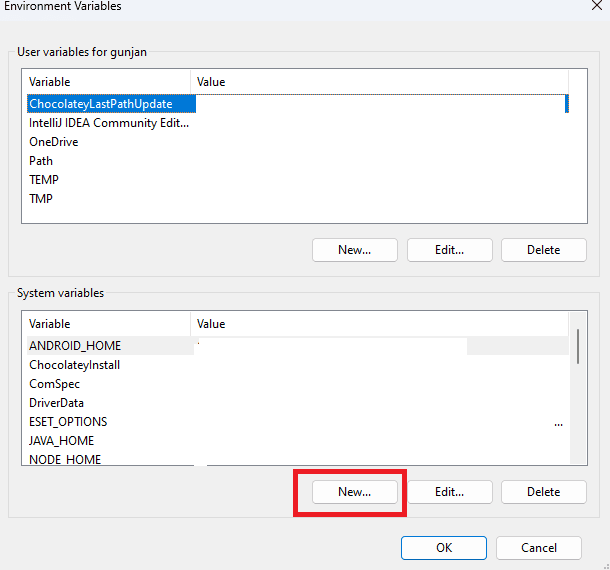
3. Now add ANDROID_HOME in variable name, C:\Users\dell\AppData\Local\Android\Sdk in variable value

4. Now double click on ‘path’ variable and add these paths after clicking on ‘New’ button
- C:\Users\dell\AppData\Local\Android\Sdk
- C:\Users\dell\AppData\Local\Android\Sdk\platform-tools
- C:\Users\dell\AppData\Local\Android\Sdk\tools
- C:\Users\dell\AppData\Local\Android\Sdk\tools\bin then click on ‘OK’
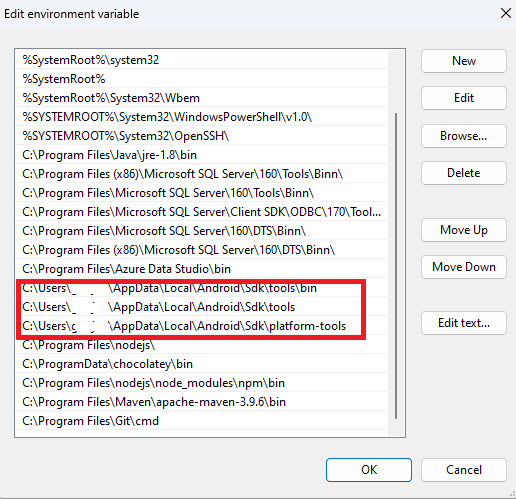
Path setup in MAC
- export ANDROID_HOME=$HOME/Library/Android/sdk
- export PATH=$PATH:$ANDROID_HOME/emulator
- export PATH=$PATH:$ANDROID_HOME/platform-tools
- export PATH=$PATH:$ANDROID_HOME/tools
- export PATH=$PATH:$ANDROID_HOME/tools/bin
What is an AVD? How to create a virtual device using Android Studio?
- An AVD stands for Android Virtual Device. It’s basically a software program that mimics an actual Android phone, tablet, or other device. You can think of it as a simulated Android system running on your computer. AVDs are created and managed through the Android Virtual Device Manager, a tool included with Android Studio.
- Here’s why AVDs are useful
- Test Apps: Developers use AVDs to test their Android applications before releasing them to the public. This lets them see how the app behaves on different screen sizes, operating systems, and hardware configurations.
- Simulate Different Devices: Since AVDs are configurable, you can create them to match a wide range of Android devices. This is helpful for making sure your app works well on a variety of phones and tablets.
- Safe Environment: Testing with AVDs is safer than using a physical device. If something goes wrong during testing, it won’t harm your real phone.
How to set up an AVD?
- Open Android Studio.
- Open the Device Manager.
- Click on + icon, ‘Select Hardware’ window appears.
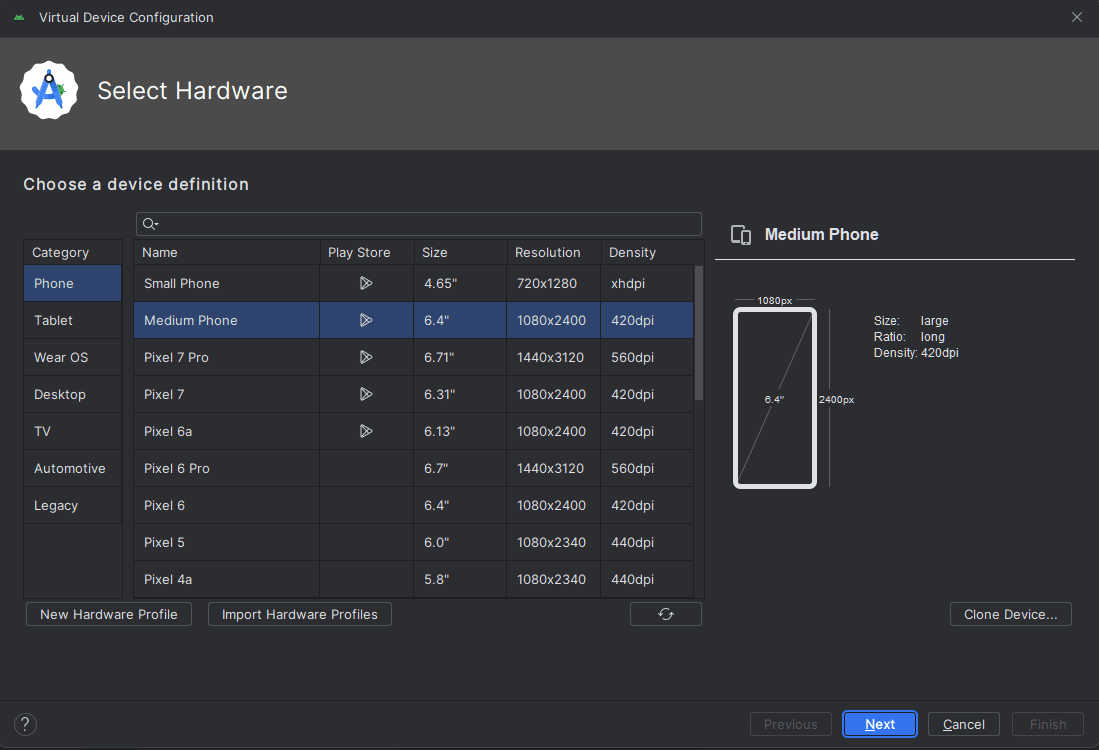
- Select a hardware profile, then click Next, ‘System Image’ window appears.
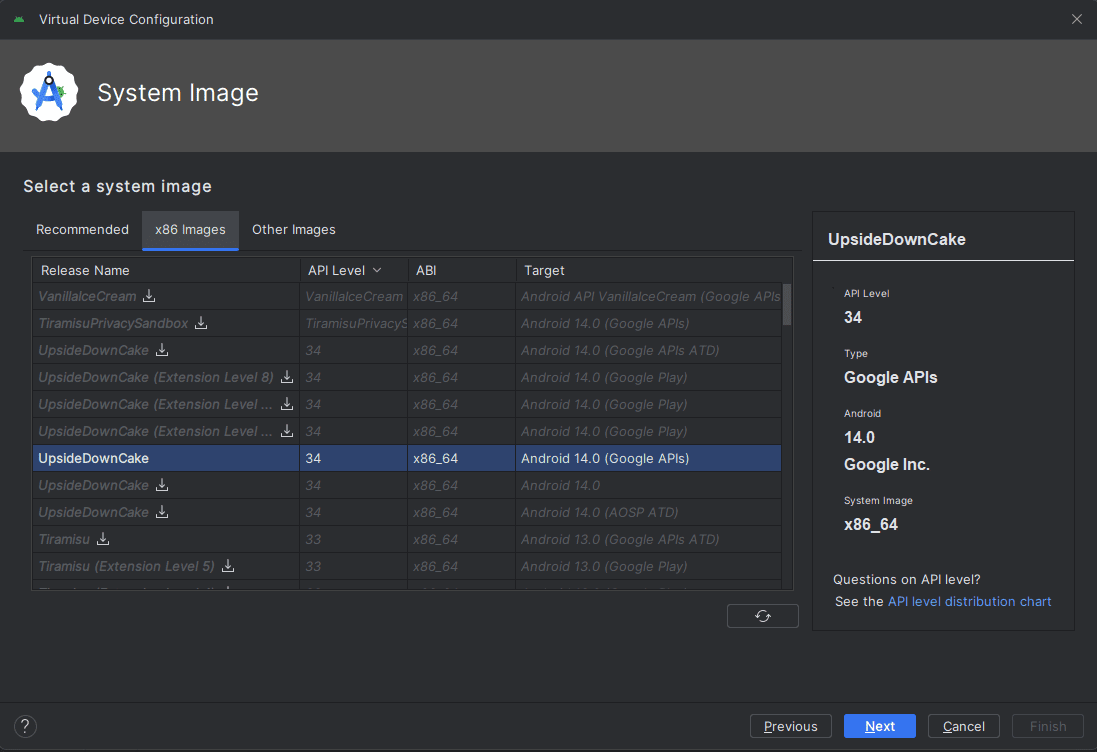
- Select the system image for a particular API level, and then click Next, ‘ Verify Configuration’ window appears.
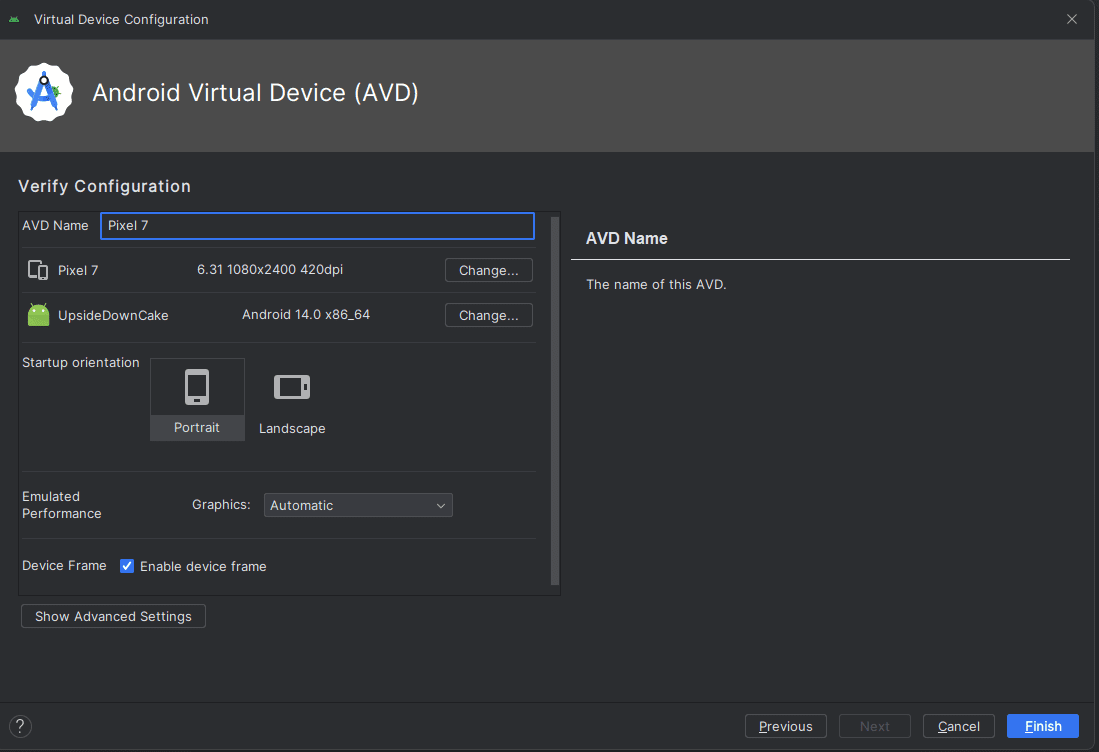
- Change the AVD properties as needed, and then click Finish. The new AVD appears in the Virtual tab of the Device Manager and the target device menu.

Run and stop an emulator and clear data
- From the Virtual tab, you can perform the following operations on an emulator
- Click Launch to run an emulator that uses an AVD.
- Click Stop to stop a running emulator.
- Click Menu and select Wipe Data to clear the data for an emulator.
Here are the steps on how to start an emulator from the command line
- Open the Command Prompt.
- to the path – C:\Users\<username>\AppData\Local\Android\sdk\emulator
- Run the following command: emulator -avd <avd_name>
Here are some additional tips
- You can use the emulator -list-avds command to list all of the AVDs that are installed on your computer.
- You can use the emulator -help command to get more information about the emulator command.
- You can use the emulator -verbose command to start the emulator in verbose mode, which will provide more information about the startup process.
- You can use the emulator -no-window command to start the emulator without displaying a window. This can be useful if you want to run the emulator in the background.
- appium driver update uiautomator2 : You can use this command to update appium driver.
- appium driver uninstall uiautomator2 : You can use this command to uninstall appium driver.
- For uninstall appium driver appium driver uninstall uiautomator2
- Appium-doctor is a test environment that identifies and fixes common configuration issues before starting Appium. It’s a node module that can be used to check if all the prerequisites for installing Appium are met. To install it, you can use the npm install @appium/doctor -g command.
- appium-doctor –version [To check version]
- appium driver doctor <driver_name>[To check if machine is setup properly to run on Android devices], see below screenshot
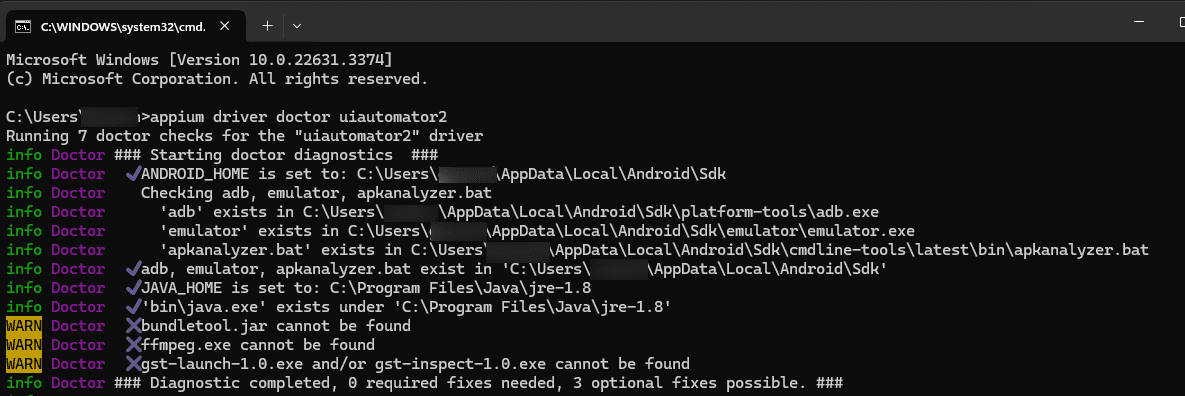
Execute the following commands in the cmd when encountering the “session ID not matched” error.
- adb uninstall io.appium.uiautomator2.server
- adb uninstall io.appium.uiautomator2.server.test
- adb uninstall io.appium.unlock
- adb uninstall io.appium.settings
Appium Inspector
- To identify individual elements, Know exactly where each element sits on the screen, making automation script creation a breeze ,Let Appium Inspector help you write automation scripts faster by generating code snippets based on your interactions with the app.
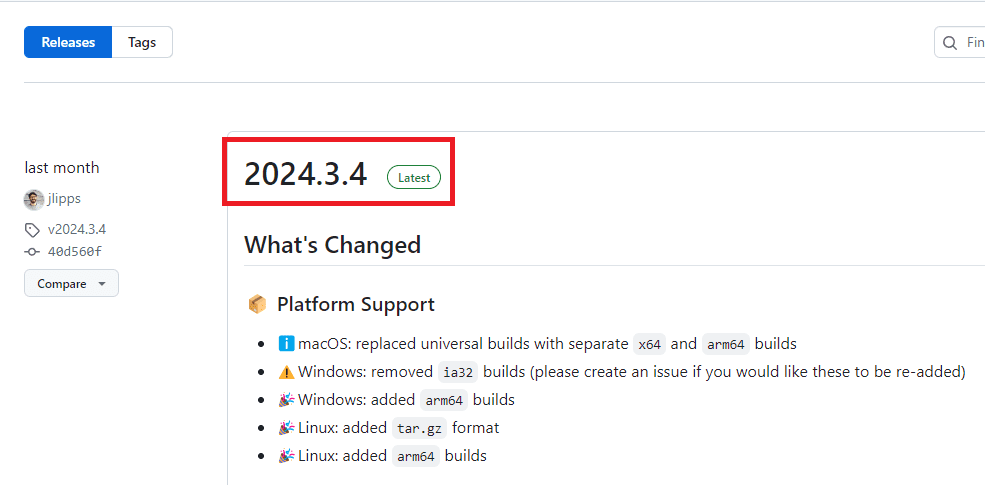
- Download Appium Desktop for your specific operating system from the official website. This will open the Github Appium Inspector Releases page, on that page , you will be able to see the latest release details , as shown below.
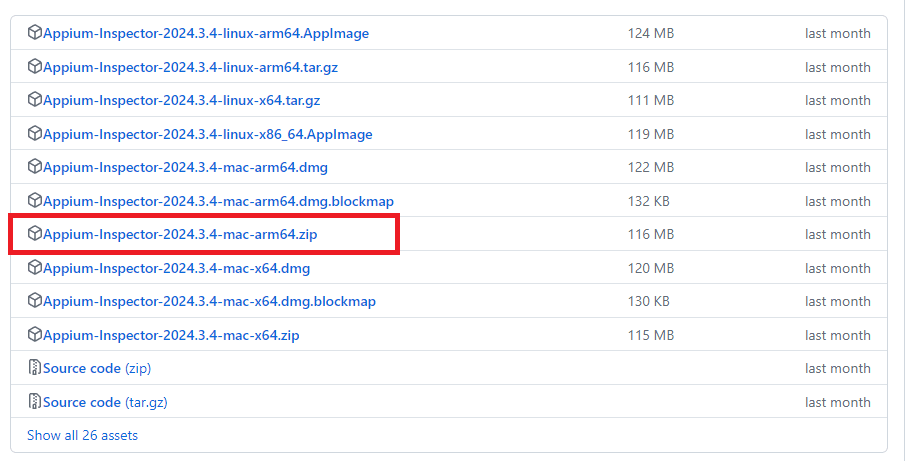
- Then go to Assets, According to your machine(32 bit 0r 64 bit), download the exe file and save it on your machine and install it.
- Once the installation is complete, open Appium Inspector.Appium GUI window would look like this.
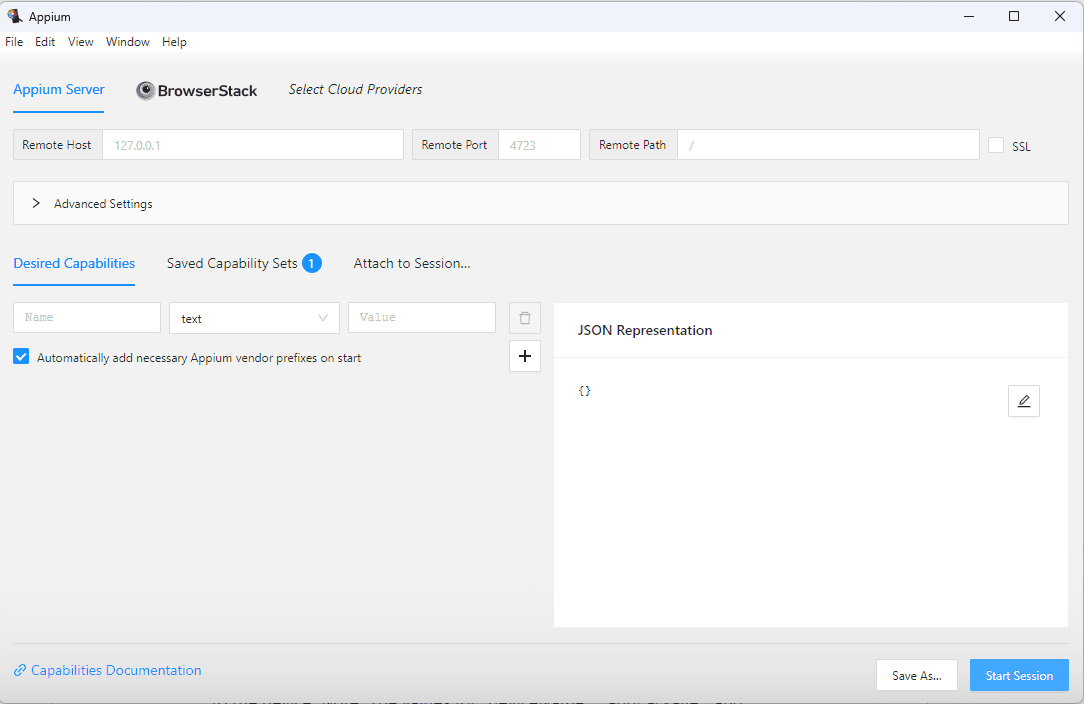
- In the “Desired Capabilities” section, enter the capabilities required to connect to the device. Note: The values for “deviceName”, “appPackage”, and “appActivity” may vary depending on the device and the application you are testing. For other desired capabilities for your emulator, you can refer to: https://appium.io/docs/en/2.0/guides/caps/.
Steps to add capabilities in Appium Inspector
- To add the first capability, type “appium:automationName” in the Name field and “UiAutomator2” in the Value field. Your screen would now look like this (note that the JSON Representation block would automatically show the capability that you have added just now).
- Now click on the ‘+’ icon, so that a new blank row gets displayed.
- Add the second capability (appium:appPackage) in this row.
{
     "platformName": "Android",
     "appium:automationName": "UiAutomator2",
     "appium:app": "C:\\Users\\dell\\Documents\\resources\\General-Store.apk"
}- Keep on adding new rows till you add all the necessary capabilities. Your screen should now look like this.
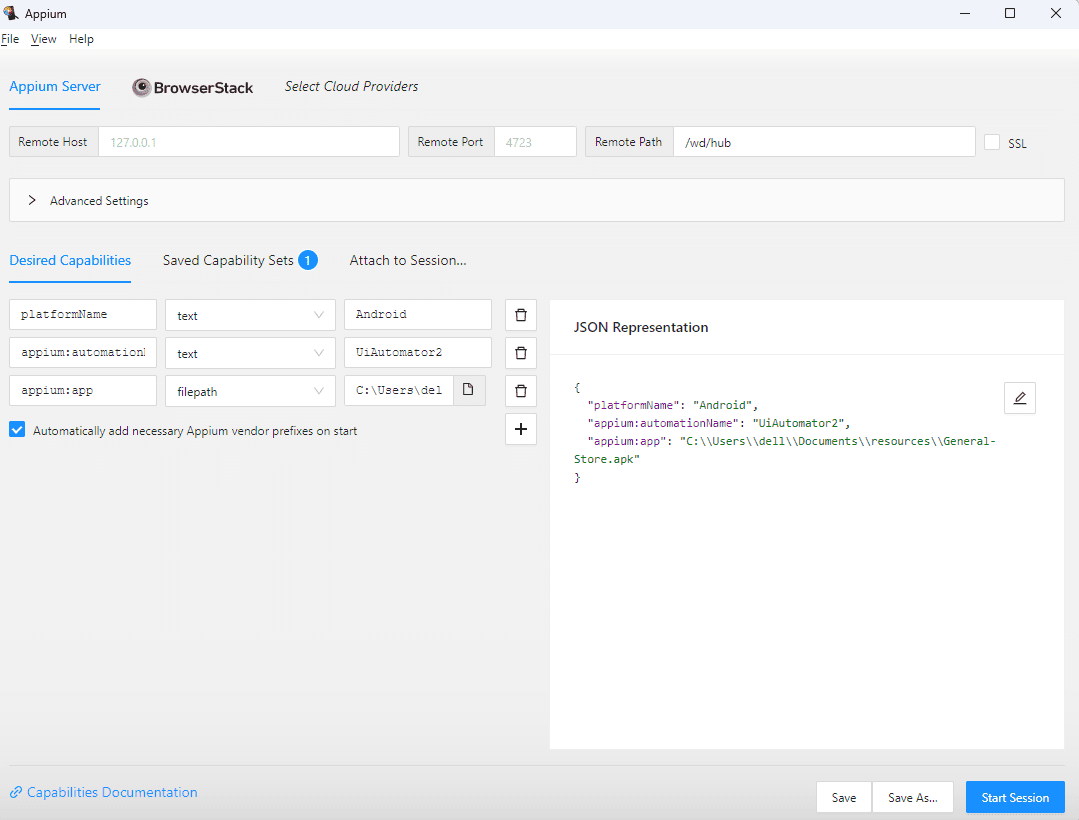
- At the bottom of the screen, where you entered all the Desired Capabilities, click on the ‘Save As…’ button.
- You would see a popup asking for the name of the Capability set ,enter any name you wish to use and click on Save button. The capability set would get saved.
- Click on Saved Capabilities Sets tab. You will see that the capability set you saved just now is displayed here.
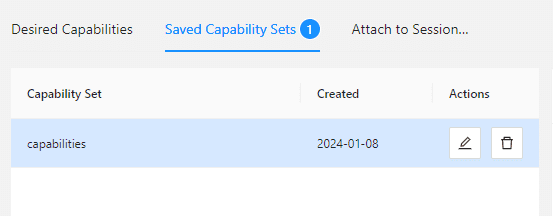
- First of all make sure that your mobile device is connected to your machine. Also see that it’s unlocked. To start Appium Desktop Inspector, click on the Start Session button.
- Appium window would display the screenshot of the General Store app together with its Object Hierarchy Dump. The Appium window screen would like this.
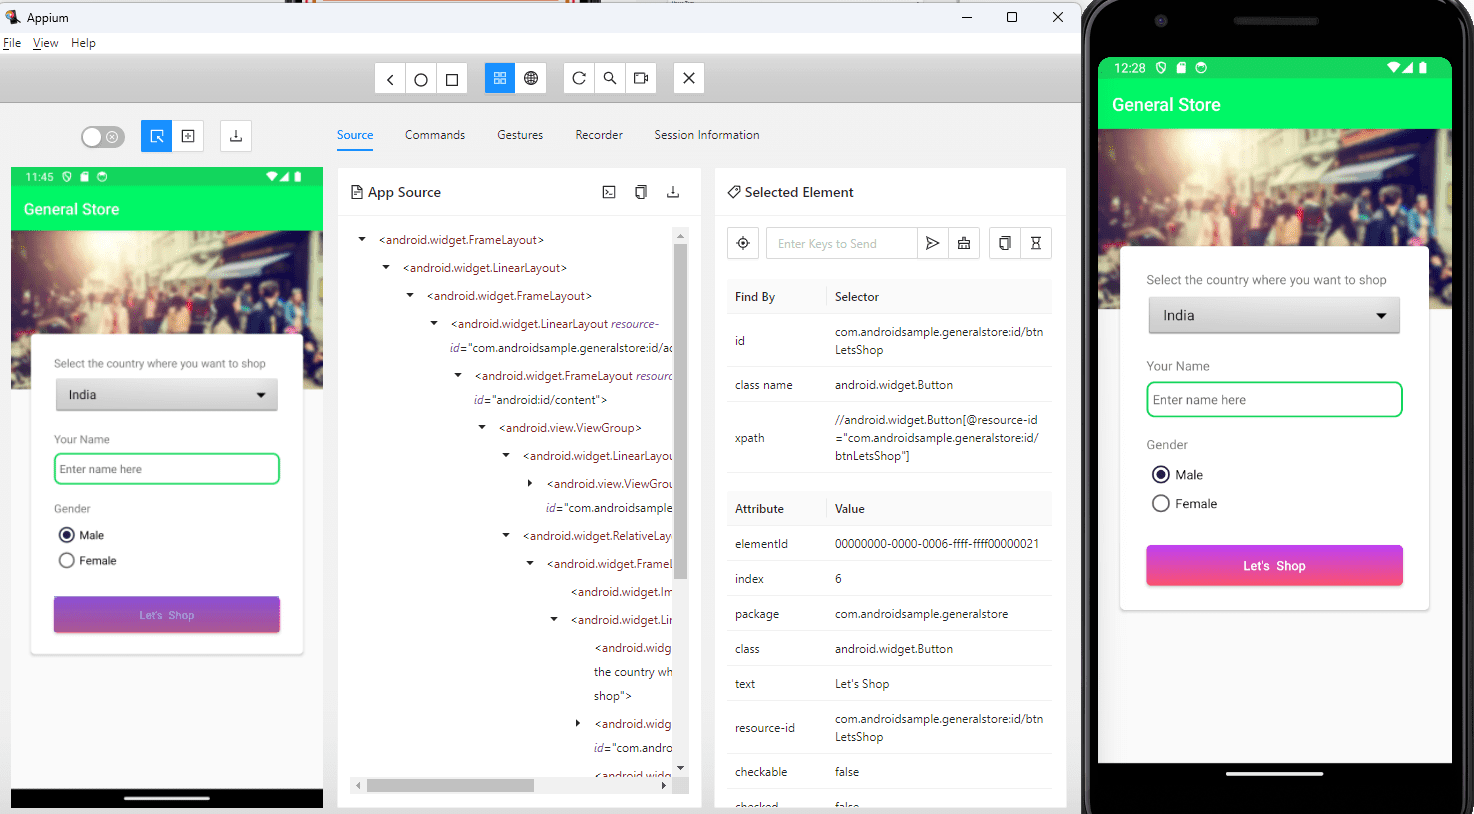
- You can also notice that the General Store app has been opened on your mobile emulator as well.
- Appium Desktop Inspector utilises various methods to identify mobile app elements. This can include the following
- Find element by ClassName
- Find element by ID
- Find element by XPath
- Find element by Accessibility
- Find element by Tag
Conclusion
- Appium, a popular tool for mobile app automation, offers several advantages despite its limitations. One advantage is its cross-platform capability, allowing developers to write tests in many languages (like Java, C#, or JavaScript) and run them on multiple platforms like Android and iOS. This saves time and effort in writing separate tests for each platform. However, Appium also has some shortcomings. One limitation is its complexity in setup and configuration, especially for beginners. It requires installing various dependencies and setting up the environment correctly, which can be challenging. Additionally, Appium’s documentation and community support, while extensive, may sometimes lack clarity or timely solutions to specific issues, leading to potential roadblocks in the automation process.
Keep practicing and exploring to master these powerful tools further with Jignect.
Witness how our meticulous approach and cutting-edge solutions elevated quality and performance to new heights. Begin your journey into the world of software testing excellence. To know more refer to Tools & Technologies & QA Services.
If you would like to learn more about the awesome services we provide, be sure to reach out.
Happy Testing 🙂

