

In modern software development, automated testing plays a crucial role in ensuring product quality and reliability. Selenium has been a cornerstone for automating web browser interactions, while Cucumber brings the concept of Behavior-Driven Development (BDD) to testing.
In this blog, we will examine the integration of Selenium and Cucumber within a Java-based BDD setup. We’ll also provide an in-depth guide on creating a Maven project, incorporating the necessary Cucumber and Selenium dependencies, and offering a hands-on overview of the integration process.
What is BDD all about?
Before we jump into Selenium and Cucumber in Java, it’s important to understand the basics of BDD and the Gherkin language. We’ve already covered these topics in detail in our previous blog titled “Understanding the BDD, Gherkin Language & Main Rules for BDD UI Scenarios“.
Following that, you’ll expand your knowledge of BDD and the Gherkin Language. Additionally, you’ll explore effective techniques for crafting BDD tests and dive into the details of BDD UI Scenarios.
Why choose Cucumber?
In today’s market, there are several behaviour-driven development tools available, including Cucumber, SpecFlow, JDave, and more. Among them, Cucumber stands out as one of the most favoured options for several reasons:
- Cucumber BDD is an open-source tool.
- The Cucumber Framework offers support for multiple languages, allowing you to write test scripts in Java, Python, Ruby, .NET JavaScript and more.
- Cucumber facilitates behaviour-driven development (BDD) automation and seamlessly integrates with Selenium, Wait, Ruby on Rails, and other web-based testing tools.
- It allows stakeholders to write test scenarios in plain English using a format called Gherkin, promoting collaboration between technical and non-technical team members.
- The primary advantage of Cucumber is that it fosters a common understanding of requirements through human-readable scenarios.
Why combine Cucumber with Selenium?
Cucumber and Selenium stand out as two popular technologies in today’s market. Nowadays, most organizations opt for Selenium for functional testing. Many of these organizations also choose to integrate Cucumber with Selenium because Cucumber offers readability and clarity in understanding the application flow.
By employing BDD (Behavior Driven Development), you can articulate your specifications or test cases using simple, English-like sentences with the Gherkin language. This approach enables non-technical team members to grasp the flow easily and collaborate effectively with other team members throughout the software development process.
What are the prerequisites for using Cucumber with Selenium?
1️⃣Download and Install Java, set up IntelliJ IDEA, and create a Maven Project
Before diving into the details of Cucumber, it’s important to understand its prerequisites.
- Download and Install Java.
- Install IntelliJ IDE.
- Create a Maven Project in IntelliJ.
We’ve already covered the process of downloading and installing the Java Development Kit (JDK) and IntelliJ IDE, as well as setting up a Maven project, In our previous blog on Java with Selenium.
2️⃣Add Cucumber and Selenium dependencies to your Maven Project
After creating a new project, the initial step is to include dependencies such as Cucumber Java, Cucumber Junit, Lombok and Selenium Java in the pom.xml file.
You can find the latest versions of these dependencies on the Maven Repository official website.
[pom.xml]
<?xml version="1.0" encoding="UTF-8"?>
<project xmlns="http://maven.apache.org/POM/4.0.0"
        xmlns:xsi="http://www.w3.org/2001/XMLSchema-instance"
        xsi:schemaLocation="http://maven.apache.org/POM/4.0.0 http://maven.apache.org/xsd/maven-4.0.0.xsd">
   <modelVersion>4.0.0</modelVersion>

   <groupId>org.example</groupId>
   <artifactId>Java_BDD</artifactId>
   <version>1.0-SNAPSHOT</version>

   <properties>
       <maven.compiler.source>21</maven.compiler.source>
       <maven.compiler.target>21</maven.compiler.target>
       <project.build.sourceEncoding>UTF-8</project.build.sourceEncoding>
   </properties>

   <dependencies>
       <!-- https://mvnrepository.com/artifact/io.cucumber/cucumber-java -->
       <dependency>
           <groupId>io.cucumber</groupId>
           <artifactId>cucumber-java</artifactId>
           <version>7.18.0</version>
       </dependency>

       <!-- https://mvnrepository.com/artifact/io.cucumber/cucumber-junit -->
       <dependency>
           <groupId>io.cucumber</groupId>
           <artifactId>cucumber-junit</artifactId>
           <version>7.18.0</version>
           <scope>test</scope>
       </dependency>

       <!-- https://mvnrepository.com/artifact/org.seleniumhq.selenium/selenium-java -->
       <dependency>
           <groupId>org.seleniumhq.selenium</groupId>
           <artifactId>selenium-java</artifactId>
           <version>4.18.0</version>
       </dependency>

       <!-- https://mvnrepository.com/artifact/junit/junit -->
       <dependency>
           <groupId>junit</groupId>
           <artifactId>junit</artifactId>
           <version>4.13.2</version>
           <scope>test</scope>
       </dependency>
       <dependency>
           <groupId>org.example</groupId>
           <artifactId>Java_BDD</artifactId>
           <version>1.0-SNAPSHOT</version>
           <scope>test</scope>
       </dependency>

   </dependencies>

   <build>
       <plugins>
           <plugin>
               <groupId>org.apache.maven.plugins</groupId>
               <artifactId>maven-compiler-plugin</artifactId>
               <version>3.8.1</version>
               <configuration>
                   <source>1.8</source>
                   <target>1.8</target>
               </configuration>
           </plugin>
       </plugins>
   </build>

</project>

</project>
Sample Directory Structure
Ensure your project directory structure is correctly set up.src
Java_BDD
├── .idea
├── src
│   ├── main
│   │   ├── java
│   │   └── resources
│   └── test
│       ├── java
│       │   ├── Runner
│       │   │   └── TestRunner.java
│       │   ├── StepDefinition
│       │   │   └── ContactUsSteps.java
│       └── resources
│           └── Feature
│               └── contact_us.feature
├── target
├── .gitignore
└── pom.xml
Create a Cucumber Feature file
- A feature file is a crucial component in Cucumber testing, used to store features and scenarios. It serves as the starting point for writing Cucumber tests, detailing the expected behavior of the application in plain language.
- Each feature file has the “.feature” extension and corresponds to a specific functionality of the application, ensuring clarity and organization. Multiple feature files can be created, allowing for comprehensive test coverage, but they must all use the “.feature” extension.
- Additionally, these files can include tags to group scenarios, making it easier to manage and execute selective tests. By using feature files, teams can ensure that their automated tests are well-structured and easy to understand.
[contact_us.feature]
Feature: Contact Us Form

 Scenario: Submit a message via Contact Us form
   Given I am on the contact us page
   When I fill in the contact us form with valid details
   And I submit the contact us form
   Then I should see a success message
Let’s deep dive into each line of the steps:
- Feature: A high-level description of a software feature.
- “Contact Us Functionality”: Describes the functionality related to the Contact Us page.
- Scenario: A specific behavior or use case of the feature.
- “Submit a message via Contact Us form”: Describes the scenario of submitting a message through the Contact Us form.
- Given: Precondition or initial context.
- “I am on the contact us page”: Indicates that the user should be on the contact us page.
- When: Action or event.
- “I fill in the contact us form with valid details”: Describes the action of filling out the contact form with valid information.
- “And I submit the contact us form”: Indicates the action of submitting the contact form.
- Then: Expected outcome.
- “I should see a success message”: Describes the expected result of seeing a success message after submitting the form.
Implement a Step Definition file
[contactUS_step]
package StepDefinition;

import io.cucumber.java.en.Given;
import io.cucumber.java.en.Then;
import io.cucumber.java.en.When;
import org.openqa.selenium.*;
import org.openqa.selenium.chrome.ChromeDriver;
import org.openqa.selenium.chrome.ChromeOptions;
import static org.junit.Assert.assertTrue;

public class ContactUsSteps {
   private WebDriver driver;

   @Given("I am on the contact us page")
   public void i_am_on_the_contact_us_page() {

       // Setup WebDriver
       ChromeOptions options = new ChromeOptions();
       driver = new ChromeDriver(options);
       driver.manage().window().maximize();
       driver.get("https://jignect.tech/contact-us/");
   }

   @When("I fill in the contact us form with valid details")
   public void i_fill_in_the_contact_us_form_with_valid_details() {
       WebElement textArea = driver.findElement(By.xpath("//span//textarea[contains(@name,'textarea')]"));
       textArea.sendKeys("Software Testing");

       WebElement fullNameInput = driver.findElement(By.xpath("//input[@placeholder='Full name']"));
       fullNameInput.sendKeys("Test User");

       WebElement emailInput = driver.findElement(By.xpath("//input[@placeholder='Work email address']"));
       emailInput.sendKeys("testuser01@yopmail.com");

       WebElement companyInput = driver.findElement(By.xpath("//input[@placeholder='Company']"));
       companyInput.sendKeys("Testing");

       WebElement phoneInput = driver.findElement(By.xpath("//input[@placeholder='Phone number']"));
       phoneInput.sendKeys("9568471235");
   }

   @When("I submit the contact us form")
   //public void i_submit_the_contact_us_form() {
      // WebElement iAgreeCheckbox = driver.findElement(By.xpath("//p//span[contains(@class,'first last')]//input"));
       iAgreeCheckbox.click();
      // WebElement submitButton = driver.findElement(By.xpath("//p//input[@type='submit']"));
       submitButton.click();
   }

   @Then("I should see a success message")
   public void i_should_see_a_success_message() throws InterruptedException {
       WebElement successMessage = driver.findElement(By.xpath("//div[contains(@class,'response-output')]"));
       ((JavascriptExecutor) driver).executeScript("arguments[0].scrollIntoView(true);", successMessage);
       Thread.sleep(1000);
       assertTrue(successMessage.isDisplayed());

       // Close the browser
       driver.quit();
   }
}
Here’s a detailed yet concise explanation for each part of the code:
- io.cucumber.java.en.*: Imports Cucumber annotations for step definitions.
- org.junit.Assert: Imports JUnit’s assertion methods for validating conditions.
- org.openqa.selenium.*: Imports Selenium WebDriver and WebElement classes for interacting with the browser.
- org.openqa.selenium.chrome.*: Imports classes specific to the ChromeDriver setup.
- Defines the class contactUsSteps which contains the step definitions for the Cucumber scenarios.
- Declares a private WebDriver field to interact with the browser.
- Cucumber annotation @Given specifies the starting point of a scenario. The method that follows sets up the preconditions for the test.
- Sets up the Chrome WebDriver:
- ChromeOptions object is created to configure browser settings.
- addArguments(“–remote-allow-origins=*”) allows cross-origin requests.
- driver = new ChromeDriver(options) initializes the ChromeDriver with the specified options.
- driver.get(“https://jignect.tech/contact-us/”) navigates the browser to the specified URL.
- Defines a step where actions are performed to fill out the contact us form on the page. It uses selectors to find the form elements and set their values.
- Defines a step where the contact us form is submitted by clicking the submit button.
- Defines a step where it checks if the success message is displayed after form submission. It waits for the element to be displayed and then asserts that it is indeed shown.
- The code begins by importing necessary functions from @cucumber/cucumber and WebdriverIO, as well as preparing to use Chai for assertions.
- The Given step navigates to the “Contact Us” page.
- The When steps fill out and submit the contact us form with valid details.
- The Then step verifies that a success message is displayed after submitting the form.
Test Runner Class
Ensure your runner class is correctly configured:
package Runner;
import io.cucumber.junit.Cucumber;
import io.cucumber.junit.CucumberOptions;
import org.junit.runner.RunWith;

@RunWith(Cucumber.class)
@CucumberOptions(
       features = "src/test/resources/Feature/contact_us.feature",
       glue = "StepDefinition",
       plugin = {"pretty", "html:target/cucumber-reports"}
)
public class TestRunner {
}
Execute Cucumber tests
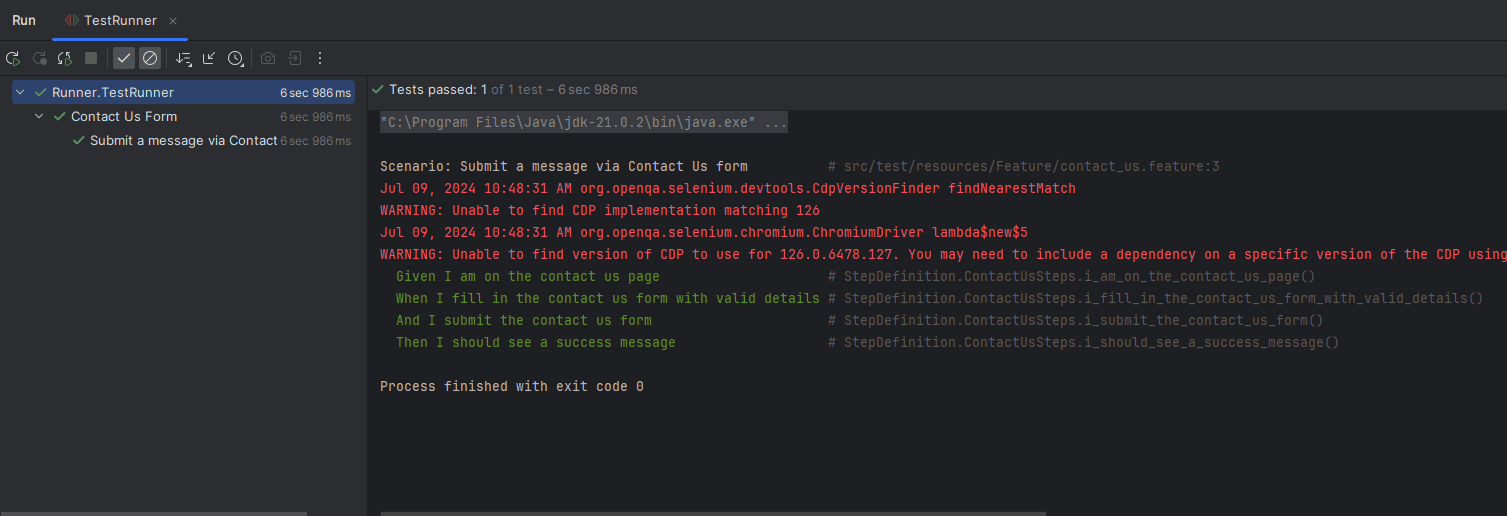
1️⃣Run the Test Runner:
- Locate the TestRunners package in the Project view.
- Right-click on the run class.
- Select Run ‘run’ from the context menu.
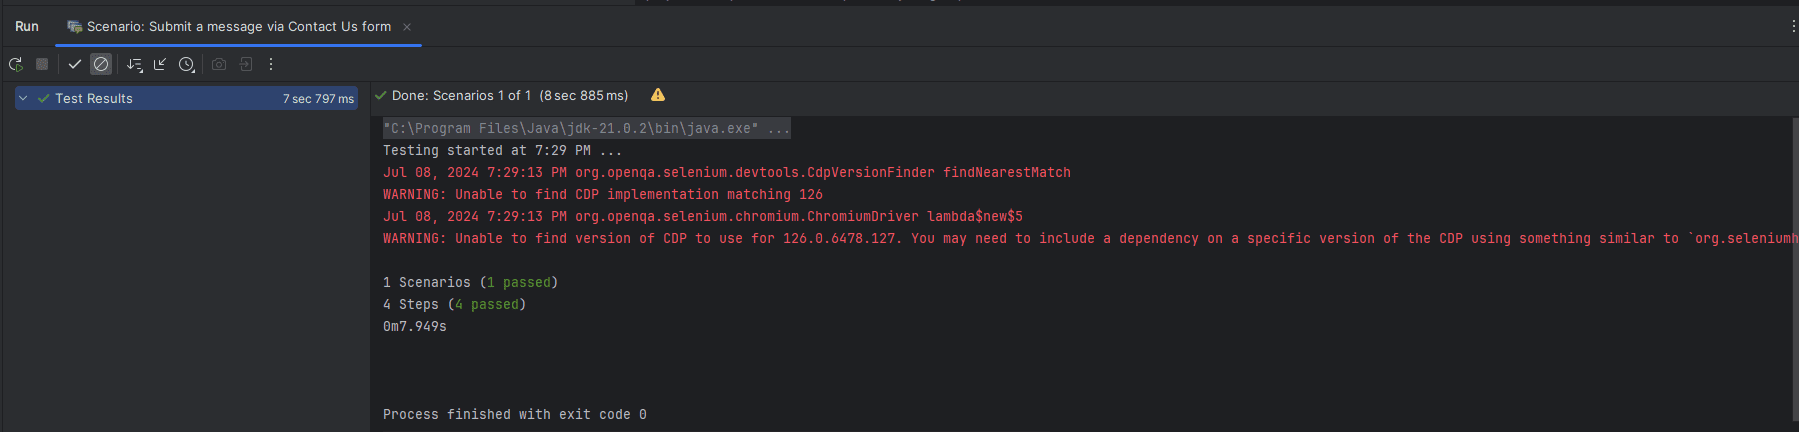
2️⃣Test Results Analysis:
- IntelliJ IDEA will compile your project and execute the tests.
- The results will be displayed in the Run window at the bottom of the IntelliJ IDEA interface.
Conclusion
Integrating Selenium with Cucumber in a Java-based BDD setup simplifies the automation of web testing, offering clarity and collaboration between technical and non-technical team members. By following the steps outlined in this guide, you can set up a Maven project, add the necessary dependencies, create feature and step definition files, and execute Cucumber tests effectively. This approach enhances the readability and maintainability of test cases, ensuring a robust testing framework for your applications.
However, it’s important to note that this setup comes with some limitations, such as a steep learning curve, maintenance overhead as the project grows, performance issues with large test suites, dependency management challenges, and limited scope for non-web testing. By being aware of these limitations, teams can better prepare and implement strategies to mitigate potential issues, ensuring a more effective testing process.
Keep practising and exploring to master these powerful tools further with Jignect.
Witness how our meticulous approach and cutting-edge solutions elevated quality and performance to new heights. Begin your journey into the world of software testing excellence. To know more refer to Tools & Technologies & QA Services.
If you would like to learn more about the awesome services we provide, be sure to reach out.
Happy Testing 🙂

")
